

Introduction
I have been playing Myr ![]() since her release and is my go-to leader for end game content provided I do not need to hit outrageous damage on a regular basis. As such, I have a strong understanding of how to form heart crosses along with the strategies used to successfully clear various dungeons. Thus, I wish to take this opportunity to share my thought process when trying to form heart crosses while matching offensive orbs in conjunction. As with any combo/matching guide, everyone’s approach may vary and while my methods are successful for me, they may not be always work for you. In addition, all of my heart cross experience comes from Myr as the only other leader I own is Anaphon
since her release and is my go-to leader for end game content provided I do not need to hit outrageous damage on a regular basis. As such, I have a strong understanding of how to form heart crosses along with the strategies used to successfully clear various dungeons. Thus, I wish to take this opportunity to share my thought process when trying to form heart crosses while matching offensive orbs in conjunction. As with any combo/matching guide, everyone’s approach may vary and while my methods are successful for me, they may not be always work for you. In addition, all of my heart cross experience comes from Myr as the only other leader I own is Anaphon ![]() who has no sub support.
who has no sub support.
I highly encourage you to check out my Cascading Combo Guide as I will be referencing strategies outlined there. I also regularly broadcast my Arena 3 clears on my Twitch Channel and it is a great way to see my gameplay and thought process live.
Video commentary
A written guide is great, but it may also help to see the video guide that goes alongside this article as you can see the heart crosses matched in real time.
—
What is a heart cross?
The heart cross mechanic is currently the strongest ability in Puzzle and Dragons as it combines a survivability and offensive component when matching exactly 5 heart orbs in a cross formation. This allows you to survive gravity/percent based attacks along with having the ability to deal spectacular damage. This has proven to be amazingly powerful as you combine the ability to stall along with burst potential provided you have at least 5 heart orbs present on the board.
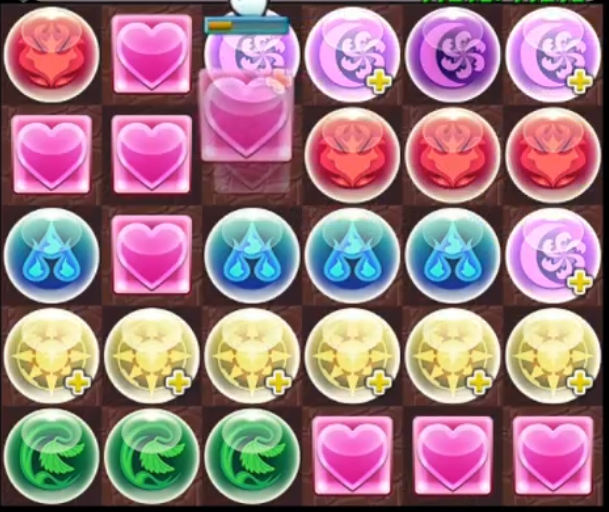
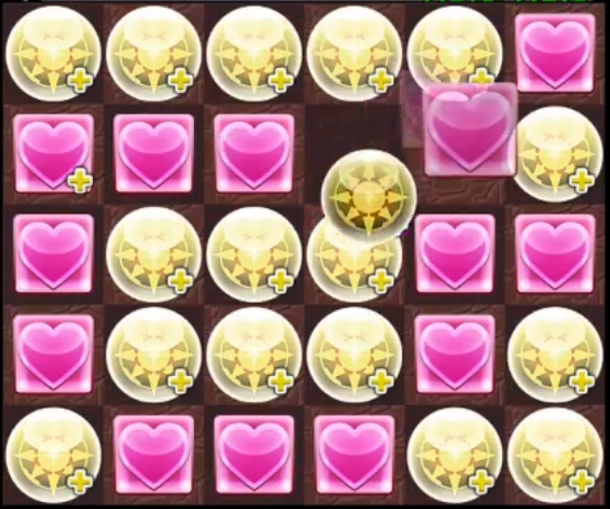
Acceptable heart crosses
The following images will show you the acceptable patterns for forming a heart cross. You can only match exactly 5 heart orbs to trigger your leader skill and will have a shielding animation pop up on screen if done successfully.
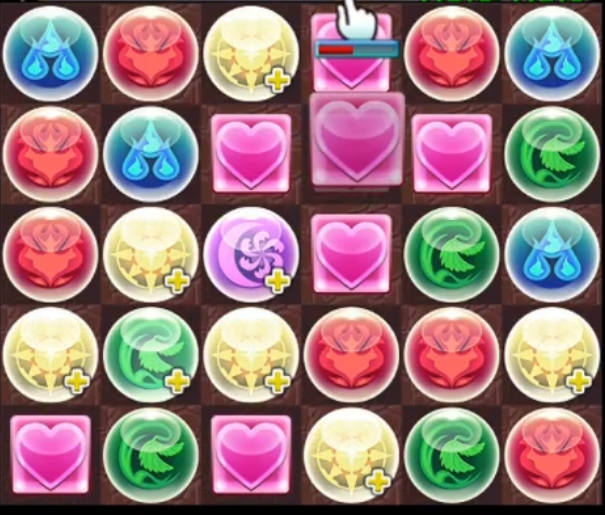
In addition, you can also match heart crosses with additional heart orbs if placed in such as a way that you will still only match 5 hearts:

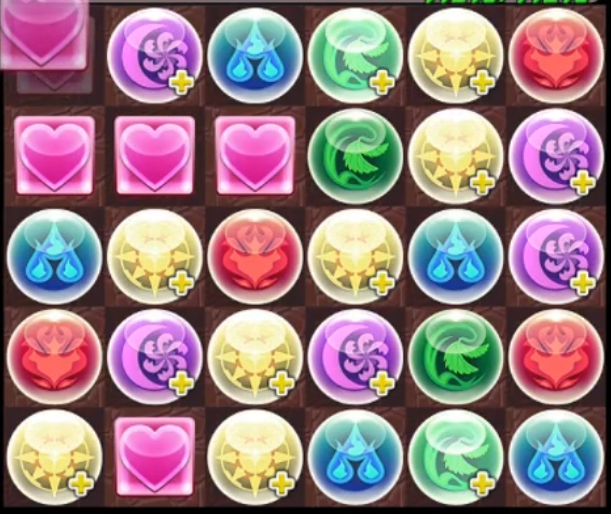
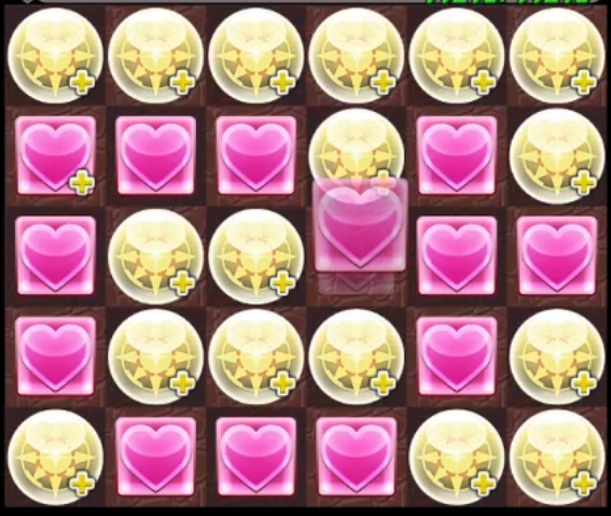
Unacceptable patterns
If you fail to match exactly 5 heart orbs, you will not trigger the heart cross benefits and leave yourself vulnerable to mechanics which will most likely result in a failed dungeon. Do not match your heart cross in this style of pattern:

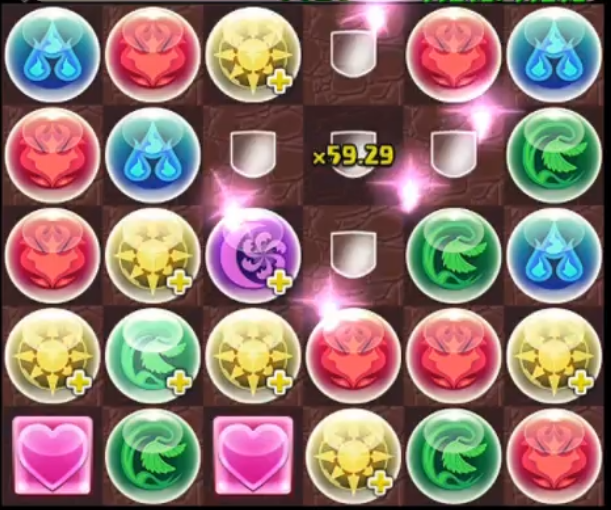
Carry over on sweep
If you sweep a floor with a heart cross and the following floor has no preemptive, you are able retain your full multiplier without having to reform a new heart cross. Just look for the little shield icon saying DEF on your health bar to know if it carried over:
![]()
Strategies to form a heart cross
Forming a heart cross is not as intuitive compared to vanilla matching as you are required to occupy essentially a 3×3 box worth of space. This will require some forethought before matching along with being able to expertly manipulate orbs into position.
Count your heart orbs
Make sure you actually have 5 heart orbs. Counting may be tedious, but it is important as the following board is un-heart crossable.

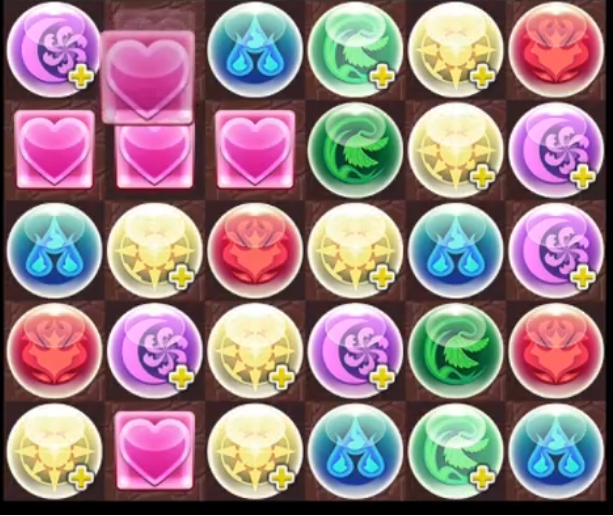
Plan where you want your heart cross to go
Once you have established you are able to form a heart cross from a given board, you need to plan where it is going to go. From this board, I want to start with the heart orb in the bottom left corner as it is the furthest away from all the others. For myself, I generally like to start with my heart orb, match my other combos, and then finish with the cross. In this example, I match bottom to top, left to right.

As a general rule, you wish to almost always have your heart cross touching either the left or right side to better maximize your space. The cross can go on any of the rows as you can form combos above or below, but will be pressured to make adequate combos if it is more centralized as there will be wasted space on the sides.

From the above two matches, it becomes apparent that there will be wasted space/orbs as the cross formation does generate some dead space. However, by placing the cross on the sides, you can help free up the central area. In addition you can use cascades to better optimize the orbs surround the cross.
Basic cascading with a heart cross
Cascading is a process in which you have specific orbs fall into position by having other matches being made. This will trigger a delayed combo and differs from Skyfalls as Cascading is a planed process.
Line cascades
The line cascade is a great way to utilize the orbs surrounding the cross as the horizontal hearts that are removed will cause orbs on the side of the topmost heart to fall into place:


These line cascades are relatively easy to set up and I find myself using them quite often as it allows me to utilize what would normally be dead orb space.
Elevator heart cross
Conversely, you can also make use of elevators for forming additional combos when using heart crosses. It may not always be as practical to use an elevator compared to the line, but it is worth understanding how it works.

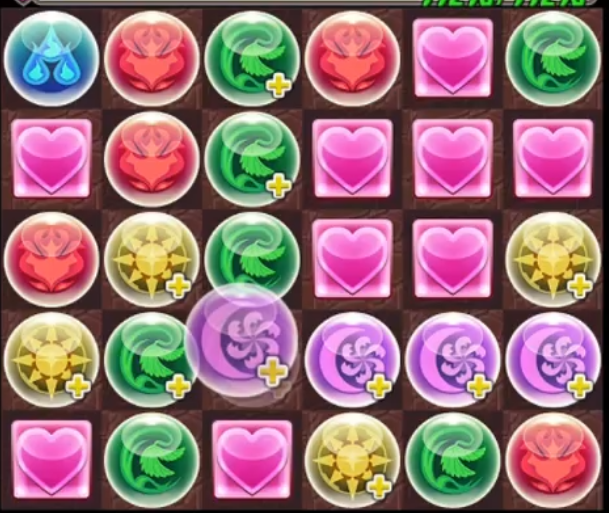
Solving problematic boards
Despite knowing the mechanics of a heart cross, there will still be situations where you will be faced with problematic boards that are not as simple to solve. These usually occur when your heart orbs are located in a corner that may be challenging to rearrange or so scattered that you can barely form the cross and your offensive orbs.
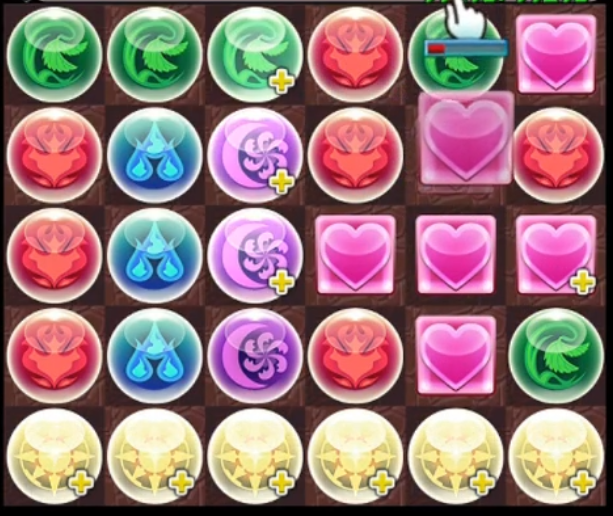
Heart orbs in the corner
Having your heart orbs stuck in the corner can make your head spin as you may struggle to dig them out into the heart cross formation. Thus the following images may provide some inspiration as to how you can rearrange them:


Scattered orbs
Having your heart orbs horribly scattered throughout the board can be problematic. Thankfully, most heart cross leaders provide ample orb movement time. What i like to do in these situations is starting with the furthest heart orb, matching the offensive orbs, and finishing with the cross.
Playing with a heart cross leader
Playing with a heart cross leader will be different than any other leader as their matching patterns are different along with your stalling strategy.
Orb management
Heart cross leaders require 2+ elements for activation (hearts + offensive colours) depending on who you use. Using a rainbow leader such as Ronove ![]() will primarily require you to hoard heart and wood orbs towards the bottom of the board as you only require 2 other elements to activate. However, if playing a mono-colour leader such as Myr
will primarily require you to hoard heart and wood orbs towards the bottom of the board as you only require 2 other elements to activate. However, if playing a mono-colour leader such as Myr ![]() or Kaede
or Kaede ![]() , you only have to really worry about your hearts and primary colour orb.
, you only have to really worry about your hearts and primary colour orb.
For myself, I like to pool my light orbs at the bottom of the board in this sort of fashion to more easily form a row along with having my heart orb being the one I pick up and match with.

By starting with that heart orb at the bottom, I have an additional layer of security when matching as I could have used it to end my heart cross if I was unable to move the other 5 into position correctly.
Stalling strategies
Heart cross leaders differ from conventional teams as their stalling strategy is completely different. This is because their defensive component is tied to the formation of a heart cross which is not always feasible every turn. Thus, I tend to only heart cross every other turn while avoiding offensive orbs during the cross turns. On the non-cross turns, I will do my very best to remove all the offensive orbs possible as they will not be dealing significant damage without the full multiplier while avoiding any heart combos.
- Turn 1: heart cross and no offensive orbs
- Turn 2: no heart cross (and no heart combos) and match all offensive orbs
- Turn 3: heart cross and no offensive orbs
- Repeat
This allows you to take better advantage of your heart cross defensive mechanic without exhausting your heart orbs too quickly. The amount of damage you can withstand will vary from team to team along with your own matching skills and the RCV of the team.
Optimal boards
Optimal boards is a term given to bi-colour boards that are perfectly matched to take full advantage of cascades, rows/TPA, and combo count to optimize your damage. These can be applied to any mono-colour/heart cross team and is simply a manner of rearranging the board into a predetermined pattern. It is ideal to have these boards memorized, but while learning you should stare at the image and practice in endless corridors.
Perhaps I will do a post covering this in the future.


Conclusion
Heart cross leaders are capable of forming the strongest teams in Puzzle and Dragons. Their ability to survive damage along with being able to unleash spectacular burst is rivaled by none. However, they are somewhat tricky to play effectively as the heart cross is an awkward pattern to form.
The key to success will be to repeatedly play in Endless Corridors until you are comfortable in matching the required 5 orbs.
Let me know what you think about this guide and what you want to see in the future.
Happy Puzzling!

Reblogged this on The personal blog of Matthew Henderson and commented:
As a ronove main on one account and bmyr on my main account, the tricks in this post are really great for learning how to play top tier puzzle and Dragons (at least until the meta changes)!
LikeLike
Glad you found them helpful! Tbh, heart crosses should be long lasting as they are simply so powerful and even if a new mechanic does come out, a heart cross will still be strong for most content
LikeLike
Helpful!
I having hard time when I pop up Saria….
Really need practice more (a lot)
Jesus cross Lol 😀 i liked that
guess I’m the “Jesus guy” 😦
LikeLike
Does Saria produce too many or few heart orbs? I tend to combo her with either Wedding Akechi or NY Hanzo (find a friend etc)
And you will form proper crosses soon!
LikeLiked by 1 person
Saria (also Venus and Myr Lol) are overflowing my board with hearts actually.
I’m ok with 8 hearts, but 15+ is a problem.
But I’m practicing, will improve soon, thanks for the tips in this guide \o/
LikeLike
Knowing optimal boards help with seeing the patterns to break up hearts into crosses etc. That and lots of practice XD
LikeLiked by 1 person
I’m really glad I started out with Sumire, then Kaede, because all of that heart crossing practice made it possible for me to effectively (for the most part) use my newly acquired Myr 2.0. Working towards her ult now ^_^ thank you for the guide, it’s helpful to see an experienced player use a heart cross leader in action!!!
LikeLike
Glad to be of help and dont forget to check out my Myr guides =D
LikeLike
I’m having issues with Sumire… The 5O1E + the cross it’s easy to mess it and difficult to make combos… I will need to memorize some boards.
Thanks for the guide, Mantastic
LikeLike
You are very welcome runge! As for your Sumire struggles, it takes practice as you are essentially using two different playstyles at the same time
LikeLike
Sumire is harder to use because of the enhanched orb requirement. What has been working for me is to pop Sumire before I need to so there are more than 5 blue and heart orbs. This usually makes matching easier. I also try to keep a few unmatched enhanced blue orbs on the board for the next move. I could use a blue orb enhancer but the ones I have do not generate blue orbs so I feel using them is a waste of a sub spot.
LikeLike
I agree that Sumire is the hardest/most constricting heart cross leader to use as you have a harder time flooding the board with water orbs. You will often be forced to leave water orbs in corners (eg. have 7 present). I would not dedicate a sub spot for an enhancer as you are better off with more orb changers. One thing to keep in mind is that cards like Skuld enhance off-colour orbs and those retain their plussed status when converted
LikeLike
Nice guide! It’s a little too row focused To be helpful for me (I play Kaede, and fitting in multiple tpas requires different setups) but it’s cool to see what I could be doing with myr. That last bicolor board is something I can’t even dream of.
I rarely have problems making a heart cross from scattered or cornered hearts. For me, my problem is when the board has been flooded by hearts by either my own orb change or an enemy’s. At that point it’s just trying to segregate a heart cross in the corner just right so you have your shield for the big hit to come. Do you have any advice on how to deal with this?
LikeLike
Well I do not own Kaede so it is harder for me to write a guide from that POV XD
As for setting up TPA boards, you will still hoard orbs at the bottom, just in a slightly different manner, but the logic is similar in that you will move bottom -> top and from one side to the other
As for advice on heart-flooded boards, knowing the optimal board patterns will help as you will eventually see how those heart orbs are broken up etc.
LikeLike