

Foreword
To all my regular readers, this is not the latest Puzzle and Dragons update and I still plan on producing PAD related content. Creature Quest is another game I have begun to play which I greatly enjoy. I have seduced quite a few of my friends into playing and I realized I tend to repeat the same beginning advice over and over again. As such, why not formally write about it as that was partially one of the reasons to start creating content for Puzzle and Dragons.
If you are reading this, I do encourage you to at least try Creature Quest out as it is quite fun and addicting as it combines many aspects that I look for in a video game.
Introduction
Creature Quest is a relatively new mobile game that combines questing, collecting, and weekly PvP/PvE tournaments into one great adventure. Some of the key elements I look for in a game are continuous replay value as well as rewarding gameplay.
Creature Quest utilizes a Gatcha-collection system in that you can gamble Diamonds (premium currency) for creatures of varying value. In addition, you can also acquire rare and powerful creatures from the 3 distinct gameplay modes that are essential for success. While Creature Quest utilizes a Freemium structure (free to play, but option of In-App Purchases/IAP), it is not a Pay-to-Win game as everything is farmable to a certain extent. Furthermore, the PvP aspect relies on using creatures of varying sizes for success and you are unable to populate it with only Legendary cards.
The combat system is an elaborate rock paper scissors game in that each element is strong against one type while weak against another (often referred to the Colour Counter Flowchart). This prevents “optimal” teams as you will have to be flexible when team building to counter the dungeon at hand. This also means you should try to resist becoming overly attached to a single creature as they will have to be rotated in and out as required as you can only use 5 at a time.
I enjoy the fact that playing the game is tremendously rewarding as each gameplay mode offers incredible rewards and keeps me motivated to continuously play. The randomness through Questing or summoning new Creatures is exciting and having Guilds adds an extra layer of community within Creature Quest. In addition, the in game text/descriptions are quite punny and the animated characters, special effect noises, and soothing music all contribute to the overall positive experience.
This article will help guide newer player through all the different components of the game along with tips and tricks to fully optimize your game play.
If you wish to read a comprehensive Dungeon Defense Guide, please check out my other article HERE.
Video commentary
—video goes here—-
Currencies
Before I discuss the gameplay, it is important to understand the various currencies available in Creature Quest. All of these have different applications are important to manage wisely.
 Challenge Points
Challenge points are your hourly recharging currency to participate in the weekly PvP Challenge Dungeons. Each charge allows you to attack a rival player’s dungeon and awards Prestige (ranking points) that allows you to unlock varying rewards each week.
 Energy
Energy is a fast, 5-minute charging resource that is used to play through Quests and the Battle Tower. This will be your main source of entertainment as the majority of the game is structured around using your Energy efficiently. Energy is also fully recharged whenever you rank up so be mindful at these times.
 Gold
Gold
Gold is the in-game currency that is used to level up, plus/totem, and evolve creatures. It is also used for awakening and tome rerolls and while you may feel that you have an excessive amount at the start, it will be quickly used up when developing several creatures. Gold is awarded from exploring and clearing dungeons. You are also able to acquire a hefty amount from the Weekend dungeon.
 Diamonds
Diamonds are not only a girl’s best friend, but Creature Quest’s premium currency. Diamonds are used to summon new creatures, increase creature storage, refill energy, and continue if you die in a Quest dungeon. Diamonds are awarded for completing various tasks, achievements, and quests along with the daily log in bonus. One nice aspect of Diamonds is that you require larger increments to use. As such, you can be awarded smaller amounts that add up over time. Thus, playing the game is rewarding as you can continuously farm Diamonds instead of solely relying on IAP or log in bonuses.
 Tokens
Tokens are another in-game currency that is used to purchase items from Quest merchants along with Token Chest summons. These chests contain varying materials (including Diamonds) and it is almost always better to save up for the Epic chest as it contains the best loot. These can be found under Summon -> Token Chest
——
 Player Rank and Rank Experience
Player rank refers to the number of times you have successfully ranked up. Each rank will add +1 to your maximum Energy as well as completely refilling your Energy bar. Rank experience is acquired via playing Quests and Battle Towers.
 Tickets
Tickets are another in-game currency that can be found throughout all Quests. They are used to summon Common or Rare creatures to help round out your Challenge Dungeon defense. In addition, you can sometimes find special encounters in Quests to gamble tickets for wonderful prizes. Can be found under Summon -> Ticket Summon.
Game modes
Creature Quest offers 3 distinct game modes: Challenge Dungeons, Quests, and Battle Tower. Each has their own merits and you will find yourself rotating between them to maximize your rewards and progression.
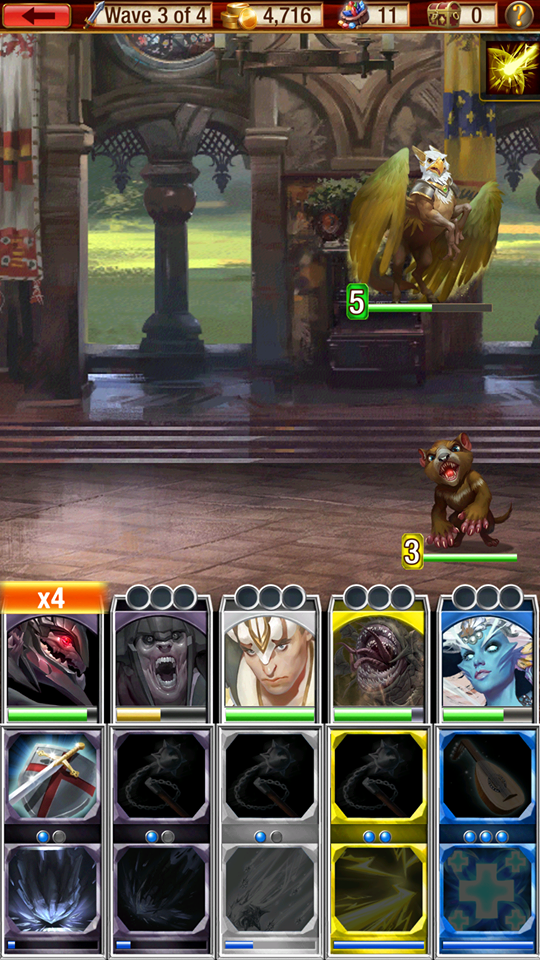
Challenge Dungeons
Challenge Dungeons are the weekly PvP (player versus player) ladder. You are able to create a dungeon with your own various sized creatures and then use your Challenge Points to attack other players. Each offensive and defensive victory awards Prestige while failed defenses lose Prestige. There is no penalty for failing an offense.
Prestige and tiers
Prestige corresponds to your numerical rank that can be directly compared against other players in your weekly bracket. At the end of the week, your numerical rank awards you various rewards that can include Legendary creatures along with generous amounts of Diamonds and additional creature summons. In addition, you are also awarded progression rewards for hitting various Prestige milestones. You are awarded these as soon as you hit that threshold so it is worth pushing for a new record every week.
In order to keep things more even, players are placed into Gold, Silver, and Bronze tiers that help facilitate more fair match making as a new player will not be facing any end game player, unless they have not played for a prolonged period of time. You can also move up or down each week in order to better place you against fair opponents. Gold tiers naturally have the highest rewards, but are challenging to climb as your opposing players will have equally powerful teams.
In addition to Prestige rewards, you can also acquire Energy as a reward for successfully clearing a dungeon and you can use this to help continue playing longer.
Defeating higher ranked players will yield more Prestige versus defeating lower ranked players. The same applies when other attack your dungeon. It is favourable to try and defeat the highest ranked player you encounter, but may sometimes have to default to a lower ranked adventurer.
As an additional piece of advice, you should view the last day of the weekly tournament like an ebay auction: plenty of movement as players scramble to improve their rankings. The last few hours are also the best time to use and purchased Challenge Points as you are less likely to be Revenged against (attacked back).
Finally, if you are part of a guild, you can gain additional rewards through each weekly tournament based on how well the guild does overall.
Dungeon defense
in terms of building a dungeon to defend yourself, you can choose either a 3 or 5 floor dungeon that should be fully populated to provide your boss floor(s) a significant bonus. As such, you are required to use creatures of all sizes and this helps prevent it becoming heavily Pay-to-Win as you can only use 1-2 Legendaries per defense and must go out and acquire the smaller creatures for success.
One thing to note that Quality > Quantity because if you are only able to field a 3 floor dungeon effectively, use that instead of the 5 floor version. If you have numerous weak points in your dungeon, you will simply be feeding free mana to your rivals. This also forces players to try and level up a diverse array of Creatures as the 5-floor format rotates every week.
When selecting creatures to defend your dungeon, you can select creatures that fit the required size or any smaller ones. However, it is best to try and use the largest size possible as they tend to be stronger.
Once you have a deeper pool of Creatures to draw from, you can begin to choose more ideal defenders. For the most part, healers are a poor choice as they allow for easy stalling and mana regeneration for your opponent. On the other hand, larger single target (ST) nukes are great as they have the chance to disable a key member from your opposition. In addition, Creatures that stun are ideal because they can disable a combo chain or prevent an important member from performing an action. Ideal bosses appear to be those that have Area of Effect (AoE) attacks as well as those that possess a counterattack awakening.
Offense
You should always preview your opponent’s dungeon beforehand and try to spot any weak points to target or ignore. You ideally want to remove their hardest hitting Creatures first and you should use the targeting system (simply tap on the desired Creature) here. Once the main threats have been removed, try to stall for mana on your key Creatures.
Quests
Quests are the solo mode PvE (player versus environment) experience that has no ranking attached to it. This will be where you spend the majority of your time as it offers Gold, Creatures, Rank Experience, Gems, Totems, evolution materials, and excitement.
Each map is shrouded in mist and you must use 1 Energy to reveal a portion of the map to explore it. Clearing the mist can yield all of the above items along with the chance of encountering a Creature you have to battle. Defeating the imposing monster will allow you to continue your exploration.
Successfully completing a Quest to 100% completion will yield a bonus reward at the end as well as being able to use Quick Battle Coins to instantly clear a Creature encounter the next time you attempt this difficulty. This is crucial later on as you may just barely defeat a particular boss and you will then be able to always skip it while retaining the rewards.
Quests offer players the chance to acquire Epic creatures than can be fully awoken which provides an amazing boost to your Challenge Dungeon defense as well as a viable unit to use on your teams. There are rotating weekly events that help provide various creatures to be won and acquired which helps keep the excitement level high.
You are able to preview the rewards for a Quest and when you are first starting out, you will be forced to play the Squire difficulty. If you are able to clear it at least the boss floor,, you can challenge the next difficulty until you reach King (just be aware you need 100% for Quick Battle).
Creature Quest Difficulties |
|||||
| Squire | Knight | Lord | Prince | King | |
| Giant Adventure | 0.5 | 1.5 | 2.5 | 3.5 | 4.5 |
| All Others | 1 | 2 | 3 | 4 | 5 |
| Grand Wish | 1.5 | 2.5 | 3.5 | 4.5 | 5.5+ |
Take these rankings with a grain of salt as your team may be better suited to tackle a particular quest due to the colour counter flowchart. However, it is generally best to try Giant Adventure first when moving up a difficulty as it is significantly easier compared to the other quests of the same difficulty.
Battle Tower
The Battle Tower is the new PvE ranking feature that has you climbing up 51 floors to score points and collect loot. Clearing each floor awards varying amount of points based on the team used, number of creatures surviving, remaining mana, and remaining health. You can reply a stage for a higher score, but it will always be more valuable to clear a higher difficulty as that will award more points.
In addition to the end of the week rewards, you can also earn valuable items along the way. These can range from Diamonds, Combo Dot rerolls, to free Diamond summons and valuable Essences. All of these reset on a weekly basis and are always worth pursing.
The Battle Tower offers the most challenging PvE encounters and provides another layer of fun and excitement for players of all skill and progression levels.
In addition to the progression rewards, each floor has the chance to drop various creatures that can help bolster your teams and Challenge Dungeon defenses.
Finally, if you are part of a guild, you can gain additional rewards through each weekly tournament based on how well the guild does overall.
Creatures 101
Now that you have read all about how the currencies work as well as the 3 unique game modes, it is time to actually understand how the Creatures work.
Size matters
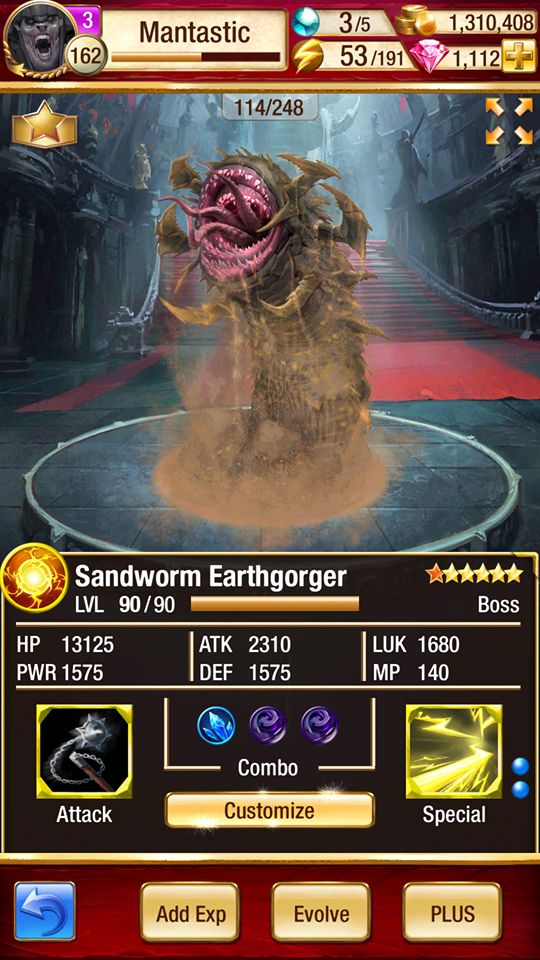
Creatures come in four different sizes: small, medium, large, and boss. This can also be viewed as Common, Rare, Epic, or Legendary and indicates what their relative overall power and potency is. Each rarity has a maximum number of stars that are unlocked as you evolve them. Each star indicates 15 levels which makes a more rare Creature obtain a higher level cap.
Creature Quest Rarites |
||||
| Rarity | Common | Rare | Epic | Legendary |
| Size | Small | Medium | Large | Boss |
| Stars | ||||
| Combo Dot(s) | 0-4 | 1-4 | 2-4 | 3-4 |
Generally speaking, size > combo dots and the real exception to this rule is to building a team that has better synergy or that can counter against specific encounters/mechanics.
Thus, when starting out, simply populate your team with the largest creatures possible and then prioritize combo dots as the next deciding factor.
Combo dots
Combo Dots refer to a creature’s ability to generate mana, their maximum multipler potential, and the speed in which they attack in Dungeon Challenges. Naturally, the higher the Combo Dot number is, the stronger the creature is; however, blindly sacrificing required utility for an extra combo dot is unwise later on.
When calculating maximum multiplier, it only takes into consideration the number of uniquely coloured Combo Dots:
Creature Quest Combo Dot Multiplier |
||||
| # of Unique Dots | 1 | 2 | 3 | 4 |
| Multiplier | 2x | 4x | 8x | 16x |
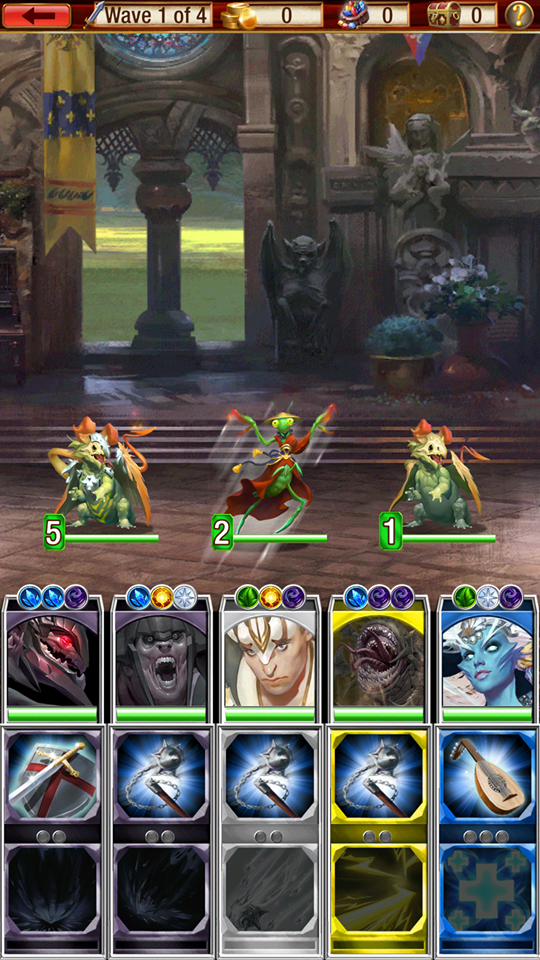
For example, the following Creature has 3 Combo Dots and can achieve an 8x multiplier if you have a green, yellow, and purple Creature on your team: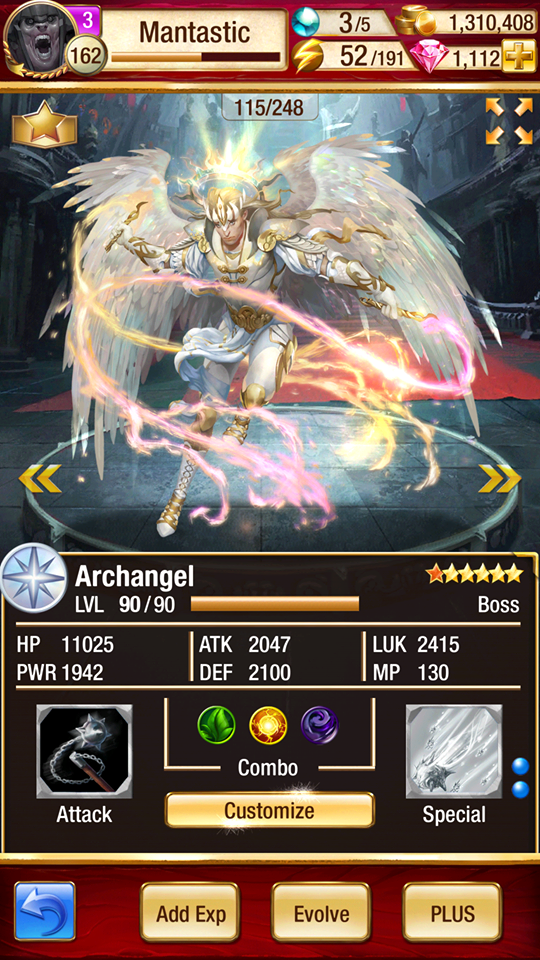
Conversely, the following creature can only achieve 4x, despite having 3 Combo Dots as there are only 2 unique colours. However, it only requires you to have a blue and purple Creature to activate:
Remember, a three Combo Dot Creature will generate the same amount of mana (at a rate of 10 mana per dot) regardless of unique colours and it can be advantageous to have duplicate colours to help trigger multiplier. This is because it can be challenging to bring all of your required utility while juggling a strict colour requirement.
Consuming dots
When playing through an encounter, the order in which you use your Creatures is important as that will determine who gains the most mana which is used to activate special abilities.
Mana is gained when using a basic attack or special ability, consuming Combo Dots from other friendly creatures, or delivering a deathblow to an enemy. Each Combo Dot consumed equals to 10 Mana.
Using your Creature will consume all their remaining Combo Dots while the attribute/colour of that creature will determine which Combo Dots are consumed from the rest of your team. Thus, a blue attribute Creature will consume all of their Combo Dots and all other blue Combo Dots from friendly Creatures regardless of which element they are. Just be aware that you can reroll the Combo Dots of a creature through a Prismatic Orb so you can change the colours (not change the number available).
Regardless of how you consume them, once you have used your entire team, all the dots will replenish and you can use them once again.
For example, the yellow Creature will have their water dot removed by a friendly water Creature. This will mean they only have 2 purple dots left and if a friendly purple creature is used before them, they will have none remaining and receive a 4x multiplier:

Thus, by using my two outside creatures, I have fully consumed my yellow one’s dots and triggered the 4x multiplier. By extension, if I use my three most right creatures, I can trigger 8x on my second from the left creature:
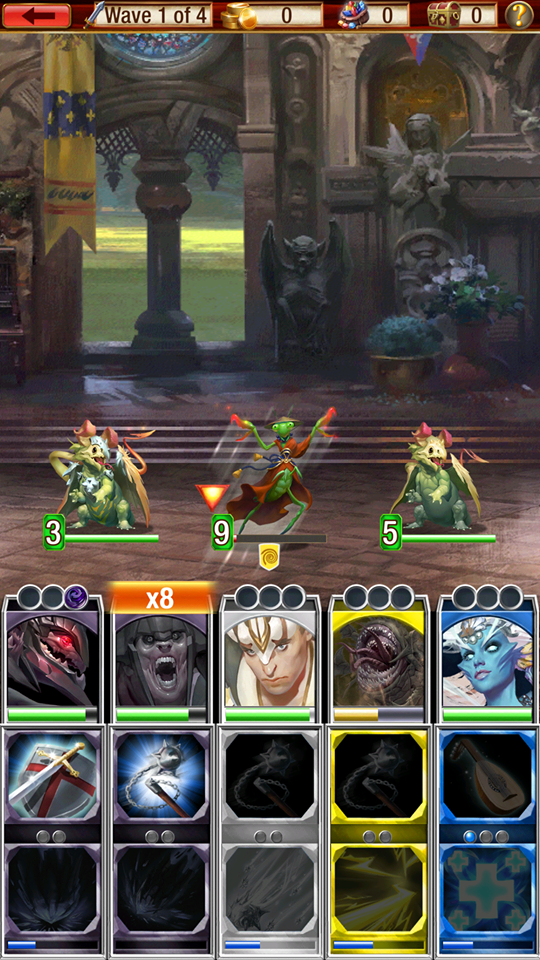
Once using the 8x creature, I will actually trigger 4x from the final card as he has only 1 purple dot remaining:
Thus, swiping right to left will trigger my 8x and 4x while rapidly charging up the first 3 special abilities.
Additional multiplier
If you trigger a combo multiplier from a Creature and something dies from using one of your other Creatures, that combo-ed card gains a slightly higher multiplier which can lead to even higher damage:

About the multiplier numbers
Despite the fact that you see x2, x4, etc., you are not actually receiving double damage but instead utilize the following formula
TotalDamage = BaseDamage + (x)BonusDamage
with (x) representing your multiplier. Thus, the multiplier is actually a coefficient for this bonus damage component. Despite not being as massive as you were led to believe, this is still a sizable increase to your damage output and it is worth pursuing on a few of your cards for additional burst capabilities.
Finally, the multipliers are not restricted to damage output and actually enhance your healing capabilities on Special Ability heals.
Further note about Combo Dots
From my above example, I have a total of 15 Combo Dots, which means I am able to gain 15 dots worth of Mana per turn. However, the order in which I press them determines who gets the most mana and who combos. Thus, it becomes a game of juggling mana by carefully choosing the order in which you use your Creatures.
For example, my blue girl (Siren) is a healer and I tend to charge her up first and then use the combos from the rest of my team to kill off some of the enemy Creatures with Basic Attacks. After a few are dead, I can then use my other team members first to charge up their Special Abilities while using my Siren to keep everyone at full health. Naturally your own strategy will vary and this is just one way of playing through challenging content.
Ordering your team
While you will be carefully planning out who is used first later on, it can be helpful when mindlessly swiping to have them in such a way that going right to left or left to right yields combo multipliers for your creatures.
Basic attack
Basic Attacks are able to be used by all Creatures and will consume Combo Dots as well as generating mana (which is used to perform special abilities).
However, you are able to add further customization to your creatures by using Tomes to change the style of their basic attack.

This extra layer of diversification is wonderful as you are better able to help a creature fulfill their specific role in your team. From my own experience, I feel that Bard, Soldier, and possibly Defender are the most valuable roles.
Special Abilities
Special Abilities refer to a creature’s unique active skill. This requires sufficient mana to activate and can hold up to three charges in some cases. All Creatures have a Special Ability that is improved through evolution as it will grant additional benefits and power.
If I were to use my blue (right most creature), I will consume all three of her dots along with all the blue dots from my allies and rapidly charge up her healing ability. This can be advantageous when trying to sustain yourself in a challenging encounter and a large part of your gameplay will revolve around managing your Special Abilities from floor to floor.
Special Abilities can range from pure damage to stuns, silences, heals, buffs, debuffs to any combination you can imagine. As such, it is important to bring a healthy mixture of varying utility and Combo Dot synergy to build an optimal team.

The above image shows a detailed description of the Special Ability along with the number of charges it has as indicated by the two blue orbs on the right hand side.
As a final note, you can only use either a Basic Attack or special ability once per turn and must use all the remaining team members before you can use a Creature again.
Colour Counter Flowchart
As mentioned earlier, Creature Quest follows an elaborate rock, paper, scissors format in that each element is favourable against one type while being vulnerable to another. This has dramatic implications for team building as you ideally want your team to counter the bosses while avoiding weakness as not only will you be less effective in your offensive abilities, but those monster will take increased amounts of damage.
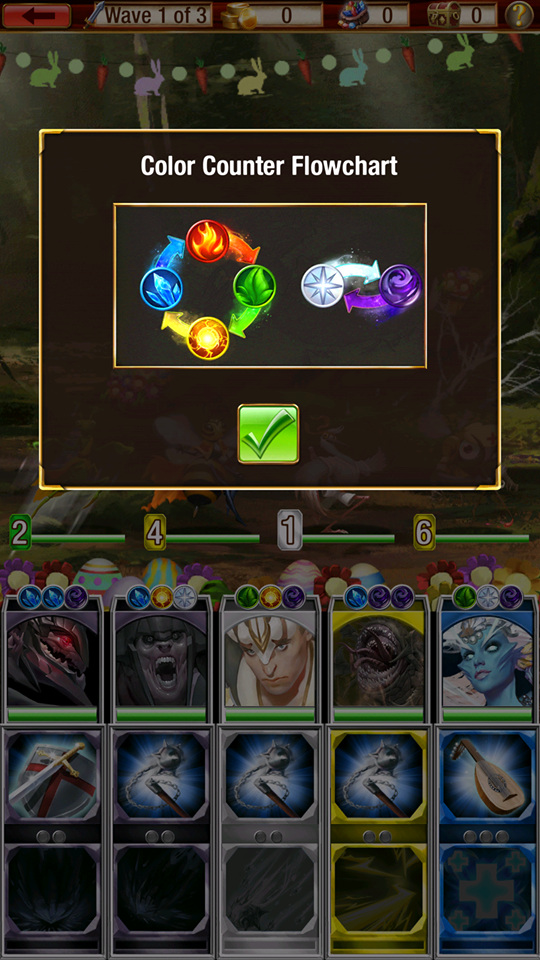
I personally enjoy this element of the game as it prevents one from building a “perfect” or “ideal” team as each card has an inherit weakness and being flexible is key to success.
This also means you cannot become overly attached to a particular monster and must acknowledge that they are vulnerable in certain dungeons and may have to be sidelined for a different Creature.
If you know you are fighting a mono-colour dungeon, it will be advantageous to populate your team with the colour counter, even if it means using smaller or fewer dot creatures as they are significantly more effective. This has the most applications in the challenging Grand Wish quests as the entire encounter is mono-colour.
Awakenings
Awakenings add an additional layer of power to all of your Creatures and is accomplished by either fusing a duplicate or appropriate Essence to unlock. Each awakenings can grant an improved level cap, buffs to your Special Ability, augmented stats, and a whole host of different powers. Furthermore, each star in a Creature’s rarity enables you to unlock a stronger awakening which will then turn your star orange. These are worth pursuing as the boost is dramatic and enables you to tackle harder content moving forward.

From the above image, the single unlocked star translates into one of the six stars being turned orange. Each subsequent awakening will continue to add power to this Legendary Vampire Overlord.
Awakenings are unlocked via duplicate Creatures or rare Essences so it is best to keep extra copies of various dungeon drops. For the most part, it is best to try and awaken a 3+ dot monster.
Creature stats
All creatures feature 6 different stats that change as you level up and evolve them.
- HP refers to your Hit Points and is the amount of health that Creature has
- PWR refers to your Power and improves your Basic Attack and Special Ability’s capabilities
- ATK refers to penetration strength. This is used to overcome defense
- DEF refers to your defensive capabilities and ability to reduce incoming damage
- LUK refers to your Creature’s Luck and ability to land critical strikes and debuffs while avoid debuffs and incoming critical strikes.
- MP refers to your Mana Points and how long it takes to charge up your Special Ability
All but MP can be modified and improved further via Totems/Pluses and leveling up.
In-game items
In addition to the various currencies, we also have various in-game items to use to improve our creatures. These can be acquired by simply playing through all 3 game modes, but Questing tends to be the most lucrative due to the exploration aspect.
 Gems
Gems
Gems are items that help you level up your Creatures. They can drop in varying sizes which award differing amounts of experience, but all require Gold to fuse. This will be where the majority of your Gold will be invested in so always try to have a large stock pile from the Weekend dungeon for the start of the week.
You are only able to fuse on-colour gems to your Creatures, but you are able to target specific gem colours through Quests to cater to your individual needs.
Finally, when fusing, there is a chance of receiving 1.5x or 2x experience and it is wise to fuse in smaller batches in hopes of receiving these random bonuses.
 Quick Battle Coin
Quick Battle Coins enable you to instantly win a battle on a difficulty you have cleared to 100% while dropping all the loot you were entitled to. This is Fantastic for both saving time and skipping challenging boss encounters. It is sometimes advantageous to clear a dungeon with a revive in order to unlock Quick Battling the next time through.
I personally use QB to auto win boss fights on the current difficulty that is giving you a hard time.
 Totems
Totems can also be referred to as pluses and are a way to add an extra layer of power to your favourite Creature. Each Totem provides a small bonus to their respective stat (all but MP) and you can use up to 100 of each kind. Thus, a fully plussed out Creature will require 500 Totems and a slightly absurd amount of Gold.
Try to only Totem Creatures you plan to use long term such as valuable Epics or Legendaries.
 Evolution materials
Evolution materials come in various shapes and rarities and are used to evolve a max level Creature. For the most part, they are colour specific and the Grand Wish quests will be the best place to acquire them.
 Tomes
Tomes
Tomes are used to both evolve and change the basic attack of a Creature. Over time, these will be harder to acquire due to the fact that they drop from the easier difficulties so it is worth purchasing as many as possible from merchants when going through the early game.
 Prismatic Orb
Prismatic Orbs are an amazingly valuable and rare item as they allow you to reroll the Combo Dots on your favourite Creatures. The new dots will be random and you can choose to either keep the old ones or use the newly randomized option. However, you should not be using these early on as you do not have a more definitive team and it is best to wait until you find a few key Creatures that you find yourself using often.
What to spend your Diamonds on
Creature Quest is a large and diverse game with plenty of options along with generous Diamond rewards for playing through the 3 game modes. As such, you may find yourself with quite a hefty amount of Diamonds to use and here are my recommendations as to where you should be spending them.
10 Diamond summons
The premium summoning machine has discounts for bulk purchases along with a guaranteed Epic/Legendary if you summon 10 at once. This cuts the overall cost by 100 Diamonds while providing better rates.
You start the game off with a single Diamond summon and then are left to somewhat fend for yourself. While it will be tempting to do a single summon here or there, it is advantageous to be patient and wait.
This temptation is able to be offset with the Refer a Friend program as well as the amazing value Starter Bundle (both explained below).
Wait for summoning events
Outside of your very first 10 Diamond summon, you should wait for special Summoning events that further increase your chances of acquiring a valuable Creature. These events act as a focus for particular cards and can help you target Creatures you are wanting to round out your teams. The only reason I say do your first 10 summon outside of these events is that they do not come around that often along with the need to actually have Creatures to build a competent team right away.
Increase maximum Energy
Starting at 200 Diamonds (and increasing with each transaction), you are able to purchase +20 maximum Energy a total of three times for a total of +60. This is vital for helping chain rank ups in the early levels along with gaining more value for your Diamonds if you choose to recharge/refill your Energy. In addition, this is a permanent bonus and and will help you benefit from all future rank ups as your maximum Energy is fully restored each time.
As a small precaution, do not use all of your Diamonds on this right away as you will end up having too much Energy for the early rank ups. Instead, buy them one at a time to help space out the Diamond expenditure.
Creature space
The Diamond Shop has the ability to purchase additional Creature storage; however, there will often be “limited time” bundles that provide you with the chance to buy 10 space for only 15 Diamonds. Always wait for these reoccurring limited time bundles to appear as it provides twice the value.
Quick Battle Coins
Quick Battle Coins are wonderful for helping bypass a previously cleared boss floor as well as saving time. Like Creature storage, it is always best to wait for the “limited time” bundles to appear before purchasing.
Revives/continues
Some may argue that using Diamonds to revive yourself is a waste, but it can be vital to progressing further in the game. This is because of how Quick Battle Coins work and how you can clear a semi-impossible difficulty and then Quick Battle your way the next time through.
This may be key to helping your overall progression as being able to farm a higher difficulty is the most efficient way to quickly advance in Creature Quest.
Only do this is you are certain you can win (such as nearly killing the last boss) and fear that you may not get that lucky again as the spawns can be random etc.
Energy refills
Refilling your Energy should only be done when you can no longer chain a rank up and will not waste the Energy when you rank up. However, you can also use this to clear the easier difficulties of various Quests as they award small amounts of rank experience.
While this does cost Diamonds, you can almost recuperate this loss via King Quests as the completion rewards are nearly on par with the Diamond expenditure.
Daily/weekly play advice
Creature Quest is full of things to play and it comes down to your own personal goals for the game along with how much time you can dedicate to playing. However, I will still highlight the key areas to success and you can decide what suits you best.
Log in every day
It may seem simple, but the daily log in rewards are quite lucrative and if there is an event running alongside, you are in for an extra treat.
Daily Quests
The 8 daily quests are simple to complete and require you to touch all 3 game modes along with fusing Gems, totems, and summoning a Creature. As such, I would always hold onto some tiny gems for fusing and various Idols (ticket, common, rare, etc.) to summon something. For the Battle Tower component, you can also simply enter level 1 of the Battle Tower as it is simple for all players to clear.All of these should only take a couple of minutes to do and grant reasonable rewards.
PvP Challenge Dungeon
Even modest participation will yield decent rewards on a weekly basis and is worth playing for the bonus Energy alone. Depending on which tier you are placed in, you could easily climb to the top for Bronze or struggle to make a dent in Gold. Either way, you need to judge how high you can realistically climb and if refilling your Challenge Points is worthwhile.
PvE Battle Tower
The rewards for climbing the Battle Tower are quite amazing and you should try to push as high as possible each week to unlock the milestone rewards as well as the end of week ranking.
Event Quests
There are weekly event Quests that grant you the chance to farm and awaken an Epic Creature. These Epic Creatures when fully awoken are on-par with Legendary monsters as the max awakenings improve their stats, max level by 15, and an augmented Special Ability. This is one of the best aspects of the game because it allows you to acquire a team from playing and reduces the dependency on purely summoning.
If you play with reasonable dedication, I feel you should be able to acquire 800 or so Diamonds every week from the various rewards and Quest completion chests.
Guilds
Guilds not only add a sense of in-game community through a built in guild chat, but also help reward players every week based on their cumulative scores in the weekly PvP and PvE ranking tournaments. While the guild rewards are not as lucrative as solo achievements, they are worth pursuing along with providing up to 10 Diamonds every day based on the number of logins.
Each guild can hold up to 20 individuals and if my reader base is large enough, I will create my own guild so we can share in the wealth and excitement.
Otherwise, you should simply join the highest rank Guild you can find and enjoy the benefits along the way.
IAP & VIP
In App Purchases (IAP) is a process of spending real life money on the game in exchange for perks and benefits. Almost every mobile game utilizes a Freemium-style platform in that it is Free-to-Play (F2P) but having the option to IAP to hasten your progress.
Companies need to be careful to juggle the prospect of IAPing and the risk of the game becoming Pay-to-Win. Naturally, an individual who spends money will have an inherit advantage, but a large part of it is saving time. This is because Creature Quest already has a very generous in-game reward system and by spending money, you are simply acquiring those rewards faster.
While having more Diamonds does raise the chances of you acquiring Legendary Creatures, it is still random and you can acquire a couple from the Refer a Friend program and certain achievements.
To IAP or not to IAP
I have played several mobile games and have seen various IAP structures and I have to say that Creature Quest has probably the most rewarding system in terms of monetary investment to in game perks.
From those that know me from Puzzle and Dragons, you would know that I only IAP through donations or gifts due to most of my income being diverted to medical expenses. However, I did indulge in Creature Quest for myself and Pancaaake for buying the Starter Bundle.
This only set me back $7 (times two) to give both of us essentially 14 Diamond Summons, a few additional Diamonds, tokens, and VIP level 1. The only thing I regret is not purchasing it sooner for myself as I wanted to wait a week to see if I did like the game, but I somewhat already knew that from day 1-2.
The Starter Bundle did dramatically accelerate my gameplay and overall enjoyment for the cost of half a meal at a restaurant. Of course, you should only do so if spending money on entertainment is within your budget. However, with Creature Quest, you are gaining tremendous bang for your buck and you do begin to unlock the VIP tiers.
VIP
Creature Quest has a lucrative loyalty program for players who IAP in that they not only gain the immediate benefits of their purchase, but also permanent perks in the game. It would be redundant to type out the rewards and is best for you to look in-game for how they are structured. However, they do not openly list the actual VIP points required to hit each threshold and here is a compiled list of points required as based on my friends who are more IAP-friendly. Just note that this may not be perfectly accurate as I lack first hand experience here and they did jump some tiers.
Creature Quest VIP Levels |
||
| VIP Level | Total Points | Points for next Tier |
| 0 | 0 | 50 |
| 1 | 50 | 70 |
| 2 | 120 | 140 |
| 3 | 260 | 440 |
| 4 | 700 | 800 |
| 5 | 1,500 | 1,000 |
| 6 | 2,500 | 1,000 |
| 7 | 3,500 | 1,500 |
| 8 | 5,000 | ? |
| 9 | ? | ? |
| 10 | ? | ? |
If you spot any errors or know the missing values, please let me know.
Refer a Friend
Not everyone is able to IAP, but Creature Quest has a wonderful Refer a Friend (RaF) program. Through their RaF system, you are able to unlock up to 550 Diamonds, a 3-dot Rare, a 4-dot Epic, 8 Diamond Summons, and a random Legendary. This is incredible as you are able to dramatically kick start your account from Day 1.
By using one of the below codes, you will gain 50 Diamonds and a 3-dot random Rare Creature:
- K2bB8k#Eh
- t2D#HdEXf
- WmAafyVXz
- KAAbkg#1f
- KMCrS8#1z
Each code can only be used 10 times so let me know if one no longer works =)
Reddit community
Creature Quest has a growing Reddit community and is worth taking a look at to expand your own knowledge from more veteran players. You can read and explore HERE.
Conclusion
Creature Quest is a diverse and exciting mobile game. It offers 3 unique gameplay modes along with a wonderful collection system with a rewarding structure for playing the game.
I have played Creature Quest for a month at the time of publishing this guide and I do foresee myself playing for the foreseeable future.
I may continue to make Creature Quest content moving forward as it will be based on whether or not there is an audience as well as my continued interest in the game.
Let me know if you have tried it out along with your own thoughts and impressions.
Happy Questing (Puzzling)!

please use my code t2NXAJeNQ
LikeLike
PLEASE USE MY CODE DmuzxhqHJ
LikeLike
Please ues me code KMqr@EWuQ
LikeLike
t2DGqkNug
LikeLike
Use my code if these are all dead,
Km#sDE8hU
LikeLike
Hi, I became looking for Day 8 | any contained your website. Many thanks for sharing this amazing details. Thanks!
vivienne westwood online shop http://www.viviennevwestwoods.com
LikeLike
New player here. My code is 4fF3sDeTe
LikeLike