

Introduction
Puzzle and Dragons is one of the oldest and complex mobile games on the market. This can be attributed to it’s 6+ years of existence that has put players through a roller coaster ride of different metas, strategies, and mechanics. While the actual injection of Powercreep is reasonable for someone who has been playing for years, it can become quite overwhelming if you are new to the game.
This article will attempt to answer the more common questions new players may have and any feedback or suggestions are welcomed. I will be focusing on terminology, Box management, explaining the various mechanics, and answering what I feel are pressing questions for newer players.
This page will attempt to answer the more common questions and will provide links to my other articles if you wish to read a more detailed analysis.
This article was last updated on March 15, 2018
Video commentary
–video coming soon–
Table of Contents
Click to jump to the respective subjects:
- Databases
- Abbreviations
- Player rank, Stamina, & Team Cost
- Magic Stones
- Daily Dungeons
- Monster Box organization
- Rare Egg Machine
- Skill Inheritance / Assist System
- Quests
- Multiplayer
- Super Awakenings
- Ranking Dungeons
- Orb manipulation
Databases
Puzzle and Dragons is a wonderfully complex game, but it has a severe lack of in-game instructions/guidance and players are forced to rely on third party resources to progress. At this point in time, the two major resources are puzzledragonx (padx/website) and PadGuide (mobile app).
Both provide valuable information on dungeon encounters, drop locations, evolutions trees, and any other information you can think of.
Feel free to use either or both resources, but I highly recommend you have one at the ready when playing through new content.
Abbreviations
All games and activities have a certain degree of lingo or abbreviations made by players to help streamline discussion or to convey complicated thoughts more easily. Puzzle and Dragons is no exception and for players who have been playing for several years, the lingo and abbreviations are not too difficult to keep up with. However, if you are just venturing out of Departure Tower (the starting dungeon), you may be overwhelmed with information and unable to understand what is being said on the various forums or Facebook groups. The purpose of this article is to provide a handy reference guide to all Puzzle and Dragons (PAD) terminology and if I miss any abbreviations, please let me know in the comments below.
Magic Stone related
Magic Stones are the premium currency in Puzzle and Dragons. These are used to expand our box space, friends list, continue a failed dungeon, as well as rolling the Rare Egg Machine (REM). These can be acquired via clearing a dungeon for the first time, logging in every day, or by purchasing with real life money.
- Stones simply refers to Magic Stones. Sometimes used in the past tense (stoned) to imply you continued a failed dungeon
- IAP or In App Purchases is a term used to convey spending real life money for additional magic stones
- F2P / Non-IAP stands for someone who is Free to Play and does not purchase Magic Stones
- Whale or any other aquatic animal is a term used to describe someone who purchases a lot of magic stones. The larger the animal (with Whale being the largest), the more they spend.
- MP or Monster Points is a secondary currency that can be used to purchase various powerful monsters
Godfest related
- GF is a Godfest where certain monters are featured at increased rates. Often confused with Girlfriend.
- PCGF is the short form of Player’s Choice Godfest. This is a special Godfest in which the players vote for the featured monsters. I do not know when it will occur next
- GFE are Godfest Exclusives that are only able to be rolled during Godfests
- Pantheon is the featured non-GFE monsters
Monster basics
- HP = Hit Points or the health of a monster
- ATK = Attack value of a monster
- RCV = Recovery and indicates how much you can heal when matching heart orbs
- Weighted stats is a collective sum of all HP, ATK, and RCV of a card and is a relative indication of strength. Each attribute has different weightings
- HP = 10
- ATK = 5
- RCV = 3
- +297 is a monster who has received the maximum number of plus eggs possible
- Inherit/Assist is the process of temporarily transferring an active skill from your assist Monster to a Base card (will be explained more further in the article)
- Latents are a special way to add additional customization to each Monster. Can come in the form of stats, Killers, or miscellaneous utility.
Monster or team related
- Card is another way to refer to a Monster or character
- Farmable is a term that refers to monsters that drop from a dungeon and thus acquirable by any player
- Rainbow team is a team that is reliant on matching numerous different colours for damage
- Glass cannon teams are those with very high attack multipliers but no defensive components. They essentially hit hard and are vulnerable to mechanics
- Heart Cross team is a team that requires you to match a heart cross to deal damage
- 5o1e stands for 5 orbs, 1 enhanced and is a particular playstyle that relies on matching exactly 5 orbs with at least one being enhanced. Also referred to as Fireworks or Sparkles
- Tank team is a team who has augmented HP/RCV
- Combo teams are those that rely on matching numerous combos to deal damage. Tends to require more skill overall
- Utility is a term used to broadly state defensive/niche actives. These abilities are not offensive in nature and grant your team more flexibility and surviability
- LS is your Leader Skill
- AS refers to your Active Skill(s)
Awakenings related
Awakenings are abilities unlocked via Tamadras that grant passive benefits. However, they are often abbreviated.
- SB =Skill Boost

- SBR = Skill Bind Resist

- TE = Time Extend
 , sometimes called Fingers
 - TPA = Two Prong Attack

- OE = Orb Enhance for the various colours


- Rows = Row Enhance


- Killers = 3x damage for a particular type of boss


- Rainbow resist is having a monster with 1% of each colour latent resist awakenings


- SDR = Skill Delay Resist
 latent awakening
 - 7c = 7 Combo
 and provides 2x damage for that particular card. Stacks with itself
 - Box = Void Damage Penetration
 and enables a card to ignore Damage Void mechanics
 - FUA =
 Follow Up Attack and enable the owning card to deal 1 point of True Damage after matching a column of hearts. Used to kill Resolve spawns
Latent Awakenings
Latent awakenings are a way to add personal customization to your Monsters. These are unlocked via special Latent Tamadras and can bestow stat bonuses, lesser Killers, Time Extend, and many more.
For the most part, these Latent Awakenings are weaker than a traditional awakening but can be used to add another layer of power to your favourite cards.
By default, each Monster has 6 Latent awakening slots and each Latent takes up either 1 or 2 slots.
Dungeon terminology
As a large part of the game actually transpires in the dungeon, many players have found ways to streamline the information.
- Cross refers to matching orbs in a Cross formation (exactly 5 orbs). They are not usually upset
- Jesus Cross occurs when a player fails to make a heart cross by connecting more than 5 heart orbs
- Mechanics is a broad term to illustrate the bosses have abilities that you need to be aware of. The more mechanics they possess, the more difficult it can be to deal with them
- Preempt is a preemptive ability done by a boss. This means their abilities go before the player can make their move
- Orb Troll occurs when your board is missing key orbs for activation
- Orb Fatigue occurs when you use the same style of orb changer over and over again and exhaust those elements so the next one cannot be used effectively
- Absorb is an absorption mechanic by a boss. It could be either absorbing a particular element or attacks that exceed a certain threshold
- Combo Shield is a defensive mechanic by a boss that absorbs all damage dealt if you do not match enough combos
- Damage Void prevents damage being dealt under certain conditions. It will not heal the boss and instead completely prevent damage being dealt
- Shield/damage mitigation is when a player uses a defensive active that reduces incoming damage
- GungTroll when something truly outrageous occurs
- Laser is an active skill that deals a fixed amount of damage while ignoring Defense
- AOE is often used to represent a Mass Attack (connecting 5+ orbs) to strike all opposing enemies
- Defense break refers to reducing a floor’s defense value to make killing easier
- CTW stands for Change the World and refers to an active that allows you to freely move orbs for X amount of seconds
- OHKO or One Hit Knock Out is used to describe a killing blow
- Sweep or sweeping is similar to OHKO and can be used interchangeably
- Sweep is a term to describe you clearing the floor and advancing to the next
- Carry on a sweep is a term to describe a benefit that continues after killing a floor and proceeding into the next that does not have a preemptive ability. Player shields do not lose a turn on their timer, defense breaks persist, and heart cross leader skills are still active when this occurs.
- True damage is damage that is dealt regardless of the boss’s defense or typing. The damage can also be called Fixed damage
- RES stands for Resolve which prevents death when above a certain HP threshold
- Guerrilla is a way to describe the limited hourly dungeons that rotate on a daily basis. You are assigned into a group based on your player ID
- (Bi)Weekly Dungeons are those that are available for a fixed period of time and feature various skill up monsters
- Rogue Descends are dungeons that have your monsters start at level 1 and level up as you progress
- L+ is Legend Plus
- M+ is Mythic Plus
- RMI is Rare Monster Infestation
Common farming terminology
With the introduction of coop and the desire to save time and stamina, new terminology has emerged to help streamline their farming practices.
Button teams are those that are capable of clearing a dungeons at the push of a button (aka active skill). These abilities either deal true damage or enough to instantly kill the floor. No comboing is required and your actives do not charge up from floor to floor. This will not trigger the turn changing over to your partner. An example is using a team of Awoken Ra ![]() in Tamadra Infestation.
in Tamadra Infestation.
Swipe refers to moving a single orb in one direction. This can be either after using a full mono-colour board changer to quickly trigger the match or to act as a way to pass your turn to your partner. Swipes do not always have to trigger a combo. Eg. Using Zeus Dios’s ![]() active to generate a full board of wood and moving a single orb over one position to instantly activate the 30-wood orb combo.
active to generate a full board of wood and moving a single orb over one position to instantly activate the 30-wood orb combo.
Poison is an active skill that is used to deal a set amount of damage to a boss regardless of the combos made. This damage can be triggered by a Swipe and is usually used to kill high defense floors.
Miscellaneous terms
Things that may not fit nicely into any particular category
- LF = looking for. Can refer to someone searching for a particular lead, friend, dungeon etc.
- BF = Best Friend. Not to be confused with boyfriend
- STTD = Star Treasure Thieves Den or Star Den and refers to the best dungeon available to acquire plus eggs
- OT = Off Topic and is usually used when posting on various groups to indicate it is not 100% PAD related
- WIP = Work in Progress and is usually used on forums to indicate a particular article is nearly completed and would like feedback
- OP = Overpowered. Simply use it to describe something that is very powerful
- Py refers to Flampy, Bubpy, Woodpy, Shynpy, or Badpy and these monsters provide a guaranteed skill up for their respective colour
Player Rank, Stamina, & Team Cost
Puzzle and Dragons has a rank system that provides a modest correlation between how much you have played.

From the above image, this account is rank 840 and has a maximum of 436 Stamina. Initially, each rank up will provide either more Team Cost, maximum Stamina, or additional Friend List space along with fully replenishing your Stamina. However, after you achieve 50 Friend List space, each rank up will alternate between Team Cost and Stamina. Regardless of your rank, Stamina will be replenished at a rate of 1 per 3 minutes (480 per day).
Since each rank up fully replenishes your Stamina, timing them is crucial to continuously play as unused Stamina is not carried over.
The temptation to farm rank may seem appealing, but being able to rank up at any time is usually more advantageous. This is because at higher ranks it takes exponentially more experience to rank up. Thus, by blindly pushing your rank upwards can be detrimental as you miss out on large amounts of free Stamina. If you wish to read more about this, please check out my article HERE.
Team Cost
Team Cost is sometimes a barrier to using the cards you want on your team. Each monster has a specific Team Cost that goes up with each evolution. In essence, you cannot run a team whose total Team Cost exceeds your limit.
In the past, Team Cost used to be a much bigger hurdle to overcome, but now all players have a larger starting value along with the option of using the Solo Mode badge to add more.
You gain more team cost by ranking up.
Magic Stones
Magic Stones are the premium currency of Puzzle and Dragons which are able to be acquired through a number of ways. Clearing a dungeon for the first time will award a one-time clear Magic Stones as well as clearing that same dungeon in Challenge Mode.
This will be the most common way to “earn” Magic Stones as the other common medium is through daily login bonuses that are either sent to the Mail or done through a Gift Dungeon. With this in mind, it is important to log in each day to ensure you do not miss out on free Magic Stones.
However, players will have to begin playing through the various Normal and Technical Dungeons to not only refine their puzzling skills, but to acquire more Magic Stones. What I suggest is playing through Normal Dungeons until you hit a figurative wall, switch to Technicals, then back to Normals when Technicals become too hard. This flip-flopping should enable you to gain numerous Magic Stones as well as providing some direction as to what you should be playing.
Spending Magic Stones
For the most part, Magic Stones should be used for either increasing Box Space, rolling the the Rare Egg Machine (REM), or adding additional friend space. It is generally unwise to actually spend a Stone to continue a failed dungeon since you can simply try again or even refill your stamina which will yield many more attempts.
Refilling your stamina via a Magic Stone naturally has the most value at higher ranks since you would be unable to chain a rank up on your natural stamina and may wish to play a particular dungeon many times. As such, it is usually better for a lower rank player to find a way to naturally rank up to continue playing as opposed to spending a Magic Stone.
Purchasing Magic Stones
Purchasing Magic Stones (or IAP-ing) is the process of spending real life money to gain more Magic Stones. This essentially hastens your level of progress as you will be able to roll more then a non-spending player. The decision of whether or not to do so is of personal preference and should only be done if you are financially able to do so.
Daily Dungeons
Every day of the week features a special dungeon for players to farm and offers a variety of drops:
- Monday – rank experience
- Tuesday – Keepers (evolution material)
- Wednesday – Masks (evolution material)
- Thursday – Dragon Fruits (evolution material)
- Friday – Mythlits (evolution material)
- Weekend – Coins
In addition to this fixed schedule, there will occasionally be special dungeons that feature all of them at once. In essence, these dungeons are the best way to farm those specific materials and also award Magic Stones for clearing.
Monster Box organization
The Monster Box in Puzzle and Dragons is by default one giant box where all types of drops are stored. While this is manageable for newer players, it will become cluttered and challenging to deal with when you acquire variuos evolution/enhance materials along with dungeon drops and REM pulls.
As such, I highly encourage players to utilize the Monster Box Folder system to better sort your Box into several tabs.

Once you go into Options -> System and turn on Manage Boxes, you will now see your Monster Box organized into variuos tabs/folders.
The All Folder is your entire Monster Box without any form of sorting.
Not Set includes everything but Evolution, Awoken, and Enhance materials (which all have their own personal tab). In addition, you will also gain 2 unlabeled folders that can be renamed to your liking. There is no hard-fast rule as to what you should be doing with these extra tabs, but many players like to use one for WIP (work in progress) to better track what you need to develop. You can move cards from your Not Set tab to either of these 2 empty ones and they will no longer show up in the Not Set but will still be seen in All.
The main advantage of using the Folder system is to better navigate your box when you begin to have hundreds of drops along with being able to systematically develop and work on specific cards.
The sooner you transition to this system, the easier it will be, especially when your box is small.
Mailbox
The Mailbox can be thought of as a pseudo Monster Box as it can hold various items for 60 days before expiring. Mail does not take up space in your Monster Box but must be claimed within 60 days upon arriving in your Mailbox. This can be used as a transitional Monster Box to save some box space.
Expired Mail is lost forever and one should regularly sort their Mailbox by “Time Left” to avoid this scenario.
Rare Egg Machine
The Rare Egg Machine (REM) is where you can spend 5 Magic Stones to receive a random monster. This is the most reliable way to enhance your Monster Box and overall level of progression, but should only be pulled during a Godfest Event.
Godfests are special events that occur approximately two times per month and will feature 20 6-star Godfest Exclusives (GFE) along with a specific roster of various cards. For the most part, the 6-star GFE are the strongest cards in the game and can only be pulled during a Godfest. Thus, it is almost always advantageous to wait for these events to give yourself a chance at rolling them.
If you wish to read more about the latest changes to the Godfest format, please refer to this article.
I also release a Godfest review each time one is announced so I encourage you to read through them to help you make the decision of whether to roll or not.
Collaboration REMs
In addition to the regular REM, there will be various Collaboration/Seasonal events to spend your Magic Stones. These machines can cost either 5 or 10 Magic Stones per pull and offer a different set of cards overall.
However, Collabs tend to feature more niche/specific monsters that are often better suited to a more developed/robust Monster Box as the bottom rarity cards are often poor quality. Thus, a newer player will generally find more merit in rolling in Godfests to better develop their pool of leaders, subs, and inherits.
With that being said, GungHo is starting to slowly shift towards an era where Collab cards are the strongest in the game. This is problematic as some of these events feature lackluster cards overall with only 1-2 good prizes at a 2% rate. Despite these poor rates, more developed players are starting to roll more heavily in Collabs to gain access to cards that we cannot feasibly replace via the regular REM.
Like Godfests, I also release reviews for each Collab North America receives.
Skill Inheritance / Assist System
The Assist System was previously called Skill Inheritance (SI) and many players still go by this name with both being used interchangeably. Regardless of which name you wish to use, this mechanic enables you to use a specific card as a Base and then transfer a different active skill to them (the Inherit).
Visualizing Skill Inheritance
Skill Inheritance may sound confusing at first and I wish to clarify how the process works once you have successfully inherited a skill. In the following example, we are using Diao Chan ![]() as the Base and Saria
as the Base and Saria ![]() as the Inherit. The following chart can be viewed as a sliding scale in that haste will advance the turn number upwards while skill delays in reverse:
as the Inherit. The following chart can be viewed as a sliding scale in that haste will advance the turn number upwards while skill delays in reverse:
Visualizing Skill Inheritance |
||||||||||||
| Turn | 2 | 3 | 4 | 5 | 6 | 7 | 8 | 9 | 10 | 11 | 12 | |
| Active | ||||||||||||
As you can see, beginning on turn 2, you can use Diao Chan’s active and this holds true all the way until turn 11. However, once you reach turn 12, the active skill now changes to Saria and will remain as Saria until using her active skill and thus resetting the turn timer. In fact, whenever you use an active skill, you reset the turn timer down to 0 and must begin recharging from the beginning.
This transfer process will allow you to use Saria’s active skill while still using Diao Chan as your sub of choice. This is advantageous when you need an orb unlocker/time buffer at the end of the dungeon, but require a board changer part way through.
If you wish to read more about Skill Inheritance, please refer to my guide HERE.
Quests
Quests are a wonderful addition to Puzzle and Dragons as it provides some guidance on what dungeons you should play.
There are numerous tiers/categories for Quests and with the exception of the Monthly ones, are permanent and will not expire. This enables you to progress at your own pace to unlock various rewards.
Quest rewards widely vary from Pys, special 1-time dungeons, and Spirit Jewels along with eventually unlocking the Solo Mode Badges (explained below).
As a new player, the rewards are quite lucrative and are worth actively pursuing.
Monthly Quests are limited time events that provide various rewards and must be completed in the given time frame. As a result, you should try your best to clear as much as possible and make sure to claim the rewards right away.
Solo Mode Badges
When playing in Solo Mode, you will be able to choose an Awoken Badge for your team that will provide various benefits. By default, you will only have a few to start, but as you complete the various Quests you will unlock additional ones. These badges can provide a significant boost to your team’s performance as you can directly improve a specific stat, gain more movement time, add team cost, and more.
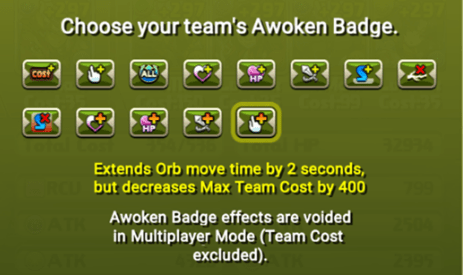
Just be aware that the higher tier Badges will reduce your total Team Cost so you may need to be a higher rank to use them.
Monthly Quests
Monthly Quests function like regular Quests in that you must clear various dungeons for rewards, but must be done within a specific time limit. Furthermore, the rewards must also be claimed by a certain time so you must make sure you actually retrieve them upon completion.
As such, I highly recommend you try to clear as much as possible within the monthly time limit.
Claimed Quests rewards can then sit in your Mailbox for 60 days before expiring.
Multiplayer
Multiplayer, or Coop, is a twist on traditional PAD as it enables you to play with 1-2 other players. However, the rules for 2-Player (2P) and 3-Player (3P) Coop greatly differ.
2-Player
2-Player Coop is the first mutliplayer mode to be released and is the most advantageous way to play Puzzle and Dragons. Through 2P, you are able to spend half stamina, share various awakenings and health, along having an overall easier time in clearing content.
2P Coop has enabled many players to quickly advance through the game as the pair of you are able to tackle significantly harder content compared to what you could do in solo mode.
This has led to many players creating a second/alt account for the very purpose of playing with themselves as everything is easier.
Unfortunately, there is no match-making system in place and you must find a partner through other platforms to coordinate your teams.
3-Player
3-Player Coop greatly differs from 2P mode as each person has their own unique team/leaders and you do not share health or awakenings. In fact, if one player dies in 3P, they are removed from the group (unless stoning to continue) and the other two will continue. This also means you could become the last player standing if both partners die and Leader Skills that rely on being in Coop will be disabled.
For the most part, 3P is less appealing as you only have 30 seconds to match and are playing in “solo” mode without the additional help from the badges.
On the bright side, 3P has a built in match making system so you do not need to go elsewhere to find partners. However, you have no control of your random teammates and this can lead to frustration and wasted stamina.
Super Awakenings
Super Awakenings are a relatively new mechanic that enables certain cards to gain an additional awakening when playing in solo mode. More detailed information can be found HERE.
Requirements
Super Awakenings will only be available to certain cards and those particular monsters must meet the following criteria:
- Must be Limit Broken (does not need to be level 110)
- Not all cards can be Limit Broken
- Not all Limit Broken cards can receive a Super Awakening
- Not all cards can be Limit Broken
- Already be +297
- Sacrifice a 297 pluses for a random Super Awakening
- Can be any combination of pluses as long as it adds up to 297
- Works only in solo mode
Limit Breaking
Limit Breaking is a term that refers to cards that have been fed a Super Snow Globe to push their max level to 110. This only works for cards that have a blue colour for their level text and is not available to all cards.

In the above example, the Machine Goemon (left) is unable to be Limit Broken whereas Yamato (right) qualifies for Limit Breaking.
Once a cards has been successfully fed a Super Snow Globe and Limit Broken, they are then eligible for to receive a Super Awakening. Just bear in mind that the Limit Broken card does not need to be level 110, it just needs to have been fed the Super Snow Globe and Limit Broken.
Super Awakening a card
Once all of the above criteria has been met, you should see a Question Mark box beside your regular awakening. This box can be tapped and held down to reveal the potential Super Awakenings.

Each card has a unique pool of three Super Awakenings they can draw upon and each +297 fused will unlock a random one.
Do not fuse +297’s to cards that do not have the Question Mark Box as they will be wasted
Ranking Dungeons
Ranking Dungeons are a special game play mode where players try to clear a particular dungeon for lucrative rewards. These dungeons attempt to “test” our skill by imposing a scoring system to determine your percentile ranking.
In these ranking dungeons, we are scored based on 3 criteria:
- Average combos made: 5,000 points per combo
- Time Remaining: 500 points per second remaining
- Maximum damage: up to 10,000 points if you hit 40 million.
Regardless of how new you are to Puzzle and Dragons, it is always worth at least completing the Ranking Dungeon as it will grant a Magic Stone along with your percentile ranking rewards.
While it may feel disheartening to not score well, it is worth the effort overall achieving new personal bests will help unlock new Solo Mode Badges.
Ranking Dungeons come in either preset or customize able team formats. For newer players, the preset teams are the best time for you to achieve a new high score as the playing field has been somewhat leveled as everyone is forced to use the same team. On the other hand, building your own team opens the door to creativity but can also mean you may be lacking key parts to scoring well.
Orb Manipulation
Puzzle and Dragons is one part team building/collecting/theory crafting and one part orb manipulation. You can have the greatest team in the world, but if you are unable to play it, you will fail miserably and the reverse is also true: if you lack the ideal team but possess the comboing skills, you may still fail.
As such, you do need to hone your matching skills and the best way to do this is practice in Endless Corridors after understanding the basics/fundamentals. You can learn either from various YouTube tutorials, watching high level players, or visiting my Spacial Planning Guide. However, you will still need to practice and it will take time to master this aspect of the game.
Conclusion
Puzzle and Dragons is a massively complex and wonderful game to play but may be overwhelming for newer players. My hopes for this article is to provide some guidance as well as answering the more common questions new players have.
Let me know if you feel I missed anything along with any suggestions you may have.
Happy Puzzling!
If you enjoy my content, please consider turning off AdBlocker for this website =)

Amazing dude, great work! Very thorough.
Couple suggestions:
* Maybe mention in the Fixed Damage section “see: Laser”, since they’re synonymous
* In the awakenings section, maybe mention 1 vs 2 slot latents? And latent killers are only 1.5x bonus, not 3x?
* In the quest section, perhaps mention the shenanigans with the mail system, especially for monthly quests. Quick something like “make sure to claim the quest rewards before the end date to send them to your mailbox. They’ll stay there for 60 days, and then expire.”
Maybe it’s not a new player thing, but getting into a habit of daily checking your mail with the “Time Left” filter to avoid missing stuff would be good to start early.
LikeLike
Thank you for your feedback and I added in your suggestions =)
LikeLike
Rockstar
LikeLike
❤
LikeLike
While this is a basic terminology for the PAD community, it’s one that confused me greatly when I first started trying to communicate with others about PAD, that I recommend you add early in the post:
Card
As a more casual player, I never thought to consider the dragons, gods, or monsters I use in my team as a “card”, and I thought perhaps there was some feature I missed when I encountered people talking about them.
Other than that, this is awesome and I wish I had found it months ago when I was first trying to play more than just casually.
LikeLike
Thank you for the feedback on Card. It is something I constantly say without realizing it can be confusing XD
LikeLike
Combo lead defined with combo, circular. That term never made sense to me. A more logical word is match but that ship sailed years ago. 🙂
LikeLike
Is your argument with GungHo? Because “Combo #” is literally printed on the screen every time a match is made, and combo leads have the word “Combo” in their leader skills, so calling them “match” leads makes no sense.
LikeLike
Hi! First of all, thanks a lot for the help you provided for me with this website… I started PAD this year, your explanations are very clear and your advices helped me not being too lost in this (sometimes) confusing game.
I do have one question, regarding best friends. I’ve read many things on the web, including your articles, but everything is quite old now and I don’t know if it’s up to date. I understand that you can only choose one BF (this is why I haven’t yet), but is there also a limitation on the number of friends choosing you as a BF? Because someone chose me and isn’t active anymore, so I don’t know what to do…
LikeLike
Glad to hear I have been of help and in regards to the Best Friend mechanic, the article are older because we have not had a BF Reset for a long time
You are allowed to choose 1 Best Friend which may reset in the future which means you may be allowed to choose another one in the future
There is no limit as to the number of people who can Best Friend you (which is why I have 180+)
I would choose someone who is active/you know so you can access their leaders more reliably
LikeLike
may u add me? im a noob with a maxed out RAnubis in need of diabolos friend
LikeLike
I am going to be accepting friend requests for those who will best friend me after the reset next week
LikeLike