

Introduction
Hello everyone, Insomnia here, and the Deadly Sin Dragons and Key Heros(SDKH) are back with buffs and a new card after almost 10 months. The debut of SDKH brought multiple meta leads and many powerful subs and equips that still see use today. Although the power level of the event has fallen off a little over the last 9 months, SDKH still remains a very powerful collab that should not be overlooked, especially if you didn’t roll much in the previous run. Today I will break down everything you can get during this event, both REM and farmables. Different cards will be useful for different people, so I will try and give you as much information on everything as possible, so that you can decide if it is worth pursuing for your own purposes or not.
Image cards are generated by Tsubaki bot, which you can find in many PAD community discords including Hyperion’s. You can find their Patreon here: https://www.patreon.com/tsubaki_bot
7-star REM
Gileon was an incredibly powerful leader on debut and still remains extremely strong for Shura 1 and is capable of doing Shura 2 as well. Unfortunately Gileon didn’t get a super significant buff to his leader skill at all so for now he’ll remain as a decent lead. He is extremely tanky sporting a 4x HP and 57.75% shield when above 50% HP. His buff giving him a bonus 25% shield when matching 3 Fire combos isn’t really useful, nor does it do much to address his biggest issue as a lead, his RCV. The RCV issue can be addressed by using a healing stick sub such as Super Reincarnated Amaterasu Ohkami[5938]. To really take advantage of his max 75.99% shield, you’ll need to use a Gileon system, which means running double Gileon leads and a Gileon sub to take advantage of his 3 turn active skill. The constant board change will hopefully create 9 Fire orbs, but as it is a tri-color board change this isn’t very consistent. Gileon also doesn’t have auto-FUA built into his leader skill so you’ll have to manually FUA, which for the most part isn’t a problem. The problems come when you are trying to FUA and make a VDP match, it can be difficult to proc the 7c damage of your other subs depending on the board. I would’ve liked to see at least an add combo to his lead skill, instead they gave him a buff in his best department already, his tankiness.
However, Gileon really shines as a sub. His 3 SB in pre-transform state alleviates some need of stalling and pressure of bringing a ton of SB on other subs. The 3 turn reduction from 30 to 27 turns to transform is also very nice, way better than his leader skill buff. Once transformed you have a tri-color board with Hearts and Fires on a 3 turn cooldown, as well as cleansing any RCV and Time Extend debuffs. His quad 7c awakenings also means he packs a serious punch. 2 of the best Fire leads in NA use him as a core sub, those being Seina[6660] and Tanjiro[6531]. If you run either of these 2 leads then you really should chase a Gileon if you don’t have, as he will continue to be a key sub on those teams and many future Fire teams to come.
Gileon’s new equipment form is actually very powerful. Boasting a SB, OE for Fire, and Team HP awakenings alone already makes it a very strong equip, the powerful active it has is just icing on the cake. Full clearing binds and awoken binds and removing all unable to match orbs effects is a highly desirable set of effects in an active already. The board creation is just a bonus, and although it doesn’t create heals, the active recovers all your HP anyways. The only place where this would be a problem is if your lead doesn’t have auto-FUA (which ironically describes Gileon). Despite all this, if you already own a similar active equip, you may not find as much value in this one. It’s not an absolute must have, but it is nice to have.
Menuit is unfortunately not the most useful lead. The meta for heart cross lead was 4+ years ago, and they’ve never made a comeback after that. Considering that all your damage and shielding is set on matching the heart cross, it’s not very consistent. Although with dual Menuits you get guaranteed 5 heal orbs each turn, that’s considering that you don’t have locked orbs on the board. What you need to make Menuit work overall just isn’t worth it as a lead.
As a sub Menuit is still a little awkward, but at least it’s more useful than Menuit as a lead. When transformed, Menuit is a high damaging Water sub and quick heart generator. This can be useful for some Water teams but for the most part there are better options. Where Menuit does shine as a sub is with farming. When transforming, her base form provides 3 turns of bypassing void damage shield and damage absorb shields. This is a unique combination of effects that no other card (except her equip form) has, and it is extremely useful for farming. Having an active that pierces through both damage void and damage absorb shields in one gives the rest of your team more flexibility, especially in dungeons where you can get different spawns each run on a floor. The fact that this effect lasts 3 turns is even more insane as there aren’t many actives for both damage void and damage absorb that last 3 turns. The transformed active unfortunately isn’t that useful for farming, unless for very niche scenarios. It is however only a 2 turn cooldown, so short cooldown inherits can be charged up.
Menuit’s equip form will probably be the best for the majority of the player-base. It combines all 3 void style actives into one, and it lasts for 2 turns to deal with those pesky super resolve spawns. This equip is so insanely versatile it can go on practically any team that needs a 2 turn active for any of those mechanics. The cooldown isn’t even unreasonably high so it can definitely be up in time if you need it early in a dungeon. Highly recommend trying to pick up at least 1 Menuit for this equip. However, it’s not a big deal if you can’t as it’s quite unlikely that you’ll need all 3 effects at the same time. You can easily compromise with a combination of 2 actives for the specific scenario where you need all 3, or just use an active that only covers the one you need for the dungeon you are attempting.
Amlynea, or colloquially known as “Deer”, is an interesting lead. All of your damage and shielding is tied to matching 5 colors, which is extremely inconsistent without 7×6 boards, which is unfortunately something that newer dungeons seem to punish. Alternatively, Deer’s active provides 2 spinners that can be used to generate missing colors, and she unlocks the board first so you don’t have to worry about locked orbs. However, with a strong multiplier, a decent amount of great sub options, and great survivability, if you can deal with the challenges that come with matching all 5 colors, Deer can be a fantastic lead.
As a sub, Deer is rather average. 10c and 7c awakening provides a lot of damage if you can hit 10c, and you get plenty of time, however her active is quite niche and there are probably plenty of other subs you could use. It’s difficult to pick a team where she would be the “ideal” sub, unless of course for niche scenarios where that quick spinner generator would be useful. Her only obvious place as a sub is on a Deer team where you are pairing her with a Fasca[5842] or some other 7×6 lead and you still want the system of spinner generators.
Deer’s equip form is rather interesting, being 1 of only 2 cards in NA that gives 2 or more seconds of movement time (the other being LKali equip[7249] which gives 3 seconds but no skill boost). Overall it’s a potentially useful equip, but I wouldn’t label it as a “must have” card.
Ferule was one of the hottest leads back during the first run of SDKH, and slowly began to fall out as Shura 2, Shura 3, and their alt. dungeons got released. However, where Ferule shines the most is Shura 1 speed runs. She is one of, if not the fastest and most consistent lead for Shura 1, especially after her biggest weakness got addressed, her lack of shielding. With the new buff she gains a 57.75% shield with dual leads which keeps her healthy against gravity attacks. If you’re looking for fast and consistent Shura 1 runs, she can easily do ~12mins with practically complete consistency. If you are planning on doing Shura 1 with her, you will need to roll a second one to have a system with her 3 turn active in post-transform, otherwise you’ll lose out on consistency and/or speed due to not running an optimal team (which can be manageable especially if you don’t have a strong Shura 1 lead).
As a sub, as I already mentioned she fits onto her own team the best. However, most Light based teams can benefit from her. Her active offers a rather quick orb generation and a short cooldown spike that can be helpful for killing some of the tankier spawns. Her awakenings offer great VDP damage when needed as well, which overall just makes her a solid sub. However, there are typically far better options than Ferule in many other Light teams, simply because they have better awakenings (Ferule could be doing a lot more damage if the SFUA awakenings were replaced with another 7c or VDP).
Ferule’s equip form is just overall a great and versatile equip. The SB and rows make her useful and Light based row teams, farming or general teams, and her active is great for any Light or Light + Heal match teams, as you are always guaranteed the 15 orbs so no need to be worried about orb troll. The SFUA and Combo Orb(Corb) awakenings have niche uses depending on the team, for example if used on a Ferule team, since she doesn’t have auto-FUA built into her kit, you can match a 3×3 Heart box with the active to trigger SFUA and kill through resolve spawns. The actual orb unlock and 15-15 Light and Heal orb part is not unique however, there is 5 star card in this event that does that, making it far more accessible if you only need the 15-15 board, that card being Egg of Pride[6419].
Euchs is another lead that was considered extremely powerful during the debut of SDKH, and much like Ferule and Gileon, was slowly crept out over time. Also much like Ferule, Euchs’ is an amazing Shura 1 speed-runner that is also very consistent for relatively low effort. Euchs’ biggest issue as a lead that really prevents it from performing well in newer dungeons is the fact that you have to stay under 50% HP, or else you lose most of your damage. Being under 50% HP is always risky even with a 75% leader skill shield and 35% from the active if you are looping it like you would with Ferule. Getting to 50% HP typically isn’t the issue, if you can’t tank some hits from the first floor of a dungeon, there are plenty of HP reset actives (including your own equip) that can do that for you, but having enough healing to not just straight up die but not so much healing that you go above 50% HP each time is not something that is super consistent. Although you could use a card like Zaerog Core[5633] that can reset your HP each turn, that is just another active slot used, which really only leaves you with 2 sub slots to cover everything you need in a dungeon. Euchs performs extremely well in Shura 1, easily on par with Ferule in terms of speed and consistency, but begins to struggle outside of the dungeon as significant team adjusts may be needed depending on the dungeon, an issue that Ferule teams don’t really have.
As a sub, Euchs is really only useful on his own teams. On his own teams he can get pretty close with just a VDP and another Dark match, which is why he performs so well in Shura 1. The below 50% HP awakenings make it so you can practically kill most spawns with just 2 Dark matches, don’t even need the VDP. To maintain the below 50% HP consistency, you should ideally run the no skyfall badge to prevent any accidental Heart skyfalls that can mess up your runs. Since below 50% HP teams are quite rare, Euchs struggles to find a home in other teams, despite having a perfectly great active.
Euchs’ equip is absolutely incredible for farming purposes. A row make along with a damage and att. Absorb void is an incredibly powerful combination as it combines basically 3 actives into one, creating more freedom in teambuilding. This combination is also unique as nothing else like it exists in the game, for any color. The awakenings are just a cherry on top as it synergizes extremely well for dark row farming teams. Since you only need 2 Euchs, one as a lead and the other for a sub, any additional Euchs should be made into this form, as not only is it great for farming, it fits perfectly onto Euchs teams, and isn’t terrible for other Dark row teams due to the SB and rows it provides as well.
Miya is the new 7 star that was released with the return of SDKH, and she’s a pretty damn good lead if you can snag her. Your active loops with dual pairing, your 75% shielding is passive (which is pretty significant when compared to conditional ones), and you only need to match 4 combos, given that 2 of them is a Light and Heal to reach 8c with the added combos in your leader skill. Matching 6 combos will give you enough to trigger your double 10c awakenings outputting massive amounts of damage. Your Team HP awakenings give you some sense of HP as well even though you lack a HP multiplier. Miya also has a rather high RCV multiplier, letting you match through Poison and Mortal Poison orbs in peace, as you don’t have much raw HP to begin with.
Miya as a sub also fits onto many other Light teams, as she straight up brings HP, damage, some utility in the form of L shield and unlock, and a quick orb generating active. Most light teams that have added combos to take advantage of her double 10c will be able to use her, making her extremely versatile.
Overall Miya is just an incredible card to own, for any current and future Light teams. At the moment she is an incredibly powerful lead for Shura 2, but as with anything will eventually get crept out of favor, especially since Shura 3 is already a thing in NA. However, similar to Gileon in a way, it will still be a while before she gets crept out of favor as a sub, simply due to how much she brings. If you manage to get dupes, for now unfortunately they aren’t that useful, but she will almost definitely get an equip form the next time SDKH comes around, whenever that may be.
6-star REM
**The equip form I will be referring to as the sin name(eg. Envy, Lust, etc.) while the reincarnated evolution I will be referring as the dragon’s name(eg. Jevi, Varias, etc.)**
**Another note, you pretty much never use the middle evolution of any of these cards outside of extremely extremely niche scenarios, so I will be talking about all the dragons in their max evo form**
Envy is a rather nice equip, it provides a 2 turn damage void nullify active on top of a board change. The unbindable and 4 Water OEs are also great for water teams. The board is unfortunately not ideal for rainbow leads (typically the kind of teams that use this kind of active) which decreases the value of this card. However, it is still overall a great pull especially for those that don’t own a damage void nullify active yet, much less a 2 turn one. This is especially true now that the cooldown went down from 25 turns to only 18 now. Otherwise, for people with better damage void nullify active, Envy will serve only as an unbindable equip or for the Water OEs on Water teams. It’s long cooldown unskilled also lets it serve as a delay shield for the card it is inherited on top of.
Jevi features an array of offensive awakenings and an incredible 6 SB as a sub. The active has the same issues as Envy in that it’s not the best for rainbow teams. Now that the cooldown has been reduced to 18 turns, you can more effectively inherit something on top of Jevi, if you want to still take advantage of the awakenings he provides. This however is rather situational and will heavily depend on the team and dungeon you are attempting, but it’s worth mentioning. As a lead Jevi does have a fixed 9 second orb move time, which can prove useful in certain pairings, but his multiplier is far too low to be significant as a general lead. (something that all the 6 and 5 star cards share)
Overall Envy line is nice to have, mostly for those without good void damage nullify actives. However the active itself is mediocre at best as it can create unwanted boards, especially since mono and dual color teams can typically just match a VDP, which for the most part is better than using an active.
Sloth is also a pretty decent equip, the active is perfect for any rainbow team and although super resists are more and more common nowadays, the 40% resist in blind and poison can still be helpful if you have other 60% resist equips. The unbindable is also a nice bonus. All this combined makes Sloth an overall useful equip in many scenarios.
Feygoran attains the same useful active but also has a skill charge awakening, giving you access to the 14 turn active much quicker when used on a rainbow team. Combined with the other offensive awakenings makes Feygoran a great sub for many rainbow teams. Though it’s not the best overall sub for rainbow teams, most players will be able to find a place for him.
Overall the Sloth line is a solid addition to any box, a utility active and awakenings will always have a use somewhere. Although a bind clear with the active would be nice, it’s not a necessity to make the active good.
Greed has one of the more rare actives combining damage absorb void and attribute absorb void, making this active both useful for farming and normal teams. Having unbindable and 60% poison resist is just a bonus for any team. As previously mentioned, the increasing popularity of super resists is beginning to make these kind of resists irrelevant, however the strength of the active makes up for it.
Rhamamoa although has the same active as Greed, is not really used for his active ironically. He is mostly used for his triple dungeon boost awakening, each of these awakenings giving a 2% increase to rank exp, monster drop rate, monster exp, and coins when used in solo play. The only other card in the game with 3 is Xmas Saline[5772], a significantly rarer card to obtain. You will frequently see him being used in teams that run the int difficulty of many collab dungeons, and combined with the drop rate increase leader skill of Veroah[4649], lets you easily farm the collab exchangables.
Overall the Greed line is an excellent line to own, having 4-5 in Rhamamoa form and a few in Greed form would be ideal. Even if you do not farm, this is a very easy to grasp concept as it pretty much just revolves around having Rhamamoa subs with lazers such as Awoken Ra[2012] inherited on him.
Wrath is a very powerful equip for any dark based row team, for farming or for general use. The SB along with the 3 rows while providing a cleric and burst in the active makes Wrath an all around amazing equip. The dual purpose nature of the active allows Wrath to find a use in a wide variety of different situations.
Vald is also an absolutely amazing card as a sub. Capable of providing 6 SB to a team, while having the same incredible active as Wrath, and having great offensive awakenings makes Vald extremely valuable. If the SB isn’t necessary you even have the option to have super blind resist. Many Dark based teams, and even a couple Fire teams can utilize him quite well.
Overall the Wrath line is one of the best lines out of the 6 and 5 stars. Having such powerful uses in both egg and reincarnated form means having many dupes of him is highly desirable, whether it is to stack dark rows on a farming team, or to have different latent or super awakenings setups in Vald form, most players will benefit from having multiple of him.
5-star REM
Lust is an okay equip, it does provide a tape resist and a 2 turn haste for transforming teams, and can be used as a spike later on. A 12 turn cooldown is pretty decent for what you are getting so it’s definitely useable.
Varias is unfortunately not that useful. It could be used for farming with 5 SB and a 2 turn haste, but farmable cards like Whaledor[2940] has 1 more SB and a significantly lower cooldown. As a traditional sub it has some 7c damage, but provides practically nothing else other than it’s somewhat useful active.
Overall the Lust line isn’t too great, there’s not any need for dupes of them, but you’ll most likely get a couple if you roll a couple times in this event.
Pride has a unique 15-15 board, which for those that don’t understand the strength of this, means you can always match 10c from it. It also means you never have to worry about the board not giving you enough of 1 color. 15-15 boards are extremely powerful for ranking as you can get the fast solves while maintaining a high average combo. Although you do have the extra animation of the unlock orbs, unless you are going for a high .1% score, this won’t matter, especially now that crown cutoffs are at 5% instead of the old 3%. Owning multiple of Prides is ideal as a result.
Fadelle has the same uses as Pride, for ranking. Both evos will find use as both still maintain the important awakenings, the 5 SB. In second evo form you only have a main attribute, which allows for faster animation (depending on length of the ranking dungeon, you can save almost an entire second), or in reincarnated form, if you need the VDP and SFUA for extra points. As a traditional sub Fadelle isn’t too great, therefore you’ll probably be better off leaving it in Pride form.
Overall the Pride line is great if you’ve been shafted from some previous rankings due to the lack of 15-15 boards. Although there’s not much of a use for the line outside of ranking, considering how common it is to roll one, you might as well prepare for the future if you are going to do ranking.
Gluttony is a great below 50% HP equip for Dark teams as it actually cuts your HP with it’s active, and provides a non Heal board to prevent you from healing back up. Below 50% HP equips were quite rare back when SDKH, only in the single digits, and although there have been a few more added, Gluttony is still one of the more easily accessible options.
Madjeh unfortunately isn’t too good. The 5 SB and multiple below 50% HP awakenings are nice, but his rather low base ATK decreases the value of those awakenings. You are much better off leaving it in egg form unless a super niche scenario for Madjeh comes up in the future.
Overall the Gluttony line is really only useful for the egg form’s below 50% HP awakening. If you already have other more useful below 50% HP awakenings, it will practically make Gluttony line cards box cheerleaders, forever collecting dust.
Sacred and Cursed Keys
There are 2 types of keys you can farm, Sacred and Cursed Keys. Sacred Keys all have their own unique active skill whereas Cursed Keys share the same active as existing Sin Dragons, but with different awakenings. Either can be bought for 100k MP and there is no limit to this. As such, you should make at least 1 copy of every key, and if you already made them last time, you won’t have to worry about them.
In my opinion, there is not a single key that really warrants owning multiple, so one of each is fine. You will need these keys to farm the 3 other farmables in the collab.
Sacred Keys:
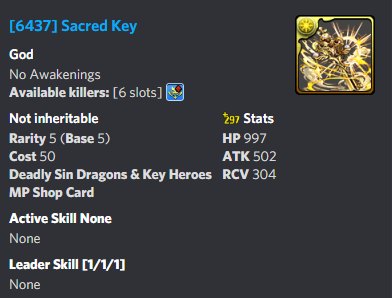
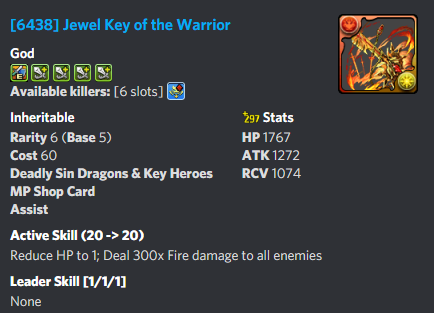
Warrior Key is a nice 300x mass Fire button for farmers by killing multiple spawns, however since it also reduces your HP to 1, you won’t be able to use the same active twice, which is why there’s not a point to having multiple.
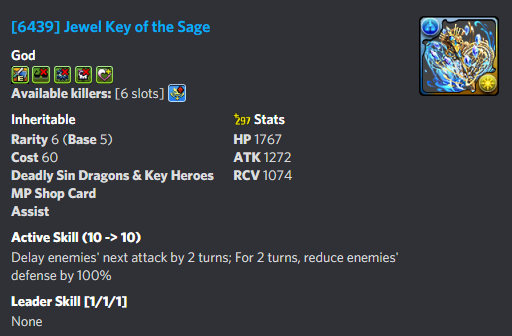
Sage Key isn’t very good in any specific area. A short delay is nice for stalling and/or transforming. A 100% defense void is nice in dungeons like Training Arenas. The 20% resist in everything is pretty pointless, as it is not very valuable anymore.
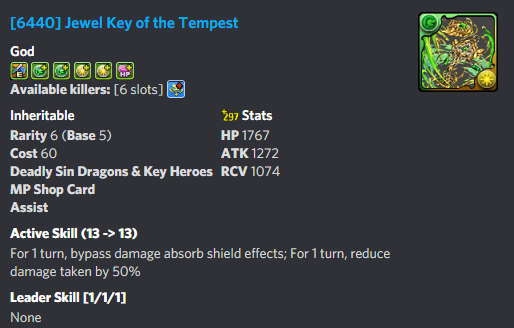
Tempest Key is actually a very nice damage absorb void option for those without. 13 turn cooldown is also very good for a damage absorb void. You get decent passive damage for Wood and Light as well. You should absolutely make this if you are lacking fast damage absorb options.

The awakenings of Blessed Key are heavily geared towards RCV, making it great on teams with naturally low RCV. However, although the active isn’t bad, it’s not very useful as a 3 turn bind and awoken skill bind clear is very lackluster nowadays. The 5 turn cooldown doesn’t help it in case you wanted to just use this for its awakenings.
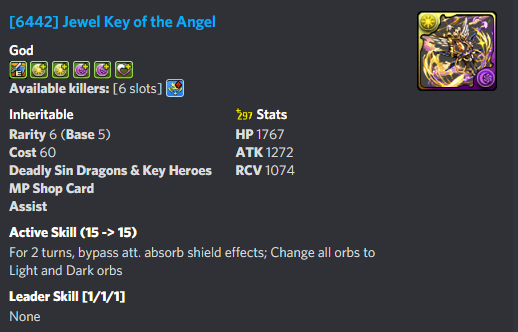
Angel Key has a board along with a 2 turn void for attribute absorb, which is nice to have. Although it’s actual usefulness depends on the dungeon and team, it doesn’t take away from this key’s value.
Cursed Keys
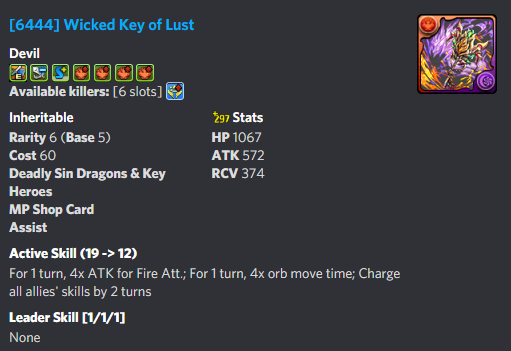
Lust Key takes the same active as the Lust line, but with significantly more useful awakenings. The 1000 decrease on ATK on whoever Lust Key is inherited on can be impactful, but you can easily just inherit it on someone who isn’t one of the primary damage dealers. The SB and rows combination allows Lust Key to be used on traditional Fire row teams and Fire row farming teams.

Envy Key takes the same active as the Envy line, but with interesting awakenings. TPA and L unlock in one card doesn’t necessarily synergize, but it’s not necessarily bad either. Although it does let you be versatile in how you want to use it, Envy Key is probably more for rankings, where all 3 of his offensive awakenings count for style points. Otherwise it’s the same slightly awkward nullify damage void active as the Envy line. Do be aware the 2500 decrease in HP awakening can be significantly impactful.
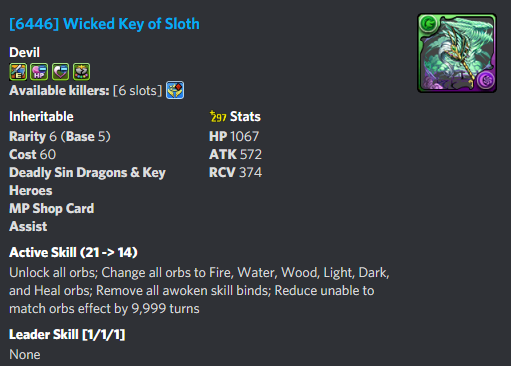
Sloth Key takes the same great active from the Sloth line, but at the cost of a 2500 decrease in HP and 2000 decrease in RCV, gives you a guard break awakening. Although a guard break equip is extremely rare (the only other card in the game that has a guard break and it an equip is Dyer’s Story Equip[7116]), it’s honestly not worth the stat decreases. Sloth Key will find more value in ranking where there is an emphasis on the guard break awakening. Although some traditional rainbow teams could need a guard break awakening, this is extremely niche and you’re almost always better off using a sub that has it.

Pride Key takes the same active as the Pride line, but provides a unique awakening in an equip, a super poison resist. There is no other equip currently that has this, the closest being equips with 80% poison resist. Although the 1000 decrease in ATK and 2000 decrease in RCV can be detrimental like Sloth Key, a super poison resist is far more valuable than guard break making Pride Key worth running for that purpose. Otherwise Pride Key functions the same as the Pride line, primarily used for rankings.

Gluttony Key takes the same suicide active as the Gluttony line, but provides an incredible amount of HP bulk in the form of 4 Team HP awakenings, at the cost of decreased RCV and ATK. Though there are a number of equips with 3 Team HP awakenings, Gluttony Key is the only one with 4, making it unique. Although the value of it probably isn’t as much as a super poison resist, it can be more valuable depending on the situation.
Dungeon Farmables: Gorfeis, Gorkaos, and New Gorkaos
These dungeon farmables are spawns that require specific things on your team to trigger their spawn. These are extremely powerful and I highly, highly recommend farming 2-3 for each, you’ll probably only need 1 of the new Gorkaos though. Farming means skilling them up too dont forget, they require many skillups(70 total for one) and it’s not really worth to use pys. However, with GungHo Collab going on, you can easily farm pys in it so you may opt to use that to farm skillups instead.
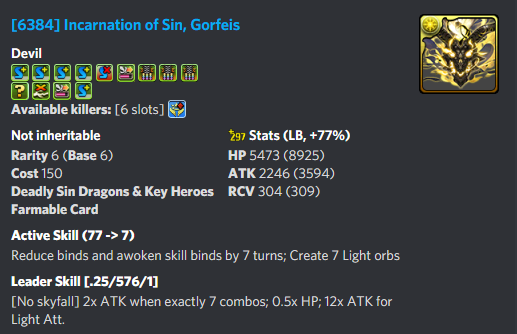
For Gorfeis to spawn, you need to have one of any key inherited on your team (the one on your friend’s lead does count). Gorfeis is a great sub for many Light teams, whether as a SB stick or for the active or for the VDP damage. It has amazing stats and a great active. It fits particularly well in Ferule[6401] teams but is extremely flexible and worth the investment.
As a lead, lowering your HP isn’t really a good thing, but if you aren’t taking damage anyways, you basically get a 576x multiplier lead as long as you are matching 7 combos. Honestly, not really useful but not completely useless either.
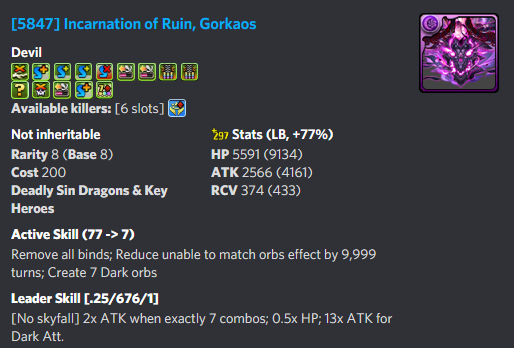
For Gorkaos to spawn, you need to have all the Cursed Keys inherited on your team (the one on your friend’s lead does count). Gorkaos is an amazing sub for many Dark teams, having potential for 6 SB or super poison resist, on top of a cleric active. In particular he fits very well on Euchs[6403], but many Dark teams and farming teams can utilize him.
As a lead, it’s the same as Gorfeis, just for Dark and slightly more damage. Not much else to say about it.
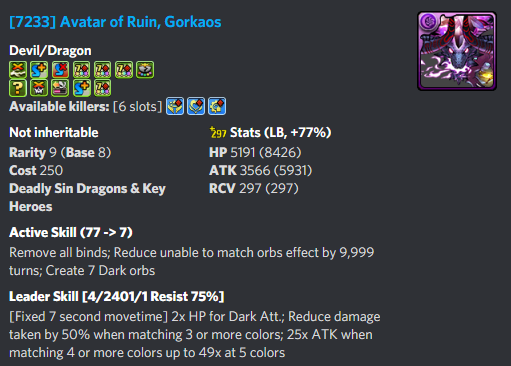
For the new Gorkaos to spawn, you need to have both Gorkaos and Gorfeis on your team with all the Cursed Keys inherited(the one on your friend’s lead does count). The new Gorkaos will drop as a gem, and you’ll need 5 of them to evolve a normal Gorkaos into this new one.
Gorkaos is an incredible rainbow lead. You are extremely tanky and have incredible damage. For the best results, ideally pair with a 7×6 lead, such as Dark Sophie[6586]. This lets you reach the 5 colors for the maximum damage output, but even the 25x at 4 colors is already enough to kill most spawns.
You also have strong offensive awakenings with the option to have super poison resist as a super awakening, or you can opt for more damage. Overall Gorkaos is just an incredibly powerful card. In base form it functions as a great sub for farming and traditional use, in evoed form functions as one of the best rainbow leads in the game.
Final Thoughts
If you made it here, congrats, this was a long article for a pretty content heavy event. Overall the SDKH event is quite powerful, however due to only receiving minor buffs for the most part, isn’t the best thing to roll for the average player. If you are however, chasing the 7 stars, buying the bundles would probably be enough if you already rolled a ton during the last run. You’d probably be better off saving stones for upcoming content, such as the Star Weaving Fairies Event, which I will be reviewing soon and will hopefully get out before the official debut. Thank you for reading!


