

Introduction
Creature Quest features 3 unique game play modes that should all be taken advantage of to make the most progress possible. In this article, I will be focusing on the PvP (player versus player) Dungeon Challenge mode from a offensive point of view to better help you tackle your opponent’s dungeons with greater consistency. I will be covering how Prestige and attacking works, basic team building compositions, and in-game strategies for playing through their dungeons.
This posting will be using knowledge/terminology previously discussed in my New Player’s Guide as well as Dungeon Defense Guide.
Video commentary
—video goes here–
—
What is the Dungeon Challenge?
Challenge Dungeons are the weekly PvP (player versus player) ladder. You are able to create a dungeon with your own various sized creatures and then use your Challenge Points to attack other players. Each offensive and defensive victory awards Prestige (points that correspond to your numerical ranking) while failed defenses lose Prestige. There is no penalty for failing an offense. To better facilitate fairer match-making, players are divided up into Gold, Silver, and Bronze tiers.
In addition to Prestige gains/losses, players are also able to acquire Energy as a reward so it can also be viewed as an additional source of Energy to continue playing in Quests or Battle Tower.
Players will be able to gain progression rewards as they achieve new Prestige milestones that include Gold, Gems, Diamonds, Tokens, and Diamond Idols.
At the end of the weekly event, your numerical score (based on Prestige level) will determine your final rewards that can include Legendary Creatures for the Gold tier. As such, it is well worth investing the time and effort to climb as much as possible.
Furthermore, by being in a Guild, you can reap additional end of week rewards as well as having a social aspect.
Goal for Dungeon offense
Naturally, you want to be able to muster a formidable offense to successfully defeat your rival’s Dungeon. Unlike the defense rates, offense tends to have significantly higher win percentages as you are able to preview their Dungeon and counter accordingly.
This means you will need to ideally have a deep pool of Creatures to draw from as each colour has an inherent weakness/advantage through the Colour Counter Flowchart.
How Prestige works
Prestige is the numerical points gained from successful offenses (and defenses) and the amount you can gain is based on the difference in Prestige between yourself and opponent and is calculated by the following formula:
Opponent’s Prestige / Your Prestige * 100
Thus, successfully defeating an opponent of a higher Prestige level will yield greater than 100 Prestige. This is important as you wish to try and attack players that are higher than you (provided you can win) as you will have greater gains per Challenge Orb spent. In addition, being Revenged will still yield less Prestige for them and will make you have a net gain.
Just bear in mind that a failed defense will result in a loss in Prestige while a failed offense has no penalty.
The Revenge System
Whenever you attack an opponent (win or lose), you will be placed on their Revenge list. Normally you are only able to see 3 targets that change with every attack. However, the Revenge list is a separate pool you can choose from that is available for 24 hours. Attacking via Revenge will not place you on their list.
This is an important concept to understand because every time you attack someone, you may be attacked back. As such, you should be conscious of your Prestige levels as attacking an opponent that is lower who has the capacity of beating your Dungeon will result in a net loss of Prestige for you.
Furthermore, trying to limit your attacks to those on your Revenge list will help minimize the number of people who can attack your Dungeon as Revenge attacks will not place you on their list.
With this in mind, I try my best to always clean up my Revenge List unless a particularly lucrative target appears on my 3-person list.
End of week/tournament frenzy
Generally speaking, the final day/hours of the weekly Dungeon Challenge has the most movement in terms of player activity. This is because people wish to secure their final rankings for desirable prizes.
Furthermore, due to the fact that offense win rates are significantly higher than defense rates, you want to minimize your appearance on as many lists as possible. This means you should try to limit your attacks to Revenges outside of exceptionally high value targets.
Doing this will help prevent players from attacking you, even if it means you will be gaining less Prestige per win (ie. under 100).
Choosing an opponent
Your first goal of each offense is securing a victory and even though you can fail an offense without penalty, it is not ideal as you will be most likely Revenged afterwards.
For the most part, you want to try and attack either someone who has higher Prestige or someone who you know cannot Revenge you back. Once an appropriate target has been found, you should inspect their Dungeon to better plan your offense.
Inspecting your opponent’s Dungeon will help guide you in terms of what colour your team should be, finding any potential weak points, and threats that may require specific counters.
Colour Counter Flowchart
Creature Quest utilizes an elaborate rock/paper/scissors gameplay that helps ensure no one team/Creature reigns supreme as they will have natural counters due to colour weaknesses. The following Colour Counter Flowchart can be accessed in-game via the Question Mark button:

It is crucial you understand this as the best Dungeons feature mono/bi-colour floors that will trump specific compositions. This is most prominent on floor 1 when you have 0 mana and are vulnerable to their Creature’s abilities.
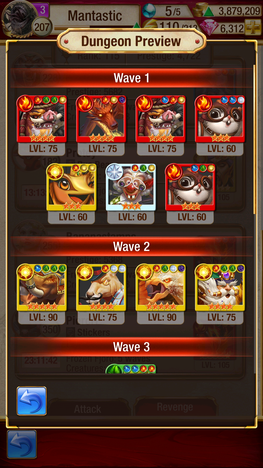
For example, it would be disastrous to bring a wood Creature against this dungeon as the gaggle of high combo dot fire spawns will burn you to a crisp. Furthermore, if you were planning on bring a water-heavy team to counter floor 1, you must be prepared for the following floor.
Finding weak points
Weak points can be either underleveled, non-evolved, innapproriate sized, or non-awoken Creatures. This will vary across Gold, Silver, and Bronze tiers and it is mostly a matter of spotting any potential gaps in their defense. If such a weak point is discovered, you can either kill it immediately, save it for later, or use a particular Creature to build additional mana when killing it.
Generally speaking, Floor 1 will be the most challenging and you should try your best to have Creatures that are not colour-vulnerable to better ensure they survive.
As such, it may be advantageous to have two different teams for Offense that have an absence of a particular colour to avoid a lethal Floor 1.
Common colour floors
From my own experience, the most common mono-colour floors in Gold tend to be Electric (yellow) and Fire (red). This is because these two elements hold some of the strongest single target nukes while attempting to counter the common (and overly powerful) Green Giant and commonly seen water Siren.
Inspect their bosses
Generally speaking, you can nuke down a boss with relative ease provided you land your stun/silence; however, you should still be aware of what you are fighting.
This has most applications when your nukes are elementally resisted as it may lead to the inability to actually kill. Another point to consider is the levels of their bosses as this can correspond to their LUK value and their chance to resist your disables.
Other things to look out for are bosses with counterattack abilities or a Phoenix. Counterattacks can ruin your synergy as these mechanics are triggered whenever you land a Special Ability. On the other hand, a Phoenix places a lethal DoT while being able to self-resurrect and heal. Naturally, the easiest counter is to use a a cleanse to remove the burn, but you are still able to burst down with the right composition.
From my own experience, the strongest defenders (in no particular order) are Green Giant, Sandworm, Phoenix, and possibly the VIP8 Angel.
Building your team
Naturally, everyone has different tools to work with and sometimes you may have to work with the tools you are simply given. However, there are some points to consider to help improve your chances of success provided you have some Creatures to work with.
Bring a mixture of Special Abilities
Creature Quest has a wide array of Special Abilities to choose from, but you should try your best to bring some diversity as you cannot simply stack the same type throughout your whole team.
Loosely speaking, we can group Special Abilities into several categories that can be either Single Target (ST) or Area of Effect (AoE):
- Stun
- Silence
- Primary healer
- Off-healer
- Debuff
- Buff
- Burst Damage
While these are distinct categories, many Creatures have overlapping features that combine several elements from the above list.
Stuns
Stuns are the most common form of Crowd Control (CC) that disables an opposing Creature by increasing the number of turns until they can attack. For example, if the opposing Creature will attack in 2 turns and you apply a 4 turn stun, they will have 4 turns added to this timer (future turns will not have the additional delay).
This is crucial for dealing with Bosses as you need to have several turns to combo your Creatures to deal sufficient damage.
You cannot reapply a stun to a Creature until they are able to take their turn so you either burst them down during this period of vulnerability or layer a Silence as well as you can have both active at the same time.
For Dungeon Challenges, you must bring at least 1, but ideally 2 Stuns/Silences in case one of them fails to land.
Silences
Silences tend to be a bit more rare than Stuns and are the other form of form of Crowd Control (CC) available in Creature Quest. Silences work a little differently in that they do not add additional turns to the timer, but instead prevent a Creature from casting their Speical Ability for X number of turns.
Thus, when a Creature is Silenced, they will take their turn as usual, but will be forced to cast their Basic Attack instead. Basic Attacks are less dangerous than Special Abilities and will provide you time to set up your combos for your own burst.
Like stuns, you cannot chain Silences and must wait for the opposing Creature to cast their Special Ability before they can be re-silenced. However, you can both Silence and Stun a Creature. This is particularity effective as you can reapply the Stun after the Creature casts a Basic Attack which further prolongs this period of safety.
For Dungeon Challenges, you must bring at least 1, but ideally 2 Stuns/Silences in case one of them fails to land.
Primary Healers
Primary Healers sole role is to restore HP to your team in order to help you sustain through longer fights. They have limited offensive capabilities and are purely a support role. However, they have the greatest potential to keep your team topped off along with often bringing a Cleanse.
Cleanse is invaluable as it removes X number of debuffs from each Creatures and this includes Silence, Stun, DoTs, etc. This can help retain your combo synergy or can easily save someone from dying.
Unfortunately, Primary Healers tend to be more fragile than regular cards and will be unable to contribute meaningful damage. Their biggest hurdle is surviving the first floor as they tend to be most vulnerable with their lower HP/DEF stats.
Generally speaking, you will want to have at least one form of health restoring abilities on your team.
Off-healers
Off-healers are cards who can function as a lesser healer, but bring more to the table than just an HP restoring Special Ability. Off-healers will be able to provide some healing, but they tend to have other forms of utility or damage alongside. Furthermore, these Creatures tend to be significantly more durable and are able to withstand incoming damage and are more likely to survive Floor 1.
In addition, some Creatures have a build in healing component that can sometimes spread to allies when awoken.
Depending on the Dungeon you plan to attack, you could get away with an off-healer or two. However, you still should have some form of sustain available on your team.
Finally, these types of healers should try and combo for 8x in order to heal a meaningful amount as they tend to have lower base healing values.
Debuff
Special Abilities that apply a debuff will either lower their PWR, ATK, DEF, LUK, or apply a Damage over Time (DoT). Generally speaking, debuffing their LUK is the most important as it will enable to land your Stuns and Silences with ease. However, this is not always required and does no good if the Boss is going to attack right away.
DoTs tend to be lackluster in Dungeon Challenges as you want to burst and kill things quickly and are better suited for PVE where encounters have significantly more HP and take longer to kill.
Buff
Buffs do the reverse of Debuffs in that they improve the stats for your team or provide Mend. These augmented stats can be amazing for dealing more damage, landing Stuns/Silences, and Mend can be almost thought of as a pseudo heal.
Mend will cause all of your Creatures to heal for X amount of health each time they attack. However, this tends to be better suited for PVE as you tend to grind and dance with floors for much longer than in Dungeon Challenges.
Burst Damage
While most Special Abilities have secondary features, some are more skewed towards dealing as much damage as possible. These Creatures are your heavy-hitters and should be the ones you use to combo with for higher damage.
While they often lack collateral benefits, being able to instantly burst down a Boss is vital to success and you will often build your team around your hard hitters/4 dot Creatures. These are the Creatures you want to have 8x or 16x multipliers.
However, one point to consider is using White or Black Creatures for Burst Damage. This is because they do not have any weakness that reduces their output unlike Red, Blue, Green, and Yellow Creatures which helps ensure you do sufficient damage against any Boss.
Team building summary
You should bring 1-2 Silences/Stuns, one form of healing, and one hard burst nuke as a general rule of thumb.
Depending on how overpowering your team is, you may need to make adjustments based on the strength/colours of your opponent’s Floor 1.
Floor 1 is where most battles are decided as it is the most likely place you will lose a Creature as you have 0 mana and are more vulnerable to Special Abilities. If at all possible, try to shift your team away from which ever colour is particularly vulnerable while retaining the core set of Special Abilities.
Conclusion
The Dungeon Challenge is one of the most exciting aspects of Creature Quest as it provides countless replay value as you can work towards exciting rewards every week.
By being able to intelligently choose an opponent, build a competent team, and understanding the Revenge system will be your keys to success for gaining Prestige every week.
Happy Questing!

When choosing an opponent, if you don’t like first the 3 offered, you can click on the yellow circle arrow thing and three more appear. They stick for 5 minutes.
LikeLike
If you need a code use mine:
DMTY25jhc
LikeLike
Do you still recommend waiting for an event to diamond summon?
LikeLike
It is still best to wait
LikeLiked by 1 person