WetTheSystem inspired me to make this, as he doesn’t have Ultraman Leo. He made me realize Xmas Xiahou Dun is actually “copium” Leo. After a few tries at the team he conceded, “NO THIS IS IMPOSSIBLE” so I was like, “IS THAT A CHALLENGE? >:)”
Thus, I stumbled upon Shin Ultraman’s wild mechanic coverage and decent damage output which tied everything together. I made the team and both of us tested it until completion on WetTheSystem’s stream. Inspiration taken from the usual Leo ShivaDra MD2 template.
Ultimate Arena/Alts (A/AA): (PADx Archive, click the link under “Dungeons” to access each arena) A1-A6: PADx Archive A1-A6 AA1-AA4: PADx Archive AA1-AA4
Ultimate Descended Rush! – Gathering of Talents 3 (GoT3): In Progress(?)
AMD3 is an alternate version of the third entry into the Mysterious Dimension series in the Technical Dungeon section of Puzzle and Dragons. MD3 was famous for its high difficulty on release is still considered to be the most difficult dungeon in PAD. AMD3 was released on September 2nd, 2022 and is associated with the second run of the Peacock Title Challenge. Credits to Toes T. Toes for the Floor Description.
HP Thresholds: It is notable that while you still need a massive shield for DYurisha, Seina is no longer in the dungeon! This means that you don’t need to strive for the ~1.3M mark needed to survive Seina’s multiple hits.
R: Fire, B: Water, G: Wood, L: Light, D: Dark, H: Heart, J: Jammer, P: Poison Rows: Counted from top to bottom, Columns: Counted from left to right TE: Movement Time, RCV: Recovery, Gen: generation, NoSF: No Skyfall
ASR3 is an alternate version of the third entry into the Shura’s Realm (Illusory World of Carnage) series in the Technical Dungeon section of Puzzle and Dragons. ASR3 was released on July 21st, 2022 and is associated with the second run of the Spacetime Title Challenge. Credits to Toes T. Toes for the Floor Description.
R: Fire, B: Water, G: Wood, L: Light, D: Dark, H: Heart, J: Jammer, P: Poison Rows: Counted from top to bottom, Columns: Counted from left to right TE: Movement Time, RCV: Recovery, Gen: generation, NoSF: No Skyfall
F1: Super Carbuncles (5 Spawns)
Super Red Carbuncle: 3.125B HP, 15M DEF, 1T Timer, R/x, Healer
50% resolve
Preemptive: 15T skill bind
Moveset:
T1-14: 160,800 DMG (2 hits)
T15+: change to random attribute, 12,684,000 DMG
When 1 spawn remains: enrage to 999T 900% DMG
T15+ when 1 spawn remains: change to random attribute, 5,628,000 DMG (7 hits)
Super Blue Carbuncle: 3.125B HP, 15M DEF, 1T Timer, B/x, Healer
50% resolve
Preemptive: 20T full team bind
Moveset:
T1-14: 160,800 DMG (2 hits)
T15+: change to random attribute, 12,684,000 DMG
When 1 spawn remains: enrage to 999T 900% DMG
T15+ when 1 spawn remains: change to random attribute, 5,628,000 DMG (7 hits)
Super Green Carbuncle: 3.125B HP, 15M DEF, 1T Timer, G/x, Healer
50% resolve
Preemptive: 5T top row tape
Moveset:
T1-14: 160,800 DMG (2 hits)
T15+: change to random attribute, 12,684,000 DMG
When 1 spawn remains: enrage to 999T 900% DMG
T15+ when 1 spawn remains: change to random attribute, 5,628,000 DMG (7 hits)
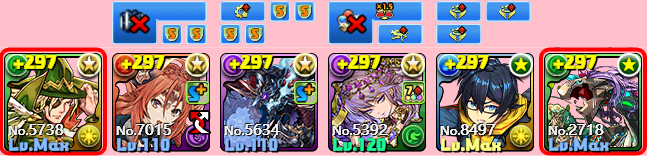
This won’t be a dungeon guide, as much as it will be a team template. The checklist of mechanics in this dungeon is pretty short. Follow-up Attack, Color absorb, Jammer Skyfall and Damage Absorb are all present on the first couple floors, then Odin Dragon hits hard and makes you a full rainbow/Jammer, Poison/hearts board. Realistically nothing that you can’t actually clear with the two fixed leads you are forced to use (Story Odin x Gaia Dragon). The issue is that should you want to farm this, whether for skill-ups on Odin’s new (Very strong) equip, or Odin Dragon himself, it is going to be a very painful and long process without some specific set-ups. A warning in advance, these teams are not very free-to-play friendly, and will often require the presence of at least Todo or Macha. The combination of the double fixed leads AND no assists, is just not very forgiving to team building. This is the Skyozora Link should you need it.
https://www.youtube.com/watch?v=U5hWbfA0mhE Latents are not shown in the video, but I have tested the team myself, and what is pictured is what is necessary. Daytona, as always is likely your fastest/easiest option, what else is new?
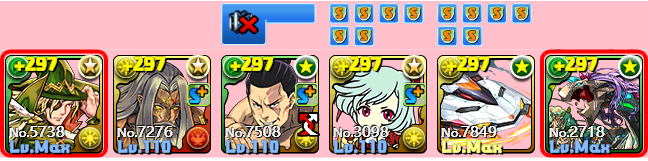
https://www.youtube.com/watch?v=l0STW2Lozcc This is likely the most free-to-play team you can get away with in this dungeon. If you can use literally any other team from earlier on this list I recommend that instead. This is not easy, and it’s very slow compared to the others (nearly 3-4 times the clear speed and difficulty)
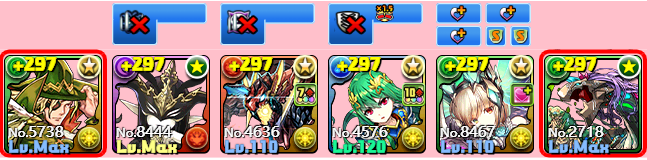
https://www.youtube.com/watch?v=OM1gOMAzkJ0 Another much slower clear than the first 2. This one however, is still fairly easy, just due to the bulk and overall damage of the team.
Enjoy, and feel free to ask in our Discord (linked above) should you need any clarification from me.
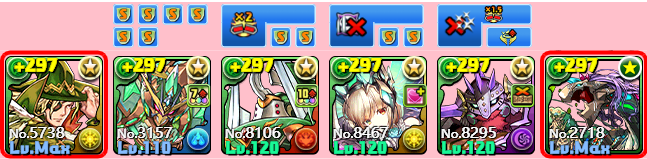
With the advent of Academy Tokugawa and Academy Ina, a new, powerful MD3 team has entered the fray. By taking advantage of non-transforming leaders, this team mitigates the danger of stalling to transform Atori or Raphine. Additionally, it takes advantage of high eHP and ease of stalling to make TF Yurisha and Seina manageable. While the team is relatively safe with copious amounts of movetime and high durability, it suffers from a tedious and slow playstyle that is highly contingent on cheesing Raphine’s spinner and matching precise boards for clean one shots. Though the sub slots are highly inflexible, most of these equips can be easily substituted. Whether you’re looking for safe MD3 clears or a simple one-and-done, this build will do the job.
Build Notes
Build assumes rainbow solves with dark bricks unless otherwise noted. Additional notes indicate extensions of rainbow solves except for F3 and F4. Lead with Baran for a 7×6 board. Stall for Tokugawa as needed. Stalling without a dark brick requires 10-11 connected dark orbs. System Raphine and HChakeol after F6 and F7 respectively. Certain floor sequences must be followed precisely to maintain systems for orb generation while countering debuffs.
HP Thresholds:
52,813 with awakenings
52,376 without awakenings
Potential Replacements:
Bonta-Kun: leader swap
Saitama: SB and long CD, preferably with team HP and/or RCV and poison resist
Orochi: cross, preferably with team HP and/or RCV and poison resist
Tsukuyomi: NY Tsukuyomi, Myr
Kiyosumi: delay, preferably with team HP and/or RCV and poison resist
Ultraseven: HInahime’s Club, Shusuke’s Article, HMadoo’s Hat
Floor Guide
Use Bonta-Kun and transform Raphine T1. Match a minimum of 10 connected dark orbs and 10 combos over 2T to kill.
Use Okuninushi to clear the potential awoken bind and avoid Saitama overcharge. Use Tsukuyomi to create a long term time buff. Kill over 2T.
Use Ultraseven to buy time for debuff clears. Match 2 red or dark crosses, a light or dark TPA, and a light or dark L. Kill over 3T, with the first turn spent clearing debuffs.
Stall 2T, matching 10-11 dark orbs without 10c. Use Kiyosumi and Tokugawa. Bring the Phoenix to super resolve in 1T. Transform Raphine. Stall 2T, then use Raphine again. Stall 1T, then kill all spawns.
Use Tokugawa and one shot with rainbow activation.
Use Raphine T1 to begin system and overwrite Horus’ debuff if he appears. Use Okuninushi if Ra appears. One shot with rainbow activation.
If Ruel spawns, use HChakeol to unlock. Stall 1T for Tokugawa. Use Tokugawa and kill by matching a light TPA or an additional dark combo.
If Rozuel spawns, use HChakeol and kill by matching a light TPA or an additional dark combo.
If Famiel spawns, use HChakeol, stall 1T for Tokugawa. Use Tokugawa and kill by matching an additional dark combo.
For all spawns, stall until Okuninushi is 2T away from charged and Raphine is 1T away from charged.
If Uriel spawns, use Tokugawa and kill by matching a light TPA and an additional dark combo.
If Gabriel spawns, use Tokugawa and kill by matching a light TPA, an additional dark combo, and either a water TPA or a wood TPA.
If Michael spawns, use Tokugawa and kill by matching a light TPA and an additional dark combo.
If Raphael spawns, use Raphine and kill by matching a light TPA, an additional dark combo, an additional light combo.
If Lucifer spawns, use Ultraseven to counter his full heart board and his 50% moveset. Spend T1 clearing the board, kill over the next 2T.
If Baal spawns, match an additional dark TPA to clear light unmatchable.
If Sarasvati spawns, use Okuninushi and kill by matching 2 light TPAs, and an additional dark combo. Either one light TPA or the additional dark combo must be substituted with an L of the corresponding color.
If Astaroth spawns, bring her to super resolve. Be cautious of bringing her to super resolve when you have 1T spinners as this will render her puzzle impossible. Clear her puzzle by spinning away the poisons in the two leftmost and two rightmost columns. Leave the connected poisons in place to match.
If Pandora spawns, stall 1T if needed for Tokugawa. Use Tokugawa and kill by matching a light TPA and either an additional light combo or an additional dark combo.
If Krishna spawns, use Baran or Kiyosumi to void her absorption shield and either Ina or Raphine to clear the time debuff.
If Vishnu spawns, use Okuninushi T1 to delay shield. Stall until his absorb shield lowers to ensure Okuninushi is ready by F14 T2.
If Belial spawns, use Ina or Raphine to clear the time debuff.
If Amon spawns, shield T1. Chip him T2 with minimal activation, then kill on T3.
If Seina spawns, ensure you heal to full while she is enraged. Use Tokugawa T1 to chip, then use Ina T2, Raphine T3, and Ina T4. She should be killable in one shot after her void shield lowers. Alternatively, one shot her T1 by matching 5 light TPAs, a fire combo, a water combo, a dark TPA, and a dark brick.
If Ryumei spawns, make either a light L or a dark L T1 to unlock and kill over 2T. Alternatively, one shot him by matching 5 light TPAs, a fire combo, a water combo, a dark TPA, and a dark brick.
If Mikage spawns, make either a red cross or a dark cross T1 and kill over 2T. Alternatively, one shot him by matching 3 light TPAs, 2 fire combos, 2 water combos, 2 dark combos, and a dark brick.
If Uvo Sara spawns, use Okuninushi to clear awoken bind and kill over 2T.
If BSara spawns, chip her T1, then use Tokugawa and kill T2.
If LSara spawns, use Okuninushi or Kiyosumi and kill her over the following 8T. Stalling the full 8T is not necessary.
Make either a red cross or a dark cross T1. Kill over 4T.
If TF Yurisha spawns, stall for Ultraseven by piercing her void sparingly. Use Ultraseven the turn you bring TF Yurisha to super resolve. Mind her 5% execute.
If GYurisha spawns, maximize damage by matching additional dark combos and light TPAs. Kill over 12T.
MD4 is the fourth entry into the Mysterious Dimension series in the Technical Dungeon section of Puzzle and Dragons. It was released on May 6th, 2022 and is associated with the Zeroth Title Challenge. Credits to Toes T. Toes and ShadowInfinity99 for the Floor Description.
HP Thresholds: Soft check: 10% gravity+850,010 DMG, Hard check: 1,275,015 DMG
R: Fire, B: Water, G: Wood, L: Light, D: Dark, H: Heart, J: Jammer, P: Poison Rows: Counted from top to bottom, Columns: Counted from left to right TE: Movement Time, RCV: Recovery, Gen: generation, NoSF: No Skyfall
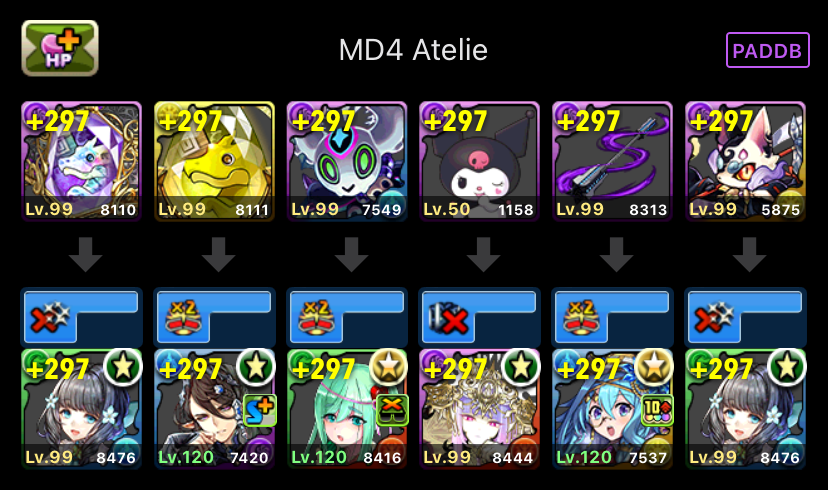
DFagan, VAstraea, and GValeria are flexible equips that provide 1 SB, 60% blind, 100% jammer, and enough HP to achieve the threshold of 85,001 HP (Sakuya > Kanna). Alternative equips include Minerva, BYog, and other combinations. Jammer resist is optimal but optional.
F1: Super Enhance Dragons
Transform both Raphines
Use Feygoran and Gojo
Single target and kill the Super Gold Dragon within 2T
Chip the remaining Super Enhance Dragons, spending 5-6T on F1
F2: Super Ogres
Transform Melty
Single target and kill the Super Wood Samurai Ogre
Transform one Raphine
Kill the Super Blazing Ice Ogre
F3: Super Fighters
Transform Raphine
Dark mass attack
F4: Super Shieldras
Use NY Reeche and Feygoran
Dark mass attack
F5: Super Slimes and Super Volcano Dragon
Single target the Super Volcano Dragon and bring to super resolve
Dark mass attack
F6: Chinese Celestials RBG
All spawns are killed by activating
F7: Mega Awoken Sonia
All spawns are killed by activating
F8: Japanese Pantheon 1 and Indian Pantheon 1
Use Gojo to counter each preemptive
Full combo Hino’s board
Full combo Orochi’s board, then full combo his second board
Activate off Indra’s board
Make two dark crosses on Vritra’s board, then activate on T2
F9: Dragonbounds
Kill Ryune with a 1R/1B/2G/2L/1D/1H solve
Kill Sylvie with a 1R/1B/1G/2L/1D/1H solve
Kill Typhon by activating
F10: Divinities 1
Aten
Use Raphine
Bring to super resolve
Use DFagan and Amaj, stall 1T
Kill by activating
Lucifer
Kill by activating
Eschamali
Kill by activating
F11: Chinese Celestials LD
Sakuya
Use Raphine and NY Reeche
Heal to full to survive Sakuya > Kanna interaction
Haku
Use NY Reeche, make 1 R/D cross
F12: Divinities 2
Dantalion
Make 1 R/D cross
Scheat
Use DAten
Kanna
Use DAten
F13: Divinities 3
Kamimusubi
Use Feygoran
Kill in 2 shots
Macha
Kill by activating
Morrigu
Kill by activating
Yog Sothoth
Kill Yog with a 2R/1B/3G/1L/1D/1H solve
F14: One Born From Chaos
Make 4 R/D crosses over 3T
Kill by T4
F15: One That Writhes In the Void
Kill within 6T, match extra B/G/L to increase damage
F16: Zeroth Dimension Creator, Big Bang
Heal to full before 50%
Have Feygoran/NY Reeche/VAstraea/Gojo ready for the full dark board
note: if raffine is mentioned its for fixing a time debuff otherwise system her
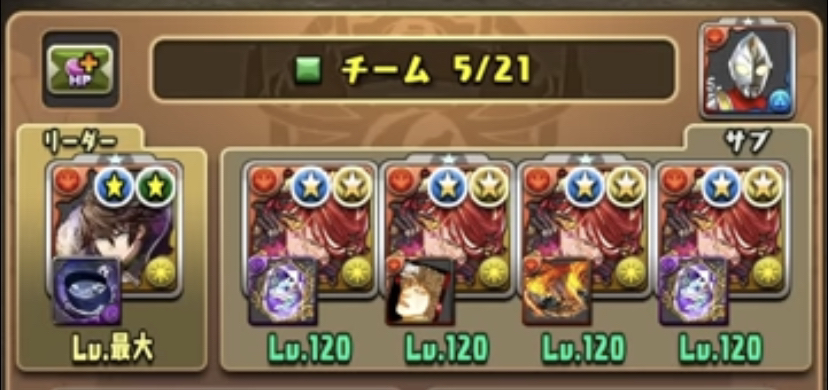
f1: belial > raffine > 2T stall > 5dra > 2T stall > Atelies f2: amaj f3: raffine f4: blalbrecht > stall if needed > akine f5: atelie f6(Karin): atelie f7: no comment f8(hino): atelie f8(orochi): atelie f8(vritra): atelie/akine > 2 B/L crosses > BCecilia if needed f9(ryune): stall if needed > atelie f9(sylvie): keep in mind spinner spam f10(aten): atelie > break SR > amakozumi > 10dra > atelie f10(lucifer): atelie/akine f10(NOTE): CHECK AKINE COOLDOWN and burn if it overcharges next floor f11(sakuya): rafine > atelie > 1 B/D L-unlock (not optional) f11(haku): akine > kill with one B/L cross f12(dantalion): 1 B/L cross f12(scheat): atelie f12(kanna): atelie/akine f13(yog sothoth): bcecilia > atelie f14: 4 B/L crosses > kill on final countdown turn f15: burn down within 6 turns f16: T1 unlock, use Amaj before knocking to 50%. Keep in mind spinner troll chance during >50% phase and guaranteed spinners for 50%.
Build assumes 9TPA boards Pre-xform HP threshold: 45,627 Post-xform HP threshold: 65,626
Thanks to mopad for providing this and the floor breakdown translation. View the original Twitter post here: JPN Antares MD4 System
How to System: Avan > Antares
Can also cycle Tsukamoto
Assume 10c total for each match unless specified
Match1: Brick Red
Match2: Brick Red + Box Light
Match3: Brick Red + Brick Light
Stall: Antares: min combo (or combo to gather orbs), 5to11-match Red May need to cycle Tsukamoto during stall or just cycle all the time Stall as necessary to return to system or gather the correct orbs Can cover tape with Bride Trailokya equip instead of Metatron
F8: HinoKagutsuchi? Match2 Orochi? Match2 then Match1 Indra? 2 turns of Antares: Swipe (Have Tsukamoto’s shield up before swiping the 1st full board) Vritra? Have Tsukamoto’s shield up before swiping the full board Match2
F9: Ryune? Match2 then Match1 Sylvie? Match2 Typhon? 2 turns of Antares: Swipe then Match1 (Have Tsukamoto’s shield up before swiping the 2nd full board)
F10: Aten? Match2 then Match1 then Match1 Lucifer? Match1 then Game then Match1? Eschamali? Match1 then Match2
F11: Match2 for both spawns
F12: Have Tsukamoto’s shield up before killing the floor Dantalion? Match2 Scheat? Match1 then Match2 Kanna? Match1 then stall 1 turn then Match2
F13: Cycle Tsukamoto on this floor to survive Macha? Match2 then Match2 Changed to Blue on the supposed kill turn? Stall then Match2 Else? Match2 then Match2
F14: Match2 then Match1 then Match1 then stall 1turn then Match3 The killing match helps produce combo orbs for next floor
F15: The following chart shows how much damage you do on each turn with Match1 or Match2. Any combination of those matches that add to 100% should kill. Assumes only the minimum combos necessary to pass the combo shields Shield | 95% | 90% | 85% | 80% | 75% | Match1 | 4.0% 8.1% (12.1%|16.0%|19.8%|| Match2 | 8.3%|16.5%(24.6%|32.5%|40.3%| Have Tsukamoto’s shield up after the 85% shield turn
F16: Match1 does 5.0% of HP and Match2 does 12.1% of HP Cycle Tsukamoto
Thank you Tsubaki Bot for the image card sources! Art and icons are owned by GungHo Online Entertainment, Inc. For now, only Colosseum 4 is listed. Shoot WetTheSystem a DM if interested in early Colosseum write-ups.