

Introduction
The REMDra Fever part 4 continues the trend of these special Ranking Dungeons for North American players. These events can allow players to achieve a Crown by simply hitting the cap of 999,999 points along with lucrative rewards along the way. With that being said, it will take numerous runs to achieve but will be faster this time around due to the 7×6 board but one can still augment their scores by following the strategies outlined in this article.
With that being said, the dungeon is profitable to run over and over again as it only costs 30 stamina and offers valuable drops. Furthermore, any number of players can achieve a Crown and is not only given to the first X number of players to hit 999,999.
This article will explain the rules for REMDra Fever and how to maximize your score potential.
4th REMDra Fever Event: 7/26 (Fri) 12am ~ 7/28 (Sun) 11:59pm (UTC-8)
Video commentary/clear
–video coming soon–
Scoring system
The REMDra Fever Ranking Tournament values players in significantly different ways and we must alter our play style accordingly.
In essence, you score points for higher combo count but this is multiplied by the level you have achieved. You start the dungeon at level one and have to clear a certain number of orbs to advance to the next. This orb count increases with each level but is not tied to combo count, only orbs erased. Thus, a match of 6 vs two 3-orb combos yields the same level progress.
In addition to this scaling level count, players also have to erase 35 orbs of a specific colour (Red, Yellow, or Green) to clear the dungeon which is based on the colour of the spawn. Failing to do so will result in a loss and all points earned that round will be forfeit; however, clearing too many of these orbs on lower levels will result in a premature conclusion and fewer points overall. You need to clear orbs of that specific colour to finish the dungeon but should try your best to avoid matching them in the early levels.
Furthermore, we have a new type of timer that continuously ticks down at an increasing rate the higher level you go. Leveling up fully replenishes the timer but matching heart orbs will also “heal” some of it back. With this in mind, it is best to try and level up as much as possible while avoiding the specific 35 orbs you need to end the dungeon.
Finally, all active skills are charged upon entering the dungeon but can only be used once. Be aware that using actives will not halt the timer progress so make sure you can actually solve after converting.
Strategies
Taking all of the above points into consideration, there are several key aspects to consider:
- Level up as much as possible
- Pay attention to the number of orbs required
- 1 combo to level up
- You can even 0 combo to set up board/move orbs
- Score is greatly enhanced with higher levels
- Avoid matching the specific colour
- No bonus points for matching this colour
- Move them to bottom of board without comboing
- Use specific orb changers to remove them
- High combos at higher levels = more points
This sounds relatively simple but is much harder in practice due to the convoluted nature of this event. With that being said, you want to try your very best to avoid matching any of the designated colour for as long as possible. Doing so will prolong your run which inevitably leads to a higher score as you should have reached level 4+.
For the most part, I try to only max combo the board (and thus matching the key colour) at level 4/5. With this in mind and the greatly enhanced chance for skyfalls should enable players to finish much faster compared to the third event.
Orb changers
We are given 6 cards with orb changers but only several are of value and the ones you will be using will depend on the spawn in the dungeon. Essentially, the colour of the REMDra you encounter will determine which colour is required to kill it/end the run. You can think of this as “health” as it requires 35 orbs to kill.
With this in mind, you want to actively use orb changers who remove that specific colour. Doing so will allow you to level up more as you are prolonging the death of the REMDra. Just be aware that if you fail to match 40 of those orbs, you will die and score 0 for that run.
Furthermore. you cannot use any active skill more than once per attempt but all start fully charged up. I am only showing relevant orbs being generated to make reference easier.
REMDra Fever Active Usage – Part 4 |
|||
REMDra spawn |
Use First |
Use Second |
Use Last |
 |
 All |
 |
 All |
 |
All |
 |
All |
 |
All |
 |
All |
During the first few levels, it is best to try and hoard/save the REMDra colour’s orb near the bottom of the board and then use Dark Kali in any order to soft reset the board. This will still produce the problematic colour but there should be less of them. It is possible to use both Kalis but I feel the time constraints make it risky and you already have two other orb changers.
Continue to hoard orbs near the bottom and use the Third orb changer when it becomes too flooded. This will result in non-problematic orb board and can be easily solved.
At this point you will probably be combo-ing like normal but still retaining Zeus Mercury who will create a full board of Water orbs. I would suggest using him after a higher Level Up to guarantee 42 orbs cleared (with no problematic colour) which should make great progress towards the next Level and takes hardly any solve time. One interesting thing you can do against the Wood or Light REMDra is to use Akechi after Zeus Mercury to get a full board of Hearts which will replenish your timer.
Cascading & special timer
The REMDra Fever Ranking Dungeon features a different timer that does not move/tick down while orbs are comboing/falling into place. As a result, cascading becomes significantly more appealing as it helps promote additional combos being made.
In essence, Cascading is the art of having combos fall into place at a staggered rate. While this process takes more time overall, it gives additional chances for combos to skyfall into place and we are not punished for this type of animation time.
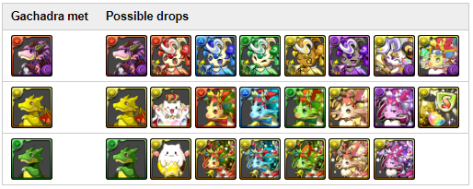
Lucrative rewards
Alongside the chance of securing a Crown, the REMDra Fever Ranking Dungeon has lucrative clear rewards and is essentially the most efficient way to acquire valuable drops. Every run will also yield a drop of some kind and value often exceeds the 30 stamina cost to enter. As such, I highly encourage you to play this dungeon for the clear rewards alone.
The following compiled image is courtesy of Miru Bot on Discord:
Conclusion
The REMDra Fever Ranking Dungeon places a new twist on Ranking Dungeons and gives all players to secure a Crown by repeatedly clearing the dungeon. Your scores are cumulative and acquiring 999,999 total points will guarantee you a Crown. Furthermore, the clear rewards are quite lucrative and provides additional motivation for playing this event.
In theory, all players can secure a Crown but being able to have a higher average score will accomplish this at a faster rate. Thus, using the above tips and tricks can cut down on time and stamina costs for securing your desired score. With that being said, the 7×6 board along with numerous orb changers should result in significantly higher average scores for most players.
Let me know how you feel about this event in the comments below.
Happy Puzzling!
If you enjoy my content, please consider turning off AdBlocker for this website. If you wish to support me directly, please consider clicking the beautiful image down below.


Hello Mantastic, thank you for the advice i was able To clear the 3th Challenge for a crown and i m close To get another one in this here. What do you think about Traiding all the Rainbow medals that you achieve for Blue athena since she is in the Monster exchange shop.
Have a nice day!
LikeLike
Thanks for the advice!
It was much easier round to crown, I managed to do it within a day with about 2-3 stamina bars (397 stam), which included chaining rank ups at Alt Arena 1. As of this post we also just reached the extra server wide goal – here’s hoping there will be another one for fun 🙂
Got my 4th DMeta though -_-“
LikeLike