

Introduction
The GungHo Collab returns to North America once again but this time at a much later date relative to the JP server. This has significant Powercreep consequences as this event took around 4 months to arrive instead of the normal 2. I want to stress that the 2 month window for JP content is a guesstimate as nothing is guaranteed but being delayed by 2 additional months makes many of these cards feel “dead on arrival.”
To make make matter worse, the Monster Hunter Collab has a simultaneous release with JP which means we got significantly stronger cards much earlier than expected. This in turn makes many of the GungHo cards laughable by comparison.
As such, I feel that this is a relatively lackluster/underwhelming event as there almost no value at the bottom rarity along with the 6 and 7-stars often being inferior to other available options. As such, this can be an easy event to skip from a rolling point of view and maybe using the Monster Exchange to acquire a key card for your Monster Box.
Finally, I want to mention that this event is home to three cards who have an 18 turn Leader Swap ability. Owning one of these cards will be valuable for late game players as it does open up Leader Swapping strategies for WoC2 / Rank EXP abuse. As such, the value of these cards heavily hinges on your current game progression and what other Leader Swap options are available. For players who cannot take advantage of Leader Swapping, these will be relatively average cards.
Video commentary
—video coming Monday—
Overview
GungHo Collab REM Pros & Cons – April 2021 |
|
Pros |
Cons |
|
|
GungHo Collab REM |
|
| 7 Star base (24.5% total) |
|
| 6 Star base (33.7% total) |
|
| 5 Star base (41.8% total) |
|
GungHo Collab – April 2021 |
|
| S | |
| A | |
| B | *( |
| C | |
| D | |
Order within each tier is random and not reflective of ranking
Icons show Base form except for the Leader Swap cards
*Owning one of these Leader Swapping cards from the GungHo Collab will be valuable for late game players as it does open up Leader Swapping strategies for WoC2 / Rank EXP abuse. As such, the value of these cards heavily hinges on your current game progression and what other Leader Swap options are available. For players who cannot take advantage of Leader Swapping, these will be relatively average cards.*
Regardless of card’s ranking, you should always keep it if it is your very first time acquiring them
Bottom rarity quick summary
The bottom rarity should be the main motivation to roll in an event and the following chart shows all the 5-star Rankings. In total, they comprise 40% of the rolling pool.
GungHo Collab REM Bottom Rarity (5*) REM Rankings – April 2021 |
|
| S | |
| A | |
| B | |
| C | |
| D | |
Limit Breaking
Limit Breaking is the process of leveling a card beyond level 99. This will unlock more weighted stats along with the potential to receive Super Awakenings. These additional awakenings can add significant power, but only function in solo mode or in 3-player coop.
Any card that can qualify for Limit Breaking will have their level displayed in blue and feeding a Super Snow Globe will push them beyond the level 99 cap.
You can read more about Super Awakenings HERE.
Monster Exchange
The Monster Exchange System has mostly eliminated the need to roll in most events as players can simply trade in for a card of their choice. This is often done during lackluster events to avoid spending Stones on poor bottom rarity cards or to snipe a specific card if luck is not on your side.
Due to the rate of new cards being released, care should be taken when considering a trade as you want to ensure you gain long term value.
Weapon Assists
Weapon Assists are a special evolution for select cards that will be used exclusively as inherits. This form retains the same base stats as the original form, but will also transfer over all awakenings on the Weapon Assist card and this occurs if the Awoken Assist ![]() is present.
is present.
My approach to Collab/Seasonal rolling
Rolling any Rare Egg Machine is a gamble and it becomes a matter of maximizing your rate of returns in an event.
This translates into rolling when the bottom rarity has high value as those will be the most common cards. Furthermore, I may utilize the Monster Exchange system to acquire the higher rarity cards if they will significantly advance my progress. As such, I tend to look most closely at the bottom rarity pool to determine if it is worth rolling in.
This is just my own personal approach and everyone has different goals/motivations so take this section with a grain of salt. If you wish to read about this more in greater detail, check out my other article HERE.
Reincarnated Evolution
A Reincarnated Evolution (Revo) grants up to 8 Latent slots and is often times a stronger overall card. Sadly, pursuing these forms will lock the monster in this state as they cannot be reversed. As such, only commit to a Revo if you 100% know you will get significant value from them right away.
7 Star base
 Sari (New) – A

Pros |
Cons |
|
|
Sari is the first new card within the GungHo Collab and has the potential to be a viable Cleric solution for mono Fire or Wood teams.
This is because she comes with the ability to clear 6 turns of Awoken Binds and Unable to Match effects while also generating 6 Fire and Wood orbs. Furthermore, she comes with Super Poison Resist ![]() and Enhanced Fire and Wood Combos
and Enhanced Fire and Wood Combos ![]()
![]() .
.
All of this sounds appealing but she is sadly outpaced by current options as Christmas Gremory ![]() has 2 more Skill Boosts
has 2 more Skill Boosts ![]() and FUA
and FUA ![]() for Seina. Furthermore, Gremory also has better HP and significantly higher RCV compared to Sari and does not mix colours on her Enhanced Combos. On the flip side, Fasca
for Seina. Furthermore, Gremory also has better HP and significantly higher RCV compared to Sari and does not mix colours on her Enhanced Combos. On the flip side, Fasca ![]() and Alynna
and Alynna ![]() are stronger Cleric options for Wood teams which leaves Sari in an awkward place.
are stronger Cleric options for Wood teams which leaves Sari in an awkward place.
She is not bad by any means but is outclassed by other options and makes me more hesitant to suggest Monster Exchanging for.
 Sari Uvo

Pros |
Cons |
|
|
 Weapon

Pros |
Cons |
|
|
Sari’s Weapon provides unique bulk via 2 Team HP ![]() and 2 Team RCV
and 2 Team RCV ![]() which can help teams achieve enough Effective Health to survive large hits. Furthermore, this Weapon provides 6 turns of Awoken Bind clear along with removing 6 turns of Unmatchable orbs.
which can help teams achieve enough Effective Health to survive large hits. Furthermore, this Weapon provides 6 turns of Awoken Bind clear along with removing 6 turns of Unmatchable orbs.
While this is a helpful active, there is a strong chance it may not be enough to counter the mechanics in a given dungeon such as the Ogre floor in WoC2. This is problematic as players will have to rely on a different solution for these mechanics which may just replace the usage of this Weapon.
 Lucy & Valkyrie Style (New) – A

Pros |
Cons |
|
|
Lucy’s Base form could have been valuable but she is held back by several problematic aspects. Firstly, her active skill does not remove Awoken Binds which is basically mandatory in almost any dungeon. This is a shame because she clears regular Binds and Unable to Match effects but players will still need to find a solution for Awoken Binds.
Furthermore, her high personal damage will be marred by not choosing Skill Boost Plus ![]() Super Awakening which in turn lowers her to 1. This makes it challenging to Transform or Leader Swap along with her 20% Jammer
Super Awakening which in turn lowers her to 1. This makes it challenging to Transform or Leader Swap along with her 20% Jammer ![]() , Poison
, Poison ![]() , and Blind
, and Blind ![]() Resist being outdated in 2021. A single Super Resist is 5x more efficient compared to one of these awakenings and Lucy is already relatively short on awakenings.
Resist being outdated in 2021. A single Super Resist is 5x more efficient compared to one of these awakenings and Lucy is already relatively short on awakenings.
Taking this into consideration, it would be best to pursue her Weapon Assist.
Finally, this is possibly one of the worst art works in the game for both the card and Weapon Assist.
 Weapon

Pros |
Cons |
|
|
Unlike their base form, Lucy’s Weapon can fully clear Awoken Binds which in turn makes them a fantastic solution as it provides Skill Boost ![]() , 2 OE
, 2 OE ![]() , and 20% Poison
, and 20% Poison ![]() and Blind
and Blind ![]() Resist which can combo with Samurai 3 Weapons.
Resist which can combo with Samurai 3 Weapons.
While all of this sounds appealing, Christmas Tamadra ![]() is a superior choice as they also provide Skill Boost but are much more efficient against the Ogres in WoC2 due the Delay aspect ensuring safety against the guaranteed 600,000 attack.
is a superior choice as they also provide Skill Boost but are much more efficient against the Ogres in WoC2 due the Delay aspect ensuring safety against the guaranteed 600,000 attack.
With that being said, Lucy’s Weapon can still be a viable solution as the Full Heal triggers after clearing the Binds so assuming you have enough Effective HP to tank 600,000, it does work.
As such, this Weapon’s value will hinge on whether or not you own Christmas Tamadra and it is a shame she cannot be Monster Exchanged for due to the Orb Skin status.
Orb Skin

 Guardian Goddess Minerva – C

Pros |
Cons |
|
|
It is difficult to find a meaningful usage for GH Minerva as she does not fulfil any particular niche well.
") Guardian Goddess Minerva (Dark Color)
Guardian Goddess Minerva (Dark Color)

Pros |
Cons |
|
|
 Weapon

Pros |
Cons |
|
|
 Lakshmi, Goddess of Fortune – S

Pros |
Cons |
|
|
GH Lakshmi’s Base form is a phenomenal Damage Solution for mono Fire teams assuming 10 combos can be reliably achieved every turn. This is due to her respectable ATK stat combined with double 10 Combo ![]() for 25x personal damage against any spawn while also being able to use any Killer latent. I have found this to be a significant boon in WoC2 where everything has huge amounts of Effective HP and she helps ensure everything dies with relative ease.
for 25x personal damage against any spawn while also being able to use any Killer latent. I have found this to be a significant boon in WoC2 where everything has huge amounts of Effective HP and she helps ensure everything dies with relative ease.
Furthermore, she comes with a highly valuable active skill that provides 30% Damage Reduction for 7 turns on a 9 turn cooldown. This has nearly 100% uptime and the Damage Reduction provided may be sufficient to tank all the hits in WoC2. As such, having an active that is required along with immense personal damage and other valuable awakenings makes GH Lakshmi a truly powerful card.
With that being said, she is an Orb Skin card which means she can be directly purchased with real life money but also means she cannot be Monster Exchanged for.
") Lakshmi, Goddess of Fortune (Dark Color)
Lakshmi, Goddess of Fortune (Dark Color)

Pros |
Cons |
|
|
 Weapon

Pros |
Cons |
|
|
 Loki, Wily God of Destruction – B

Pros |
Cons |
|
|
") Loki, Wily God of Destruction (Dark Color)
Loki, Wily God of Destruction (Dark Color)

Pros |
Cons |
|
|
Dark Loki is a fantastic Damage Solution when below 50% HP due to his 32x personal damage against all spawns. This can help overcome even the most durable encounters but the main difficulty will be incorporating him onto a team.
This is because he only brings 1 Skill Boost ![]() which means he could have been a Transforming card who may bring more to the team as he is mostly just raw damage. With that being said, his active skill provides 2 turns of 100% DEF Void which can overcome the Dragon Seed in WoC2 for mono Water teams but again, he may be hard to incorporate.
which means he could have been a Transforming card who may bring more to the team as he is mostly just raw damage. With that being said, his active skill provides 2 turns of 100% DEF Void which can overcome the Dragon Seed in WoC2 for mono Water teams but again, he may be hard to incorporate.
As a leader, he is more than capable of smashing through WoC1 (my clear from December HERE) due to his huge personal damage and ability to trigger 10 combos with relative ease. Just be mindful that it can sometimes be a slog/grind as it is still 196x with Rainbow activation.
 Weapon

Pros |
Cons |
|
|
 Reginleif, Bearer of the Slain – A

Pros |
Cons |
|
|
Reginleif can still function as a mono Dark sub due to her high Skill Boosts ![]() , valuable active, and respectable personal damage. While this is valuable, she has become somewhat outdated due to newer cards being released.
, valuable active, and respectable personal damage. While this is valuable, she has become somewhat outdated due to newer cards being released.
There was once a point in time where players would run 2 Reginleifs on a team to have a permeant +15% Dark Skyfall. While this is a nice concept, a single Nergigante ![]() can achieve this while also being a super star card in his own right.
can achieve this while also being a super star card in his own right.
As a Cleric, Araragi ![]() and Gore Magala
and Gore Magala ![]() are stronger solutions along with Wrath
are stronger solutions along with Wrath ![]() if Unable to Match can be addressed which in turn hinders her potential to being used. Reginleif is not a bad card, she is just outpaced by other options but at the same time, is a much more accessible card should players be lacking Araragi.
if Unable to Match can be addressed which in turn hinders her potential to being used. Reginleif is not a bad card, she is just outpaced by other options but at the same time, is a much more accessible card should players be lacking Araragi.
") Reginleif, Bearer of the Slain (Dark Color)
Reginleif, Bearer of the Slain (Dark Color)

Pros |
Cons |
|
|
Dark Reginleif’s main appeal is her easy to use Leader Skill that only requires any 4 connected orbs for her massive 22x ATK with a single leader. Of course this is a situational usage and her Base form has more universal value.
 Weapon Assist

Pros |
Cons |
|
|
 Lilia – B

Pros |
Cons |
|
|
Base Lilia is a reasonable card but her main problem is that she will never be the best possible choice for any given metric. As a Cleric, Oichi ![]() and Fasca
and Fasca ![]() perform this role better and her VDP
perform this role better and her VDP ![]() potential is inferior compared to the Farmable Jurond
potential is inferior compared to the Farmable Jurond ![]() .
.
Furthermore, Wood teams are currently favouring combos instead of Rows which in turn lowers her number of effective awakenings.
") Lilia (Dark Color)
Lilia (Dark Color)

Pros |
Cons |
|
|
Dark Lilia suffers from being a truly generic card in the sense that she does not fulfill any particular role well and is more of a Jill of All Trades, Master of None.
This is attributed to her lack of Resists and active skill that does not counter mechanics along with average personal damage. None of these are favourable traits and it would be challenging to find a truly viable use for her.
 Weapon

Pros |
Cons |
|
|
 Omega – A

Pros |
Cons |
|
|
Base Omega is a respectable card that does not fulfil any particular niche well. As a leader, they do boast strong multipliers and while their 1 turn active solves the activation requirements, it is an underwhelming effect overall.
The multipliers are healthy but they do lack Effective Health compared to the best options as lower shield values tend to be less ideal due to higher instances of Gravities.
As a sub, they have flexibility due to their 1 turn cooldown and significant personal damage, but they do not counter any mechanics through their active or awakenings which in turn may side line them for other options.
Finally, their Dark form is one of the strongest/most efficient Farming leads in the game.
 Omega (Dark Colour)

Pros |
Cons |
|
|
Dark Omega remains one of the strongest and easiest to use Farming leaders in the game due to their activation requirement being below 50% HP. This should relatively easy to achieve due to Omega’s active along with the explosively high damage potential when layering Rows ![]() and <50%
and <50% ![]() awakenings.
awakenings.
As a whole, the viability of Dark Omega will hinge on what orb changers you have available as the key to success is a constant flow of orbs.
 Weapon

Pros |
Cons |
|
|
 Noir – S / B* (read Chibi section)

Pros |
Cons |
|
|
 Chibi Noir (New)

Pros |
Cons |
|
|
Chibi Noir is the first of many 7-star cards who offer a Leader Swap active on an 18 turn cooldown. This can be inherited and while it does not provide any awakenings, the 18 turn cooldown plus 15 turns of on-colour Skyfall are justified. This is further compounded by the fact that there are few Leader Swap options available and 18 turns is the fastest as it is tied with Bonta ![]() .
.
The idea with Leader Swapping is to enter a dungeon with either 7×6 or an EXP boosting lead and then Swapping into a more desirable card. This Swapping process does not revert the larger board back down to 6×5 along with all the bonus Rank EXP still being retained.
This may seem fantastic but 7×6 is heavily punished in AA4 and modestly hard in WoC1. On the other hand, the 7×6 penalty in WoC2 is relatively insignificant and this dungeon is the most popular place to abuse 7×6 Swap strategies. With that being said, few players are able to tackle this dungeon which is why Leader Swapping is highly situational.
On the other hand, Swapping to abuse Rank Experience from Arenas is not my favourite approach as it can waste Stamina at lower Ranks due to Rank Ups not preserving any excess Stamina and multiple Rank Ups being wasteful. As such, I feel that only truly high Rank players (950+) should contemplate Bonus EXP leaders as it is arguably not needed when chaining Rank Ups are doable. On a side note, playing WoC1 already provides 40 million Rank Experience which should take care of most of your needs with both my Mantastic and Fantastic account using this to Rank up instead of EXP Lead Swapping.
Taking all of this into consideration, having one of these Leader Swapping cards from the GungHo Collab will be valuable for late game players as it does open up Leader Swapping strategies. As such, the value of this card heavily hinges on your current game progression and what other Leader Swap options are available. For players who cannot take advantage of Leader Swapping, this will be a relatively average card.
 Ralg – S / B* (read Chibi section)

Pros |
Cons |
|
|
 Chibi Ralg (New)

Pros |
Cons |
|
|
Chibi Ralg is the another card who comes with a Leader Swap active on an 18 turn cooldown. This can be inherited and while it does not provide any awakenings, the 18 turn cooldown plus 15 turns of on-colour Skyfall are justified. This is further compounded by the fact that there are few Leader Swap options available and 18 turns is the fastest as it is tied with Bonta ![]() .
.
The idea with Leader Swapping is to enter a dungeon with either 7×6 or an EXP boosting lead and then Swapping into a more desirable card. This Swapping process does not revert the larger board back down to 6×5 along with all the bonus Rank EXP still being retained.
This may seem fantastic but 7×6 is heavily punished in AA4 and modestly hard in WoC1. On the other hand, the 7×6 penalty in WoC2 is relatively insignificant and this dungeon is the most popular place to abuse 7×6 Swap strategies. With that being said, few players are able to tackle this dungeon which is why Leader Swapping is highly situational.
On the other hand, Swapping to abuse Rank Experience from Arenas is not my favourite approach as it can waste Stamina at lower Ranks due to Rank Ups not preserving any excess Stamina and multiple Rank Ups being wasteful. As such, I feel that only truly high Rank players (950+) should contemplate Bonus EXP leaders as it is arguably not needed when chaining Rank Ups are doable. On a side note, playing WoC1 already provides 40 million Rank Experience which should take care of most of your needs with both my Mantastic and Fantastic account using this to Rank up instead of EXP Lead Swapping.
Taking all of this into consideration, having one of these Leader Swapping cards from the GungHo Collab will be valuable for late game players as it does open up Leader Swapping strategies. As such, the value of this card heavily hinges on your current game progression and what other Leader Swap options are available. For players who cannot take advantage of Leader Swapping, this will be a relatively average card.
 Orage – S / B* (read Chibi section)

Pros |
Cons |
|
|
Base Orage has respectable sub potential on mono Water teams but faces heavy competition as a sub along with their active not being the greatest overall.
Furthermore, they have access to their Chibi form which provides a Leader Swap active which is invaluable under specific circumstances, and especially if you do not have any other option.
 Chibi Orage (New)

Pros |
Cons |
|
|
Chibi Orage is the another card who brings a Leader Swap active on an 18 turn cooldown. This can be inherited and while it does not provide any awakenings, the 18 turn cooldown plus 15 turns of on-colour Skyfall are justified. This is further compounded by the fact that there are few Leader Swap options available and 18 turns is the fastest as it is tied with Bonta ![]() .
.
The idea with Leader Swapping is to enter a dungeon with either 7×6 or an EXP boosting lead and then Swapping into a more desirable card. This Swapping process does not revert the larger board back down to 6×5 along with all the bonus Rank EXP still being retained.
This may seem fantastic but 7×6 is heavily punished in AA4 and modestly hard in WoC1. On the other hand, the 7×6 penalty in WoC2 is relatively insignificant and this dungeon is the most popular place to abuse 7×6 Swap strategies. With that being said, few players are able to tackle this dungeon which is why Leader Swapping is highly situational.
On the other hand, Swapping to abuse Rank Experience from Arenas is not my favourite approach as it can waste Stamina at lower Ranks due to Rank Ups not preserving any excess Stamina and multiple Rank Ups being wasteful. As such, I feel that only truly high Rank players (950+) should contemplate Bonus EXP leaders as it is arguably not needed when chaining Rank Ups are doable. On a side note, playing WoC1 already provides 40 million Rank Experience which should take care of most of your needs with both my Mantastic and Fantastic account using this to Rank up instead of EXP Lead Swapping.
Taking all of this into consideration, having one of these Leader Swapping cards from the GungHo Collab will be valuable for late game players as it does open up Leader Swapping strategies. As such, the value of this card heavily hinges on your current game progression and what other Leader Swap options are available. For players who cannot take advantage of Leader Swapping, this will be a relatively average card.
Building upon this, Chibi Orage has a reasonably easy to activate Leader Skill (unconditional 18x per leader) and can abuse entering with Saline and then Swapping assuming the dungeon is not too difficult. The Damage Reduction and Auto Follow Up occurs with 2 Water combos but the ATK multiplier will always be available.
 Raizer – A

Pros |
Cons |
|
|
") Raizer (Dark Color)
Raizer (Dark Color)

Pros |
Cons |
|
|
Dark Raizer remains a solid Damage Solution against Devil and Machine spawns who are the most commonly encounters WoC1. This is meaningful as players now have a potent solution to overcoming these floors along with a fantastic active skill.
This newly upgraded active provides 2 turns of Damage and Colour Absorb with both being needed in WoC1. In fact, Wood teams can potentially encounter a Colour Absorb by Denbola, Damage Absorb on Sopdet and Cosmo Crusader, and maybe Colour or Damage on the Menoas.
This means Dark Raizer may be needed four times and with his 17 turn cooldown, players will be forced to stall on numerous occasions. As such, you may wish to bring additional actives to help ease the potential stalling required.
This is a shame because if it was a single turn of Absorb counter, the cooldown would be significantly lower which means only a longer Colour Absorb would be needed for the Menoa as Raizer could handle the rest.
") Weapon
Weapon

Pros |
Cons |
|
|
 GungHo Collab Reeche – B

Pros |
Cons |
|
|
GH Reeche is not a bad card due to their ability to potentially have their 2 turn Damage/Colour Absorb ready in (25/4) 9 turns due to their three Skill Charges ![]() .
.
While this is a valuable active skill to have, they lack personal damage and are grossly outclassed by NY Reeche ![]() and Zinogre
and Zinogre ![]() for this role along with Polowne
for this role along with Polowne ![]() being quite accessible and fulfilling a similar function.
being quite accessible and fulfilling a similar function.
As such, if you already have these options available, their Weapon may have more merits.
 Weapon 1

Pros |
Cons |
|
|
GH Reeche’s Weapon was more appealing before we got the Chinese Celestial Weapons as they also provide Skill Boost ![]() and Bind Immunity
and Bind Immunity ![]() . With that being said, the Qilin Dragon Gem may be out of Reeche for some players and this Hat is an easy way to acquire these awakenings.
. With that being said, the Qilin Dragon Gem may be out of Reeche for some players and this Hat is an easy way to acquire these awakenings.
6 Star base
 Fonce (New) – A

 Fonce Uvo

Pros |
Cons |
|
|
Fonce’s first evolution grants him immense personal damage against Physical spawns which is relevant for WoC2. Sadly, I feel it will be hard to justify his inclusion onto a team as he does not provide enough value otherwise along with their Chibi form fulfilling a stronger niche.
 Chibi Fonce

Pros |
Cons |
|
|
Revo/Chibi Fonce fulfills an interesting niche in mono Dark teams as they can provide a 2 turn orb generator that can also overwrite any RCV debuff. This is meaningful as players can produce 4 Dark orbs on a regular basis along with being able to carry an inherit with relative ease.
For myself, I found it challenging to find a low cooldown Dark card who could buff movement time or RCV that has meaningful awakenings and Fonce solves this while also having significant personal damage against Devils with a 3×3 Box.
Devil spawns are most notable in WoC1 through the 1.5B DEF Devil floor and WoC2 with Gilles being the final hurdle. As such, Fonce can be utilized as a sub for these dungeons on orb hungry teams and their 2 turn cooldown can be abused to carry an inherit of your choice.
 Eclair (New) – B

 Eclair Uvo

Pros |
Cons |
|
|
Eclair is a powerful solution against Attacker type spawns which are reasonably limited in nature.
 Revo Eclair

Pros |
Cons |
|
|
Eclair’s Revo form does not fulfil any particular niche well as there are no notable God spawns in current end game dungeons which in turn means she is an average VDP ![]() solution.
solution.
 Base Ciel – B

 Ciel Uvo

Pros |
Cons |
|
|
Healers are relatively rare spawns along with Susano ![]() being the superior choice for Wood Damage Reduction. With that being said, her personal damage is exceptionally high against these spawns which are commonly seen in TA2.
being the superior choice for Wood Damage Reduction. With that being said, her personal damage is exceptionally high against these spawns which are commonly seen in TA2.
 Revo Ciel

Pros |
Cons |
|
|
Ciel’s Revo form has strong potential against Machine spawns but is not truly needed as Wood already has numerous solutions for damage. Furthermore, there are relatively few Void spawns along with current teams favouring combos over blob matches.
As such, I feel she will struggle to find a true home/use. With this in mind, I would be most inclined to use her Healer Killer form as it is more unique.
 Goddess of the Past, Urd – A

 Weaver of the Past, Urd

 Weaver of Destiny, Urd

Pros |
Cons |
|
|
") Weaver of Destiny, Urd (chibi)
Weaver of Destiny, Urd (chibi)

Pros |
Cons |
|
|
Chibi Urd walks a strange path as she is capable of both Farming easy/mid level content due to her 20x ATK multiplier with a single 6 Fire match along with the potential to approach Arena-style content due to her accessible bulk.
With that being said, the lack of Damage Reduction will hinder her potential in Arenas due to Gravities becoming more common. As such, I find myself using her more and more as a Farming solution and greatly enjoy pairing her with Dark Omega ![]() due to his synergistic Leader Skill and active.
due to his synergistic Leader Skill and active.
This pairing makes short work of the majority of encounters as it can stack Rows ![]() along with <50%
along with <50% ![]() awakenings with Urd solving half the Fire orb needs every turn. As such, the success of this team hinges on how many reliable orb changers you have at your disposal as this team can be a viable solution for dungeons like Training Arena 2.
awakenings with Urd solving half the Fire orb needs every turn. As such, the success of this team hinges on how many reliable orb changers you have at your disposal as this team can be a viable solution for dungeons like Training Arena 2.
With that being said, Chibi Urd can asymmetrically pair with Dante ![]() to tackle a large chunk of content.
to tackle a large chunk of content.
 Goddess of the Present, Verdandi – B

 Creator of the Present, Verdandi

 Creator of Destiny, Verdandi

Pros |
Cons |
|
|
") Creator of Destiny, Verdandi (chibi)
Creator of Destiny, Verdandi (chibi)

Pros |
Cons |
|
|
Chibi Verdandi has a unique 2 turn active that generates a column of Hearts but also prevents healing with Hearts for a single turn.
This is truly counter intuitive and the best use I feel for her would be a part of a System for Hino ![]() teams. This is because Hino needs any 5 connected orbs for his massive Auto Follow Up Damage and this column of Hearts fulfills this role while also not doing any animation Pings. This leads to faster clears but is truly situational overall.
teams. This is because Hino needs any 5 connected orbs for his massive Auto Follow Up Damage and this column of Hearts fulfills this role while also not doing any animation Pings. This leads to faster clears but is truly situational overall.
 Goddess of the Future, Skuld – B

 Guardian of the Future, Skuld

 Witness of Destiny, Skuld

Pros |
Cons |
|
|
") Witness of Destiny, Skuld (chibi)
Witness of Destiny, Skuld (chibi)

Pros |
Cons |
|
|
Chibi Skuld has the potential to be a respectable mono Wood sub but her biggest hurdle will be not out performing other options as Wood is somewhat stacked now. Of course, not everyone has a truly deep Wood box which in turn may give Skuld more usage as her 3 turn cooldown with high Skill Boosts ![]() will always be helpful.
will always be helpful.
 Flame Winged War Goddess, Urs Laguna – B

Pros |
Cons |
|
|
 Chibi Urs Laguna (New)

Pros |
Cons |
|
|
Chibi Urs Laguna comes with solid personal damage against Attackers or Healers but their main appeal will be their 3 turn active.
This active generates a column of Fire orbs which can be self System-ed with 3 Chibis. This has merits for mindless Farming, especially with leads like SR Hino ![]() who deal massive Auto Follow Up Damage with any linked 5 orbs.
who deal massive Auto Follow Up Damage with any linked 5 orbs.
 Brilliant Sea Beast, Grand Starster – C

Pros |
Cons |
|
|
Jammer Blessing ![]() will actually harm your performance and should not be awoken. Furthermore, Grand Starster has no true usage as they are grossly outpaced by other Wood Clerics such as Usui
will actually harm your performance and should not be awoken. Furthermore, Grand Starster has no true usage as they are grossly outpaced by other Wood Clerics such as Usui ![]() , Beach Planar
, Beach Planar ![]() , and Leginia
, and Leginia ![]() .
.
 Chibi Grand Starster

Pros |
Cons |
|
|
 God of Commerce, Mercury – C

Pros |
Cons |
|
|
") God of Commerce, Mercury (chibi)
God of Commerce, Mercury (chibi)

Pros |
Cons |
|
|
Chibi Mercury is a wonderfully potent Killer Solution against Physical and Attacker spawns as they can own three of those Killers along with matching Latents. Furthermore, their high ATK stat helps ensure sufficient damage and her 3 turn cooldown makes for easy inheritance or an instantaneous column of Wood.
Of course, we now have many other Killer options available which means you may have someone stronger at your disposal as quad Killers do exist.
 Shust – B

Pros |
Cons |
|
|
") Iceblade Divine Beast, Shust (chibi)
Iceblade Divine Beast, Shust (chibi)

Pros |
Cons |
|
|
Chibi Shust is most similar to Christmas Uriel ![]() in the sense that both cards have copious amounts of Rows and a 4 turn cooldown which generates a Row of their primary colour. This in turn provides an incredibly efficient Farming Solution as the Row will deal massive damage and this can be System-ed with 4 cards.
in the sense that both cards have copious amounts of Rows and a 4 turn cooldown which generates a Row of their primary colour. This in turn provides an incredibly efficient Farming Solution as the Row will deal massive damage and this can be System-ed with 4 cards.
Of course, this is probably not a likely scenario for the average player but even just owning a single Shust will improve your Water Farming potential. Just be mindful of Shust’s Bind vulnerability and no SBR ![]() .
.
5 Star base
 Psyche, Fae Blade Princess (New) – C

Pros |
Cons |
|
|
 Weapon

Pros |
Cons |
|
|
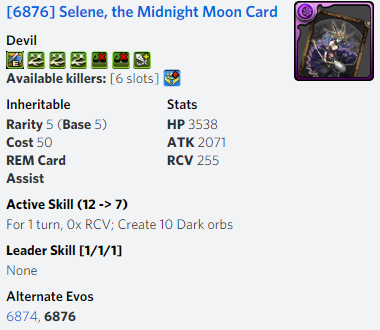
 Selene, the Midnight Moon (New) – C

Pros |
Cons |
|
|
 Weapon
Pros |
Cons |
|
|
 Helen – D

Pros |
Cons |
|
|
") Helen (chibi)
Helen (chibi)

Pros |
Cons |
|
|
 Konohanasakuya – C

Pros |
Cons |
|
|
") Konohanasakuya (chibi)
Konohanasakuya (chibi)

Pros |
Cons |
|
|
Chibi Konohanasakuya can function as a potential sub for WoC1 due to her strong offensive might against Machine Spawns. While this can be helpful, Pixel Napoleon deals infinitely more damage and the only main advantage she has over him is a lower base cooldown.
 Tenfufa – C

Pros |
Cons |
|
|
") Tenfufa (chibi)
Tenfufa (chibi)

Pros |
Cons |
|
|
Chibi Tenfufa has triple Balance Killer ![]() but will not be a strong solution due to her terribly low ATK stat. On the other hand, her 2 turn cooldown can be abused to generate Dark orbs but still a situational card at best.
but will not be a strong solution due to her terribly low ATK stat. On the other hand, her 2 turn cooldown can be abused to generate Dark orbs but still a situational card at best.
 Atalanta, Tempestuous Warrior – D

Pros |
Cons |
|
|
Atalanta has reasonable Balance Killing potential but has to hit 7 combos to truly shine which may not be a desirable if trying to minimize matching/thinking.
 Weapon

Pros |
Cons |
|
|
Atalanta’s Weapon does provide a reasonable amount of Passive Damage but their low cooldown runs the risk of overcharging for an underwhelming effect.
Also, newer Water teams are shying away from Rows in favour of more combos to abuse the Enhanced Combo Awakening ![]() .
.
 Orpheus the Pining Poet – D

Pros |
Cons |
|
|
Cards with Double Coop Boost ![]() tend to be candidates to inherit a Button active as the damage scales with ATK. As such, the value of these cards usually hinges on their ATK stat and Orpheus is quite low at only 1,817 (pre-Pluses) at level 110. By comparison, Light Vajrayaksa
tend to be candidates to inherit a Button active as the damage scales with ATK. As such, the value of these cards usually hinges on their ATK stat and Orpheus is quite low at only 1,817 (pre-Pluses) at level 110. By comparison, Light Vajrayaksa ![]() has 2,913 along with 8 Latent slots and one more Skill Boost
has 2,913 along with 8 Latent slots and one more Skill Boost ![]() .
.
As such, if you own either Vaj or cards with higher ATK and 2 Coop Boosts, Orpheus will have little use.
 Weapon

Pros |
Cons |
|
|
The main idea of Orpheus’s Weapon is to increase the ATK stat of a Button card in coop in order to deal larger amounts of damage. For example, this could be inherited on Brachydios ![]() who has a large ATK stat and 350x Button active.
who has a large ATK stat and 350x Button active.
Of course, this is a highly niche usage and hinges on multiplayer.
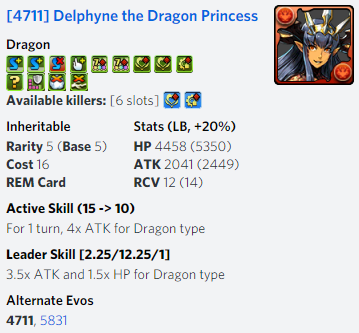
 Delphyne the Dragon Princess – D
Pros |
Cons |
|
|
Delphyne is a relatively standard solution to Healer spawns but needs 7 combos to truly shine. As such, she may be overlooked for options who do not require combos to succeed.
 Weapon

Pros |
Cons |
|
|
Do I plan to roll? & Dream rolls
I do not plan on rolling within the GungHo Collab due to the fact that the bottom rarity offers essentially no value to my Monster Box along with already owning a large chunk of the 6 and 7 star cards from previous events.
Of course, it is always fun to dream and for my ideal 7-star card, I would love to acquire GH Lakshmi ![]() as she would allow me to move away from Shiva
as she would allow me to move away from Shiva ![]() on my Seina
on my Seina ![]() teams and in fact, I was gifted the Orb Skin bundle by Bruers while writing this article and immediately purchased her. Suffice to say, she was a massive upgrade for my Seina team and I managed to clear Alt. WoC2 twice in a row right after:
teams and in fact, I was gifted the Orb Skin bundle by Bruers while writing this article and immediately purchased her. Suffice to say, she was a massive upgrade for my Seina team and I managed to clear Alt. WoC2 twice in a row right after:

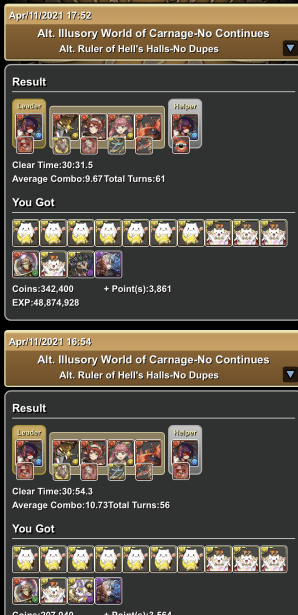
I still need to record a clear for YouTube though…
As for my dream 6-star card, Fonce ![]() would be an amazing addition to my Monster Box as their 2 turn cooldown can overwrite RCV debuffs along with generating 4 Dark orbs. Furthermore, he can also carry an inherit of my choosing to overcome any other mechanic as required.
would be an amazing addition to my Monster Box as their 2 turn cooldown can overwrite RCV debuffs along with generating 4 Dark orbs. Furthermore, he can also carry an inherit of my choosing to overcome any other mechanic as required.
Finally, Selene ![]() will be my dream 5-star card as she is both new and I feel will have more merits compared to Psyche
will be my dream 5-star card as she is both new and I feel will have more merits compared to Psyche ![]() as they can generate 10 Dark orbs on demand. I don’t know if I will really use them but they are new and may come in handy one day.
as they can generate 10 Dark orbs on demand. I don’t know if I will really use them but they are new and may come in handy one day.
My Dream Rolls |
||
7*
|
6*
|
5*
|


The above chart are the cards I would love to acquire from each rarity if I could choose one for my Mantastic account. This is my own personal opinion based on my Monster Box, goals and whether or not I have dupes.
Conclusion
The GungHo Collab makes an underwhelming return to North America due to its relatively late release along with Monster Hunter grossly overshadowing the cards found here.
This in turn makes it harder to justify rolling in as the bottom rarity will have almost no value for most account along with the 6/7-stars feeling old compared to current options. As such, Monster Exchanging or IAP-ing for the Orb Skin cards may be your best course of action as there is far too much junk/filler present in this machine.
On the other hand, the 18 turn Leader Swap may have tremendous value for end game players for 7×6 WoC2 swaps or Rank EXP abuse. If either of these have merits for you, one of these should be acquired if you have no other options.
With that being said, let me know what you think about the GungHo Collab in the comments below along with your dream rolls.
Happy Puzzling!
If you enjoy my content, please consider turning off AdBlocker for this website. If you wish to directly support me, please click the beautiful image below.![]()


Looking forward to seeing the review completed!
LikeLike
One thing I’m not following – how does Seina offset no void spawn damage for Lakshmi?
LikeLike
The Seina leaders are enough to take care of VDP damage by themselves so the fact Lakshmi’s damage will get voided is much less meaningful in that context
LikeLike
^ Seina’s have VDP and they are often enough for most content. By comparison, Gileon teams struggle more with VDP due to them not having any
LikeLike
I know this is unfinished, but in case you don’t go back to cards you’ve already written up, you neglected to mention that Pixel Orage is an amazing farming lead themself. Unconditional 2/18/2, auto fua and 25% damage reduction for 6 blue orbs, and no skyfalls saves time.
At that point, being able to swap with Saline or Ganesha is just a nice bonus.
LikeLike
Appreciate the suggestion and I do plan on going over all the cards one more time at least but will look at Orange without the N right now =)
LikeLike
A few comments on this line-up:
Base Sari is pretty much the pairing Grigory needed… LAST year, when he might have been relevant.
Lucy is legitimate trash in the current meta unless pursuing her equip. Never mind the active being trash due to it not clearing awoken binds – we have passed the stage of power creep where quad 7c cards can be considered to have underwhelming personal damage.
Of all the older cards in this line-up, Dark Omega is the one to have stood the test of time. Though he is falling out of favor for players who have progressed far enough that they no longer need to run the dungeons he excels at clearing.
Many of the other cards – both older inclusions and new additions – feel underwhelming overall. And what’s worse is that this is merely one part of a huge backlog of future events for NA that are either DOA or will be outclassed when we do get them. We’re currently four months behind JP, which hurts NA – a lot. February was particularly horrible as that month was pretty much nothing but SGF traps and back to back seasonals with no overlapping collabs (further compounding the event backlog issue), and April will be similarly bad if NA is denied the Demon Slayer collab since the next event will most likely be the overpriced DBDC rerun, an event that is approaching seasonal levels of awful. Ah well. The one good thing is that this has allowed me to save up the majority of the free gems handed out to us over the past several months for when we do get something worth rolling in (looking at Fujimi, Street Fighter, and Mystics and Spectres reruns).
LikeLike
You are right about the powercreep levels in GH collab not keeping abreast with other options along with Monster Hunter coming super early for NA
This throws powercreep somewhat out of whack and really makes this a skip or maybe, maybe a Monster Exchange/IAP Orb Skin event
LikeLike
Why do your reviews concentrate on endgame levels? I feel that most people reading here are either beginners who need advice or have advanced well past the Technical dungeons. Then when qualifying a new creature, you may dismiss it because it’s not as good as another, more advanced creature that we may not have.
Not trying to be critical or change your process, I know you’re having issues right now. Just wondering if this was an intentional direction in these reviews, or just where you’re playing right now?
LikeLike
I primarily write based on my own approach to the game which tends to be around end game content but also working with more limited resources
Also, PAD has somewhat no early game and players are given way better tools than needed so you tend to get “caught up” on dungeons quite fast. Furthermore, end game should be your goal and those cards will probably stomp the mid/early game stuff too
LikeLike
I know reviews not finished yet but chibis of 5* are 6‘s so not solutions to 5 dungeons.
LikeLike
Good catch and I have corrected my mistake =)
LikeLike
Im currently using regular polowene(RB) for absorbs on nadeko currently [nadeko/kaede/susanoo/polowene/fasca] (also have kurama and oichi as alt clerics) considering trading for raizer, I have 3x noirX, 5x dmeta, 2x sylvie and some other gfe dupes,
Im rank 700 so I dont think I get much value from noir unless nelle x mikage with noir swap is worth doing some where(no chris 1x tefufa but no other good low cd orb makers). Ive not tested that and noir ls goes much better with mikage than nelle for 7×6.
LikeLike
For 7×6 w Mikage, I swap in my Araragi but this is for AWoC2 which is probably not applicable
I feel that Polowne is still a strong option and where do you need more damage and 2 turn absorb? If you are at aa4 or lower the 2 turns has more merits
LikeLike
Might be worth mentioning that chibi tenfufa paired with SR Hades is an easy farming team. I usually run with subs SR Haku for tpas, MA Eschamali for dark orb skyfall, and SR Pandora for vdp.
LikeLike
Is it worth trading for Raizer for a Nadeko team option?
LikeLike
I don’t really think so as his active is a bit too long for WoC content. He is nice but I don’t feel he will be that game changing
LikeLike
What do you think do chibi Bradamante? It’s weird that she’s not included in GungHo collab.
LikeLike
Treat her like the other leader swap chibis =)
LikeLike