PAD Academy returns to Puzzle & Dragons for North America! This rerun introduces the new Academy Ina and Academy Tokugawa as well as color shift evolutions for Academy Valeria and Academy Kio! Dates: 05/09/22 – 05/22/22
Introduction
Two events reviewed in a row, shocking right? Welcome to the PAD Academy review, otherwise known as the, “Still making dark teams more overpowered somehow” seasonal event.
As per usual, I am only going to write about what I think are the cards most people should look out for. In this case there are only 3 new cards, 1 of which is an orb skin, and 1 of which is tradeable. Most of the older stuff is extremely unremarkable in this seasonal.
I always like to get this question out of the way fast, is this event worth rolling? NO, simple as that. Everything truly worth having in this event can either be traded for, or purchased as an orb skin. The mid rarity whale trap cards in this event are mediocre in comparison to some we have had in the recent past, and Academy Orochi sees very little use. Also unlike most other seasonals and GungHo original events where there are tons of orb skins, and most are worth owning multiples of, this event the skins are trash aside from the new one.
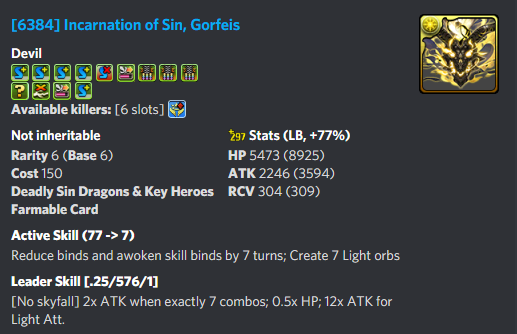
Nine Stars – Tradeable
Dark Dracoblader Freshman, Ina & Head of Student Guidance, Tokugawa Ieyasu
Going to break the rules of my reviews here, and just lump a seven star in with the nine stars. It truly is impossible for me to say anything about Ina without Tokugawa being part of it.
Academy Ina, and Tokugawa are truly the highlights of this machine now. I find myself saying this all too often as of recent, but while the team they comprise is very strong, it is going to be a bit of a stretch to build optimally for new or non-paying players.
Leading with Baran’s new evolution to give you a 7×6 board makes this team extremely capable, if not one of the fastestMD3teams, which as of yet doesn’t really have many reliable fast teams. Ina having a 2 turn cooldown active, while Tokugawa only has a 3 turn, means that no matter which one you have, you can easily choose to lead swap either of them with Baran. It is also an extremely effective pairing for tackling most of the Sanctuary of the Gods content.
Between the two of them they cover both Blind and Jammer, and have perfect leader synergy. Tokugawa brings the large (seven million) Auto Follow-up leader skill, and Ina brings the plus combo (two) leader skill. Both require ten or more dark orbs to be matched for activation, but that isn’t really an issue assuming you lead with baran for the 7×6 board. Ina unlocks your board and then after floor 4 makes you dark orbs, Tokugawa voids VDP and once again makes dark orbs. This means you have both 3 floors until floor 4, and then a 1 turn break in between both actives to find dark orbs. Fortunately basically every dark card these days seems to generate dark orbs on a tiny cooldown, so really just take your pick of which you like most for that dungeon.
[metaslider id=1111 cssclass=””]
I normally like to leave speculation out of my reviews, but I will just add a small note about Ina’s equips. The first is three jammers, with a skill boost and three turn haste active skill. This doesn’t seem like much, but really there have been very few haste actives over two turns that haven’t seen use at some point, and this one just appears very strong on the surface. However, this is speculation on my part because in my experience, research or discussions with other players, most can’t seem to find a good place for this to be used at the moment. That isn’t to say it won’t in the future.
Her other equip is a cross awakening, with four poison. Cards with this much utility in the awakenings normally do not go completely unused, as there always arises a scenario where that combination of utility is useful. Unfortunately the cooldown on this one is very short, and the active skill is very restricted to dark teams, and not all that useful to dark teams even then. So it may never see use.
[metaslider id=1116 cssclass=””]
Tokugawa has two equips, both of which are very odd, but again potentially useful. One is very simple, two Team-HP, and two Team-RCV, with a single turn of void damage, and some auto recovery over four turns, as the active. In this case, simple does not mean bad. The most simple equips done to the maximum of their simplicity are the ones that tend to live the longest.
The other is an unbindable, and below eighty percent, and a Combo-Orb. The active skill is the exact same as the base monster. This means you have a very low cooldown VDP active skill that generates dark orbs, that alone would be enough utility for this to see some amount of use, but add on that it makes them unbindable, and it is even stronger.
Academy Valeria
[metaslider id=1084 cssclass=””]
Strangely most older seasonals tend to fall out of use sometime before their machine comes back around again, but that has never been the case with Valeria. She remains useful for wood teams year round. It turns out that if you pack seven skill boosts, a full resist, and a ton of damage on a card with an active skill that is useful in many scenarios, it keeps them around for a while. Not much more I can say about Valeria’s original Wood/Light form aside from, it was good before, it is still good for the exact same things she was before.
If I say, Illusionary Artist, what is the first thing you think of? Atelie, right? That’s because she came out to a dungeon that was made for rainbow teams, and subs that were desperately starving for a lead to put them to work. What comes next? Kaishu. Fun Baran lead swaps, tons of great subs. You know who you likely don’t think of? Prim. Until now, we had no real reason to even consider her. The lead swap options for her we’re fairly mediocre, and she just felt like a lackluster version of Royal Oak, who himself is already on life support in the end game.
Well fear no more, Blue Valeria is here to save the day for Prim. Now you have your perfect 7×6 lead. Great awakenings, paired with a moderately useful active skill, and a low cooldown, means you finally have a way to put your Prim to work.
Her final use case is as a sub for SeaWolfteams, she offers him the Blind Resist that most of his best subs don’t carry, freeing up team space elsewhere, as well as huge VDP damage.
Soccer Club’s Striker, Kio
[metaslider id=1090 cssclass=””]
Unfortunately for Kio, his last run around the block saw him kneecapped due to our lack of Marvel collab, as he sorely needed Captain Marvel for his viability. Nowadays however, we have moved past Captain Marvel meta, and moved on to bigger and better things for Kio. The addition of another seven combo awakening, and VDP on his active skill has made him an extremely viable Daytona sub candidate. As with Baran from Dai recently, he is your makeshift second Halloween Cotton. Sadly for Kio, I think his days as a viable lead have long passed, but that isn’t to say it can’t be done.
His dark form at first glance seems like it would be fairly interesting. It has a fairly unique set of awakenings, and an active skill that sees use on many other cards similar to him. Sadly however, for Dark Kio is that he just doesn’t quite cut it for almost any team. One turn of a Fujin active and a VDP on an eight turn cooldown is just not short enough in most late game scenarios.
His equip retaining that same active skill, and also gaining some somewhat interesting resistances and movetime, means it will have a very niche, but still real use case on a very small number of teams.
Seven Stars – The Seasonal Whale Trap Rarity
[metaslider id=1097 cssclass=””]
This card is nothing new, or that we haven’t seen before. It does what so many other rainbow leads do, granted only requiring 3 colors not the full 5 to activate. That doesn’t make it any more exciting though. This active skill seems almost fully tailored to clear MD2. A three turn cooldown that clears unmatchable, in a dungeon that spams you with unmatchable status, is what we all want.
Qilin pairs quite well with the likes of the new evolution of Dai, and Alexander. He is fairly restricted to leads that don’t need full rainbow for activation, and dungeons that require his specific brand of active skill.
The tragedy for Qilin however, is that she is the new card added to this seasonal that you can’t trade for, or buy as an orb skin. So if you want her it is going to likely require a great deal of whaling, which if you aren’t a heavy spender, you absolutely should not be doing. This card is fun, and strong, but not worth the money it would require you to obtain. At best just lead pair with one owned by the whales on your friend list.
Honorable Mentions
I will briefly just touch on two of the eight stars, as I think almost all of them are basically un-needed to anyone’s box. Firstly is Academy Orochi, this should be fairly obvious by now. A card that is a four turn delay with a skill boost and some resists should scream, “Trade for me!” to anyone that sees it. Second, and last for this review, is Yog-Sothoth equip. It has a decent bit of utility for teams that fall in to the colors the active skill creates. If this seems like something you might want in your box, pick one up, the trade fodder for these eight stars is very lenient.
Well that’s two reviews in a row, what if I shoot for three? See ya round, folks.
The Adventure of Dai returns to Puzzle and Dragons for North America! Dates: 4/25/22-5/1/22
Introduction
Hey folks, long time no review. Couldn’t let this collab go by unreviewed, as it has too much hype, and such amazing art.
Normally, I skip out on talking about the cards I find useless, but most of the mid and top rarities of this machine are pretty heavily pushed in power level. Just a preface however, I am going to talk about zero of the low rarity cards in this collab, and only mention the mid rarity ones I feel are worth talking about. Just due to none of them receiving any meaningful buffs, so they are the exact same as last time or are not worth anyone’s time to care about. Also they will be reviewed in order of rarity, even though I think the most exceptional cards from this collab fall in the middle rarity: 7-star.
I will also answer the question everyone asks me after I write one of these articles, “should I roll this collab?”. My answer is going to depend heavily on your spending habits. If you’re a monster whale then my answer doesn’t really matter because you will buy anyways, and this collab is made for you. If you are a light spender you are going to need some luck to get what you really need from this. If you are Free-to-Play, then Godspeed friend, you are going to need the best luck of your life, or have 100s of stones stocked up.
Thank you Tsubaki Bot for the image card sources! Art and icons are owned by GungHo Online Entertainment, Inc.
Eight Stars – Tradeable
Dragon Knight, Dai
Kicking it off with the collab’s namesake himself, Dai. I will bow out on reviewing his original three forms, as they are basically as good or slightly better at the same things they were prior to this re-run. His new evo however, warrants some discussion.
Dragon Knight, Dai is an all around very versatile card both as a lead and a sub for a large number of rainbow teams. Similar to Raffine , who can pair with Geed to create a smooth clear for MD4, Dai is going to do almost that same thing for you. He relies far less heavily on spinners, that’s not to say his teams can’t also use Raffine.
His use case is very similar to something like Dark Athena’s new evo (8448) giving you your rainbow team RCV buff active, just with less utility in the earlier parts of a dungeon. The main differentiator between Dai and Raffine is that Dai is a low cool-down, non-transforming rainbow leader. Meaning that unlike Raffine who requires the use of Todo, or some insane stalling tactics in the early dungeon, he is lead swappable right from the start of a dungeon, no stalling required or Todo required.
Avan
[metaslider id=1017 cssclass=””]
Next up we have Avan, who has received some interesting buffs to his base form. I will say before I start talking about him, this is a card I think everyone should have 1 of in their box if only to use his equip. A Skill boost, L and 2 RCV equip with a 2 turn haste active is extremely strong. While it most likely won’t see use on all your teams, you will be extremely thankful to have it in those instances you find yourself needing it, as there are few other cards that fill this role.
His base form on the surface looks like nothing significant in the way of a buff, however it is more interesting when you consider the recently buffed (In Japan only for a short while longer) Ryumei from Mystics & Specters. Where Avan got a slight buff to his damage and a smaller buff to his HP, those buffs meant a great deal. Ryumei who has now received the ability to use Rows rather than Ls (similar to how most folks use Royal Oak), has unlocked the ability to have a pair that can potentially lead to an unbelievably tanky lead pairing, with very consistent orb generation. Infinite orb unlocks, with very close to boards consisting of only Fire, Light and Hearts every turn. The largest shortcoming is that having teams of so many transforms leads to fairly stunted damage, but you can tank your way to clears. This is very forgiving for newer or less experienced players who may not have an easy way to use a double transform boat lead, or rainbow 7×6, and are looking for a much safer alternative.
Baran
[metaslider id=1024 cssclass=””]
Baran, who I think received the most noteworthy buffs of any eight star in this collab. To briefly touch upon his equip before I move on to the base form and new evolution. His equip is good for what it was prior to this re-run, that is to say slapping it on your lead in dungeons that haste your leader skills, so you can safely survive the overcharge with the shield. As well it gives 2 SBR which is very important to dark teams that tend to need them desperately.
As with Avan, the buffs to his base form don’t seem like they would have any impact on his use, however these new buffs are absolutely massive. His pre-transform adding another skill boost meaning he now gives a huge 4 skill boosts to any dark team is unreal. His post-transform leader skill, while it does make him more of a glass cannon than he already was, adds insane fire power to his damage, and makes him an even better pair option for the new Mystvearn evolution, or Black Bird.
His active skill is still core to many dark team’s ability to clear content. While in the interim between the last run and this run there have been some cards that compete for this with him, he is still among the strongest options there are. Currently this active skill makes him an extremely viable option for many dark teams that are lightning fast at clearing their designated content such as Mystvearn in MD2 or almost any dark team in ASR2.
Dragon Master General, Baran
Unlike his base form which is core as a lead for his own teams, or is a staple sub on many dark teams, this form is your new go to Dark 7×6 lead swap option. This can include Kaishu, or almost any dark lead that would need to be swapped. He also has massive viability on Daytona teams as a sub for those who don’t have multiple Halloween Cotton.
Seven Stars – Whaling has its rewards
Dark Commander, Mystvearn
Lets start it off with truly the only reason I wanted to write this review in the first place, Mystvearn. Bare in mind again, none of these from here on are tradeable, so this is where it gets somewhat unfortunate for lower spending players. I am going to disregard his equip, and say it is identical to what it was before, so take that how you will. His old evo received only very minor buffs, but is part of a fast MD2 clearing 2–playerteam
Where to start with this new evolution, there is just so much good that comes from this card. For starters multiple copies of him, four to be exact, and you have yourself a swipeable clear for MD4 and MD2. That’s not even touching on the fact that he can swipe clear TA3 with 2 free slots for levels. For a card with so much utility packed into him you would think he would lack somewhere, but in reality he lacks in almost no department. His damage awakenings mean he will almost always be double capping on his main and sub attribute, meaning you vaporize dungeons at breakneck speeds.
I stated before that he was able to clear content with just multiple copies of himself, but that isn’t to say you can’t just pair him with Black bird as a single copy lead, and just use your everyday run of the mill dark team to turn huge spawns into paper, these teams just aren’t entirely swipeable. Many end game teams can be created using just cards from this collab because of Mystvearn, which is largely unheard of.
Killvearn
[metaslider id=1035 cssclass=””]
Killvearn is next, and he exists to compliment Mystvearn, Baran, King Vearn and Black bird. He is however, arguably the least attainable card for the average player, that most players would also want. He was not in the last run of this collab like all the other strong cards on this list, and unlike King Vearn, he is not an orb skin so you can’t just buy him for 20 dollars.
Quick discussion about his equip before we go on to his base form. This is a 3 turn delay with tons of team HP and a combo orb, that makes a bi-color board on activation. I shouldn’t need to tell anyone that this is obviously strong.
His pre-transform offers three Skill boosts and a 3 turn haste, which makes him an effective six skill boost card at the start of the dungeon, which is a huge boon to almost any black bird team. Post transform he breaks the enemies defense by 100% for a turn, removes locks and makes you 6 dark orbs. This is hugely useful in dungeons like MD4, where all the spawns have very high defense, making a lot of teams unable to effectively punch through them. He also has triple 10c, which in my opinion is hilarious, due to him being a transform card. He will damage cap no matter what you do, but it largely goes to waste as he can’t be Double Damage Capped. He also has a SBR in pre and post transform, which as I stated before is something dark teams sorely lack.
Dark King Vearn
[metaslider id=1041 cssclass=””]
Lastly for the dark cards that were added is King Vearn (GungHo sure loves playing favorites with this attribute). Fortunately for any light spender out there, this is your new orb skin. So twenty dollars puts this in your box at very least. His equip is hot garbage for the most part, so let’s skip it.
King Vearn has leader skill scaling similar to the recent Artist cards. That is to say, they scale infinitely for as many of their conditions that you meet, in the case of King Vearn, it’s Dark and Fire rows. Paired with himself he generates a dark row and a fire row’s worth of orbs every turn, so you can hit 10 combos with absolutely no effort. This makes him extremely effective for farming some of the more recent end game content, or just general farming use, especially MD2 and MD1. He makes an effective lead for a couple of the Alt MD1s as well.
Disciple of Love, Maam
Next up is Disciple of Love, Maam, who I will only be discussing in her new evolution form. Her new evolution is core to a swiping team that is used in both MD4 and Colo4. Her 4 turn active voids attribute absorption and spikes herself and fire attribute cards for 2 turns. This means that if we bring a system of cards that haste like Reincarnated Antares, we end up reducing that to 2 turns, so it’s an infinite loop of voids and spikes. Which means the now famous 4 Antares, Artorius team can use her to clear content where attribute absorb is their only roadblock.
Grand Sorcerer, Matoriv
The final card I will be talking about, and also the last new card added to the machine in this collab, Grand Sorcerer, Matoriv. Her base evolution and equip require little discussion in my opinion.
Unlike most other cards where I talk about how it has tons of utility in many scenarios, this card really only has one real use, a lead swap 7×6 lead for rainbow teams, mainly Atelie. She offers a great active, and some respectable damage for a 7×6 lead, as well as full poison resist.
Honorable Mentions
Popp, didn’t receive a new evolution that I deem exciting, however he did receive a small buff to the shield on his old form, so he is still a card most people should look to pick up. Finally we have Leona, who had 1 turn shaved off her active, which makes her an even more viable light cleric than she was before.
Also shoutouts to the absolute train-load of goofy farmables added to this run, there is a real reason to farm this content now.
There comes a time in every PAD player’s life when they strike gold for the first time–or diamond, rather. It’s the first time they get a truly powerful card, generally the chase card of a collab. For me, that occurred two years ago when I received Zela Kitty as my free login roll during the 2019 run of the Sanrio Collab. Zela Kitty suddenly allowed me to clear content that was frighteningly intimidating at the time, especially for a newish player. Once I stacked my team with two more Zelas, I was off to the races. When the ability to level cards up to 120 hit North America, the first card I boosted was my beloved Zela Kitty in a slightly foolish (and expensive) act of nostalgia. I know I’m not alone in loving this card, and many of us look back wistfully on the shining–though brief–moment in which Zela Kitty was on top.
In this article, I’ll be providing some thoughts regarding the 7 Star cards (Witch Kitties), as well as Charmmy Kitty and Gudetama (the orb skin bundle cards).
Summary: Overall, this is a collab that, while not earth-shattering in terms of shaking up the meta, does feature some interesting and unique cards, particularly in terms of farming. Coupling this with the fact that the tradable cards are relatively ‘cheap’ in terms of trade fodder, you may find it’s worth it to pick a few of these cuties up. The most noteworthy cards are Great Witch Hello Kitty, Reeche Kitty, Saline Kitty, and Veroah Kitty. Both of the orb skin cards, Charmmy Kitty and Gudetama, are useful and worth considering.
My personal recommendation is to do a few rolls if you’ve never rolled in the machine before, or if you really like the art/characters. However, for most players this is probably a collab where you should trade, if possible, for what you want; this is not a machine to go ham on, as the lower rarities cards are not impressive or terribly useful, which is unfortunate. Trade fodder for the five Witch Kitties can be found here.
You can check out the official announcement from Gung Ho here.
Thank you Tsubaki Bot for the image card sources! Art and icons are owned by GungHo Online Entertainment, Inc.
Seven Stars–The “Witch Kitties”
Great Witch Hello Kitty
Great Witch Hello Kitty received some interesting buffs, boasting an extra SB (now four total) and 3 dungeon boost awakenings. With a lowish cooldown on her active skill, she could be a powerful sub for button farming teams; she could replace Greed Dragon, who is a common sub found on farming teams, as he only has 2 SB and the cool down on his active skill is much longer. She also edges out Xmas Saline, who has a similar amount of dungeon boosts but a much longer cooldown. Great Witch Hello Kitty is hands-down one of the more desirable cards in the collab.
Great Witch Zela Kitty [Evo]
The buffs to evo Zela Kitty are a bit disappointing. She goes from a flat 2X multiplier for Wood Att. to 2.8, 3 additional combos for matching 9 Wood orbs (now 4 total), and a flat + 5 seconds to orb move time. In terms of awakenings, she’s only been given a dungeon boost as an addition. The biggest change is that her active skill cooldown has been nearly cut in half–from 16 turns down to 9. The multipliers from her leaderskill aren’t completely atrocious, however they don’t feel noteworthy in a world of submarines and race cars. The addition of the dungeon boost is somewhat baffling–it seems she’s being pushed more in the direction of farming, however there are much better options out there. It’s hard to rationalize using Zela Kitty for farming when we all collectively lost our minds rolling for Gojo’s not too long ago, and this collaboration features both Saline Kitty and Veroah Kitty. This leaves Zela Kitty as a potential sub on Wood teams but, again, there are generally much better options out there both in terms of active skills and damage. If you don’t have Selica, Academy Valeria, Susano, or Avalon Drake, Zela Kitty could be a somewhat decent VDP-based damage card for Wood teams, however her active skill cooldown is longish by contemporary standards for an effect that is situational at best. Coupled with the fact that she is Wood/Wood, rather than having a different colored sub attribute, it makes her place on a team a tough sell particularly because there are many dungeons with all-attribute clauses.
Cat Fact! Hello Kitty’s first appearance in the world was on a coin purse, originally sold in 1975.
Fire Great Witch Hello Kitty
Aha–a trend is emerging. Fire Kitty, a new addition to the REM, also boasts 3 dungeon boost awakenings, as well as 3 VDP and 2 SB. This card doesn’t feel as exciting as Great Witch Kitty, due to having less SB and a slightly longer active skill. Although she is doing a great job stirring her little cauldron, Fire Kitty doesn’t strike me as particularly noteworthy unless you are using a Fire-based swipe farming team and need VDP damage.
Great Witch, Madoo Kitty [evo]
Aside from having a kickass eye patch, Madoo Kitty is a TPA/10C damage stick. Her active skill, the same as Fire Kitty, provides a 2-turn 50% shield and a 2-turn delay on a 10-turn cooldown. Her active skill feels weaker in comparison to Halloween Inahime, who boasts a 3-turn delay, 3-turn 50% shield, and 3x attack boost, albeit with a longer cooldown at 14 turns. Madoo Kitty’s leader skill is mediocre at best. A low attack multiplier paired with the clause requirement of matching 5 or more connected orbs–despite the fact that Madoo Kitty is TPA based–feels a bit clunky. It mirrors the leader skills of both regular Madoo and Halloween Madoo, however neither of these cards have been noteworthy leaders for a while. If we end up with a cool Fire TPA based lead in the future, I could see the usefulness of this card as a sub, however as it stands, she doesn’t really fit into any teams.
Cat Fact! Hello Kitty turned 47 this year!
Water Great Witch Hello Kitty
Water Kitty, as well as her evo, are two of the more interesting additions to the REM. Like the other two base forms I’ve mentioned, she too has 3 dungeon boosts, however her active skill and awakenings are geared toward rainbow teams. Wood Kitty still seems like a superior option for farming in comparison, as Water Kitty only has 2 SBs, unless the situation calls for either attribute or damage absorption nullification.
Great Witch, Reeche Kitty [evo]
Okay, now we’re talking–for rainbow enthusiasts, Reeche Kitty is a card worth looking into. To me, this is one of the more noteworthy cards in the REM. Her leader skill is more competitive compared to Zela Kitty and Madoo Kitty; she’s got a nice 65% shield, 3 million auto follow up attack, and a color activation-based 22X damage multiplier. Reeche Kitty also has a fixed time leader clause of 13 seconds, which is reasonable for both 6×5 and 7×6 boards. If you like cushier orb move time for rainbow teams, this might feel daunting, however not having to deal with time debuffs is appealing. In terms of top of the line rainbow leaders, Beach Mariel and Story Mode Sakuya are currently dominant. Although Reeche Kitty is neither Dragon nor Attacker type, meaning she would not benefit from Beach Mariel’s HP multiplier, she still looks to be a fun pairing. Sadly, I still think Story Mode Sakuya is a better pairing for Beach Mariel, as she provides more shield, more attack, and pumps out twice as much auto FUA damage, albeit with a slightly stricter damage activation clause; Reeche Kitty only requires four colors to be matched, while Story Mode Sakuya requires Fire, Water, Wood, and Light specifically. That being said, Reeche Kitty looks like a fun and useful sub for rainbow teams because of her active skill. Board unlock, five attribute + heart board change, and nullification of attribute and damage absorb for 1 turn on a 9-turn cool down seems handy, especially in dungeons where only one turn is needed like Alt Shura Realm 1. End game dungeons like Shura 3 and Mysterious Dimension 1 require multiple turns of absorb nullification, however, so that’s something to keep in mind if you’re thinking of slotting Reeche Kitty into any of your end game dungeon builds–you may need to overwrite her skill by putting a Reeche Hat equip on your Reeche Kitty. She’ll be both powerful and fashionable!
Light Great Witch Hello Kitty
Light Kitty is an interesting card overall. This is a card purely designed for swipe farming in terms of awakenings, active skills, and leader skill. Her leader skill boosts both rank exp and coin accrual rates by 1.6, then provides a flat shield and 15x attack multiplier for matching two light combos. Oh, and would you look at that–her active skill provides two rows of light orbs, as well as a 1-turn haste. Thus, you could have an army of Light Kitties and loop active skills, swiping to your heart’s content (four Light Kitties on the team in total would allow you to loop active skills). You could use her as an initial lead for Alt Shura Realm 1 farming, though, if that’s something that you’re into. As a sub, this card looks great for light row swipe teams.
Great Witch, Saline Kitty [evo]
Saline Kitty is a premier card for light-based swipe farming. With a 17x attack multiplier and an additional 4 combos for matching two light combos, dual Saline Kitties means you can basically farm while asleep. If you wanted to drain your 401K to whale on this REM or decimate your stock of 6-star GFE trade fodder, you could have a team of Saline and Light Kitties and loop active skills while also benefiting from a base total of 14 dungeon boost awakenings. Because Saline Kitty has some hard hitting awakenings in the form of a 7C, a 10C, and two Light Takos (not even counting her SA options), she’s dealing considerable damage by swiping if you’re running a pair of them, as using her active skill and swiping provides 10 combos minimum. Where Saline Kitty shines, and where she has seen the most use on the JP server, is in Training Arena 3. With a double damage cap latent and the support of light row equips, Saline Kitty easily hits damage cap with basically zero effort. If you don’t currently have a TA3 farming team, Saline Kitty might be a worthy investment; however, keep in mind that most builds require at least 3 Saline Kitties total (like many popular Gojo TA3 farming builds require 3 of him), so you’d be investing either a lot of stones or a lot of trade fodder. Still, she is the superior TA3 farming option at the moment because of her dungeon boosts (netting you more exp per run). All in all, Saline Kitty is definitely one of the more useful and exciting cards in the collab, both in terms of farming capabilities and as a sub on more traditional teams.
Cat Fact! Canonically, Hello Kitty does not have a mouth. 0.o
Dark Great Witch Hello Kitty
Move over Veroah, there’s a new cat-shaped sheriff in town! Dark Witch Hello Kitty seems in many ways to be a direct upgrade to base Veroah, who has been a beloved button farming lead for years. Their leader skills are identical in the way that matters–a 1.3x boost to egg drop rates. However, where Dark Kitty pulls into the lead is in terms of both her awakenings and slightly lower active skill cooldown. Dark Kitty simply has more dungeon boost awakenings–3 with SA, compared to Veroah’s single one. For button farming teams, you are using base cards with dungeon boost awakenings and inheriting a ‘laser’ equipment on them; lasers are ‘true damage’, like Ra’s Necklace which inflicts 770K damage on enemies two times. While Veroah’s cooldown is only 5 turns, Dark Kitty’s is 3. This might make a difference, depending on your team composition. Additionally, Dark Kitty’s leader skill provides 500K true damage when matching one combo, so you could plow through INT-level floors with little more than a single match of three orbs. This is definitely a card that I am planning on picking up, specifically for farming tokens during collaborations and tickets during Gung Ho Collab. RIP, my beautiful Veroah; we had a good run, didn’t we?
Great Witch, Veroah Kitty [evo]
Veroah Kitty is in many ways similar to Saline Kitty. She deals significant damage, as her awakenings are the same except geared toward dark attribute. Unfortunately, Veroah Kitty’s active skill doesn’t make clean, neat rows; instead, she changes fire and light orbs to dark orbs. Thus, farming with Veroah Kitty requires 1 brain cell, as you’ll need to do some comboing unless you inherit an active skill which makes Dark rows, while Saline Kitty requires 0 brain cells. Veroah Kitty also does not provide a loop in active skills, which is a shame, however this does line up with the way in which each of the Kitties match the great witches they’re modeled after. Still, Veroah Kitty is a formidable farming leader and general team sub. She is capable of farming TA3 and has been featured as a sub on teams as a Dark damage stick. Her low active skill also easily allows you to either generate dark orbs or inherit another active. Overall, she’s a solid card, however if you’re looking for a premier farming card for TA3, I feel that Saline Kitty has the edge.
Cat Fact! Hello Kitty is a perpetual 3rd-grade student who lives outside of London.
The Orb Skin Cards
Charmmy Kitty
A new addition to the collab, Charmmy Kitty can be purchased as a bundle during the event; buying or rolling her will grant you the new Sanrio orb skin. Charmmy Kitty is not only adorable, but her evolutions are also modeled after the Key Heirs from the Sin Dragons and Key Heros REM machine (except for Miya, which is a grievous sin as far as I’m concerned). Base Charmmy kitty is geared toward rainbow teams and has relatively decent stats, as well as an inoffensive and mildly useful active skill in the form of a RCV buff and 2-turn delay. Charmmy Kitty does give full poison resistance, 4 SB with SA, and an additional two seconds of orb move time via her awakenings. There are certainly much worse cards you could use on a rainbow team.
Charmmy Kitty Evos
All four of Charmmy Kitty’s evolutions bring pretty big personal damage, useful awakenings, and powerful active skills on very low cooldowns. Their dual color typings and general strength make them all strong and flexible subs for a variety of teams. While I don’t think any of the evolutions are a must-have on end game teams, they are by no means terrible–I’m personally looking forward to using them in a variety of different team builds. Notably, Moon Heir Kitty is one of few cards with 5 < 50% awakenings.
The fact that Charmmy Kitty is the orb skin, and that you can switch between evolutions whenever you like, makes her a solid card to pick up particularly if your monster box is lacking in mid-game or end-game rated team subs.
Plus, the orb skin is fantastic and my lord, just look at the art for each of the Key Heir Kitties.
Cat Fact! Hello Kitty has a twin sister named Mimmy, who is featured wearing a yellow bow.
Gudetama
Gudetama was available to purchase or roll during the previous run of the Sanrio Collab. Notably, base Gudetama has been changed into an equip in this iteration of the collab. His awakenings and active skill scream Light Row farming. With a whopping 5 Light Row awakenings, Gudetama’s equip helps pack a seriously nasty punch for swipe teams. The only other equip that compares at the moment is Almighty Zeus Card from the Gung Ho Collab–this equip has four light rows, but also includes a skill boost as well. Other notable equips with 4 Light Row awakenings include Nanami’s Machete (Jujutsu Kaisen), Awoken Zeus Olympios (Duel Masters), Thunderbolt Lance Keraunós & Holy Adamant Sickle (Zeus Giga equip), and Emperor Thundersword (Monster Hunter).
If you’re planning to go all out for Saline Kitty farming, or you are lucky enough to roll multiples of her, this is an excellent equip for her (we see what you’re up to, Gung Ho). Keep in mind though that it might not be useful to stack multiple Gudetama equips on your team, as he has a pretty short cooldown and you may start running into the issue of overwriting your cards’ active skills.
Gudetama Evolutions
All of Gudetama’s evolutions share the same active skill, with the exception of Oden Gudetama (who has a cleric active). Bacon Gudetama is geared more toward Light rows, while the Omelette Rice, Pancake, and Rolled Omelette forms feature situational awakenings with overall decent personal damage awakenings (though lackluster attack stats) and full resists for Blind, Poison, and Jammer respectively. The Oden Gudetama form saw the most use in the previous run of this collab, and realistically that will hold true now as well, assuming you decide not to keep Gudetama in his equip form.
Honorable Mention
Princess Valkitty -CIEL-
Before wrapping up the article, I did want to mention one other card. Aside from her adorable staff, Valkitty is also a decent Daytona sub, especially if you are missing staple subs like Halloween Cotton or Dai. She is by no means a direct replacement for either of them–Cotton, for example, is unmatched in terms of damage, amount of TPAs, VDP void skill, and the full board change–however Valkitty could find a place as a sub on your team if you were lucky enough to roll Daytona.
And that’s a wrap! Good luck on your rolls, everyone!
Happy Halloween PAD fam! The PAD Halloween Egg Machine continues the 2021 trend post-DBDC of giving all the PAD originals/seasonals a plethora of assist equips (This time lollipops!).
Firstly, we’ll cover a full review of the machine thanks to Mantastic PAD that covers the 2021 run. Next we have excerpts from DarkDarkRai reviewing meta relevance for the brand new Halloween Inahime, Halloween Chakeol and Reincarnated Halloween Cotton. Finally, we have content from Randall_KTO: HDurga Last Year vs HDurga This Year!
The never ending crusade to push orb-skin cards power level continues here, though perhaps not to the extent of the more notable Belial. While Halloween Chakeol is no doubt the best card from this machine now, I feel I should mention Halloween Inahime first, because this will either convince you to spend 20$, or skip purchasing this bundle, without reading farther.
Her main use as a sub is going to be for [7772] Blazearm Scarlet Conqueror, Sea Wolf, but her primary use will likely be as a sub in the long term. Though she has not been out long enough to have her best-use cases tested, she has still seen quite a large amount of use, especially for Sea Wolf.
Delays and skill-boosts increase in use with each new absolutely game shattering double transform lead that gets released. Most of the best delays up until this point for red have been tied to an equip, such as Glavenous Helldnova, Red Shelling Ford and CROWS1 ([7421] JPN-Only). However, this is the first time that red has received a late game viable card with a delay active that is not an equip since Duval from Sacred Relic Dragon Saga. Not only is this card late game viable in its non-equip form, but it also has a dark sub-attribute which is the one color that Red teams desperately needs in NA at this current moment, due to lack of JPN-Only Magneto.
Halloween Inahime’s main drawback is that outside of Sea Wolf (who uses 7cs to boost team damage), her damage is lackluster. 3 7C awakenings for an 8x multiplier often does not make the cut in today’s current late game meta. If you tack her extra VDP SA on to that then she reaches a 20x personal multiplier which is still only modest. She will struggle to hit damage cap with leaders other than those similar to Sea Wolf.
Aside from her delay she does have a couple other great draws. A cross awakening (or 2 with SA) for blind skyfall mitigation since end game throws it at you left and right. 100% poison resist is also in her kit.
The cards Inahime is most likely to replace are other low cooldown cards that can hold delay active equips. Your most likely candidate for a dark attribute card, that has a low cooldown active skill, and can hold your equips? GungHo Belial. What does GungHo Belial have? A Super Poison Resist Awakening. So not only does Inahime help you cover the same attributes as the ever notorious Belial, but she effectively serves the same purpose that Belial would in the early game, while also providing better damage, and the potential for a DDC (double-damage cap) latent on Sea Wolf.
Example Team Making Use of H.Inahime
This team offers absolutely massive damage with a ton of 7c stacking for Sea Wolf’s active skill, all the cards available to be Damage Cap broken, full coverage, and amazing utility with the addition of Inahime.
[7954] Masquerade Witch, Chakeol
[7954] Masquerade Witch, Chakeol
Halloween Chakeol is the true queen of this collab. Is she ever a doozy: a system-able 35% shield active, strong awakenings and the ability to also be used as a leader and sub. Her optimal home is currently as a sub for Yuji/Mahito teams. Sadly, her usefulness in NA is somewhat diminished due to lacking Darth Vader, who loads up the dark takoyaki/ACE awakenings that Chakeol desperately wants as a leader. He also provides an extremely low cooldown VDP active on a dark sub, which NA does not have as of now. Her optimal pair as a lead is Baran (7697) from Dragon Quest collab which is also currently JPN-Only.
Her base form offers an amazing suite of awakenings for dark teams, boasting the valuable double 10c awakenings without SA, Tape Resist and 2 dark takoyakis/ACEs. Not to mention the great utility offered via 100% blind resist SA, meaning you can have 2 statuses covered with one slot. One issue with her kit is the lack of VDP.
Example Team Making Use of H.Chakeol
This team presents what I believe to be the most relevant use for Halloween Chakeol. If NA had Dragon Quest collab or Star Wars collab this team would look much different. Due to the lack of these cards I do not think Halloween Chakeol has much real use in Shura 3, and her use is mostly restricted to MD1 and future-proofing your monster box.
[7960] Cheerful Toy Dragon Caller, Cotton
[7960] Cheerful Toy Dragon Caller, Cotton
Finally we come to what I most recommend trading for in this event, Halloween Cotton. Her new reincarnated evolution packs a powerful punch with the upcoming Godfest Exclusive, Daytona. Boasting a huge personal multiplier with 6 TPAs, and a 10c, she is almost unparalleled when it comes to damage on Daytonas TPA reliant teams. She also has the option to Super Awaken any of the 3 main resists (Poison, Blind or Jammer), giving you the ability to cover any resist you may have missed in the rest of your team building.
She also has a strong active, giving you a tri-color board of Light, Dark and Heals, and unlocking the board at the same time. More importantly, she gives you the VDP (pierce damage void) active that Daytona desperately needs, allowing you to make optimal TPA boards capping your entire teams damage. This active is so good in fact that there are even instances where multiple Cotton on your Daytona team is very viable.
Daytona/Daytona Double H.Cotton build – Credit to Randall_KTO
Randall_KTO’s Halloween Durga Template: 2020 vs 2021
Final feature is for Randall_KTO who has abused Halloween Durga’s passive 50% shield and systemable 35% active shield.
GungHo Collab is back with an almost a complete renewal. There are as many new cards as there are re-shows. This re-run premiers some powerful subs, usable leaders and cards that fit into tight niches. Analysis is provided by WetTheSystem with some light-hearted commentary for each 7-STAR provided by BattleCorgi. The Score Diamond is generated by 0.0-3.0 scale scoring from select players. Each line on the diamond is equivalent to a 0.5 score. Very few cards will have a full diamond as most cards have certain niches in the game they fit into.
Some notes: Scroll over the images to get directional arrows to view additional evolutions on each card. Naming and spelling may vary due to localization changes when content comes to NA and so there may be some discrepancies in the names shown here. Monster IDs are provided to reduce confusion. This particular article is currently only discussing cards new to the REM. There are some notable buffs especially to Karin’s leader skill as a leader for new players and Elena’s awakenings making her a viable double damage cap sub.
Image cards are generated by Tsubaki bot, which you can find in many PAD community discords including Hyperion’s. You can find their Patreon here: https://www.patreon.com/tsubaki_bot
Summary: GungHo Collab NA Re-run 7/2021 is a strong renewal for a long time machine. Many of the new entries, even some of the gold eggs, are nice catches. However, there are some painfully useless cards on the bottom end which take up 45% of the odds in the REM and even a few diamonds (like Joker) might leave you feeling trolled. More conservative players might choose to just trade for Rudra and buy the Belial orb-skin bundle, especially considering the soon to arrive Faeries event. Don’t forget to farm the event dungeon for gold tickets as its easily the most efficient way to farm Pys.
Almighty Zeus [7283], [7284] & [7285]
[metaslider id=313 cssclass=””]
Almighty Zeus lacks a current good home in a team or as a tool in current endgame. Zeus [7283] is a 6 skill boost light blob/row farming sub and leader. His skill is useful in farming applications as it guarantees a row, can provide for SFUA and unlocks the board. His leader skill is good row based leader similar to Haohmaru from Samurai Showdown. [7283] has 20x attack with 6+ combos and a strong AutoFUA (5M) at 6+ light orbs. His leader skill is compatible with the newly buffed Ferule and creates a viable Light-blob Shura2 team. Also notable that this AutoFUA is perfect for tackling the 1% SR first floors of many of the new Extreme Annihilation difficulty descends. Dark Zeus [7284] has a strong cleric active that provides 5 lights, 5 darks and 5 hearts. Unfortunately it only reduces statuses by 7 turns so its not appropriate for the 10 turn status effects in Shura3 and clunky in A.Shura2. His 4 light Takos mostly go to waste due to our lack of Light-combo based leaders. Finally, Zeus Assist [7285] provides an impressive 4 light rows and 1 skill boost and his strong farming active as the active skill. This further cements this card as a great farming tool.
Almighty Zeus is an average card, but has some potential to greatly improve players boxes who lack good light blob farming tools and would like a good leader, SB stick or assist equip. His base form is compatible with Ferule and makes her more endgame viable.
Corgi Rating: Zeus comes off as the type of guy whose idea of a great first date is listening to Nickelback in a WalMart parking lot at 11:50PM. He drives a lifted truck and spits sunflower seeds into an empty Mountain Dew bottle. Sitting next to him means being consumed by a cloud of Axe body spray. 1/5 Corgis
Rudra the Destroyer [7286], [7287] & [7288]
[metaslider id=317 cssclass=””]
Rudra the Destroyer Is a very powerful and versatile fire sub. Rudra [7286] can pack an impressive FIVE red Takos providing fire combo teams huge amounts of passive damage. Most notably his awakening set will become useful when NA gets the Faeries event that introduces Rosalyn. Her active scales off red Takos in a way similar to Nautilus and Royal Oak. His active is a 10 turn cooldown 1/2 RCV and Void Damage Void for 2 turns. This is a very low cooldown for this active, and if RCV is adequate this is a good option for overwriting more serious RCV debuffs as well. Dark Rudra [7287] has 5 cross awakenings that give him absoutely insane personal damage on a single cross match. He also has a very powerful 2 turn active that creates 3 Fire and 3 Dark (over non-Heal) making him a potential sub choice for Fire/Dark leaders that need a potential orb system. Finally, Rudra Assist [7288] provides a Cross and Team HP+s. The cross gives other teams access to blind skyfall clear and the active skil provides a low cooldown assist for bypassing damage voids. This is a perfect card for cross teams that want to approach content with Void Damage shields.
Rudra the Destroyer is a powerful and versatile fire sub. He has current usability but will really shine when Rosalyn is released in North America in the near future. Don’t miss this card if you are planning to play Rosalyn.
Corgi Rating: Rudra’s abs hold almost as many secrets as his hair. He has a clearly beloved pet snake and multiple arms, meaning he’s not as emotionally stunted as Zeus and he probably gives great shoulder rubs. Rudra writes really bad poetry that he often shares on Instagram but his laugh is kind of cute. 4/5 Corgis
Tyrant Empress Belial [7289], [7290] & [7291]
[metaslider id=321 cssclass=””]
Tyrant Empress Belial, the newly introduced orb-skin, comes packing with 3 very useful forms. Belial [7289] is a critically useful heal-stick and FULL cleric for many teams due to her 5 heart orb enhances, high RCV stat, 100% poison resistance and stacked low-cooldown (5 turn) active. She packs an optional 4 SBs or cloud resist and can be an inherit base for critical early dungeon active skills like Red Shelling Ford. Belial [7290] has a 1 turn suicide that overwrites time debuffs and generates 3 Dark orbs which is a perfect active for archetypes popular in TA2 and TA3 dungeons. Her awakenings and leader skill accentuate her kit and make her a strong <50% sub and leader herself. Finally, her assist equip [7291] provides a diverse awakening set of Cloud, FUA and God Killer and her powerful full cleric active. The low cooldown means this card can be inherited and still have a lower cooldown than many other cleric options. Tyrant Empress Belial gets high marks in as a meta sub/assist and longevity due to her strong active and heal focused awakening set. She’s an important sub for several meta teams and meta teams in future content including Rosalyn. She’s also a notable farming tool.
Corgi Rating: Belial has an enviably adventurous fashion sense and a mysteriously stern expression. Belial will ghost you after the 2nd or 3rd date; however, you’ll always think of her fondly because of her sardonic sense of humor, as well as the impressive speed with which she scarfed down an order of mozzerella sticks when you took her to Chilis. She spends a lot on pedicures and also has a tail. 4/5 Corgis
Lance Princess Berte (Velte) [7292] & [7293]
[metaslider id=325 cssclass=””]
Lance Princess Berte (Velte) is a welcome sub expanding the available Nautilus roster. Berte [7292] provides full Blind resist and provides meaninful damage through 3 green rows, 10C and VDP (through SA). She may have a better home on Freyja/Nautilus pairing due to the increased +combo in her leaderskill, but even if not being used as a damage stick she provides so many things Nautilus may want with 4 skill boosts, the already mentioned rows and a rocking Wood/Heart generator with time extend and no skyfall overwrite on a 2 turn cooldown! Not only that this means that every 2 turns you can do very precise damage control setups because of the one turn of no skyfall guaranteeing your damage output or your ability to save orbs. You may find it difficult to fit her on team especially in Shura 3 due the the All Attr Required clause and her shared color set with Nautilus (G/B). Both forms have a good leader skill, but her chibi form will probably be the most useful of the two leader skills. Chibi Berte [7293] ‘s great leader skill is dampened by her mediocre active and low skill boosts. She still synergizes well with Nautilus: 3x eHP, 6x eRCV and 20x Attack.
Berte is a good addition to Nautilus teams. Her low cooldown active and general synergy makes her a great pick. Also a playable leader if you are looking to pair with Nautilus.
Corgi Rating: Berte is clearly a librarian by day, but slayer of supernatural foes ala Madoka Magicka by night. With her sensible haircut and trusty fenic side-kick, Berte is the ultimate gal-pal. She’ll happily be your confidante–as well as a shoulder to cry on–after a bad date. The easiest way to make her blush is to quote Pride and Prejudice in her presence. She’s also absolutely not interested in you. 5/5 Corgis
Ceressa, the Resonance of Lost Gear [7294] & [7295]
[metaslider id=328 cssclass=””]
Ceressa, the Resonance of Lost Gear is a slightly late addition to Royal Oak teams. Ceressa [7294] packs plenty of Ls, 100% poison resist and 4 skill boost and a decently potent active on a 3 turn cooldown, but is out competed by the SamSho orb-skin: Hisame Shizumaru. The active skill overwrites no skyfall debuffs, gives a 2.5 RCV multiplier and creates an L of blue BUT it does not make hearts and can even overwrite existing hearts on the board. This doesn’t make her bad, she’s great, especially with access to Cloud and 10C through her Super Awakenings. However, you may find it difficult to fit her on team especially in Shura 3 due the the All Attr Required clause and her shared color set with Royal Oak (B/D). Chibi Ceressa [7295] is strictly less useful. Her guaranteed 10,10,10 board with 2 turns haste may see some use in farming but her utility focused awakening set does not work well with such a low impact active skill. Unfortunately this active skill (and her low SB) also impacts her usefulness as a leader, because Chibi Ceressa does actually have an excellent leader skill that synergizes with Royal Oak: 3x eHP, 6x eRCV and 20x Attack.
Ceressa is a good addition to Royal Oak teams especially if you are missing some of the other more meta options like Shizumaru, Mega Skuld and Kyori. Also a playable leader if you are looking to pair with Royal Oak. Her base form’s low cooldown active is a systemable water L if you happen to pull 3 of her.
Corgi Rating: Ceressa always makes a great first impression, but her cheery grace obscures a dark inner turmoil. Ceressa peaked in high school and now has a business on Etsy where she sells custom knock-off Starbucks tumblers. She’s in a massive amount of debt because of three failed attempts at profiting from MLM schemes. However, Ceressa does have great hair. 2/5 Corgis
Type 61 Battler: MeiXin [7296], [7297] & [7298]
[metaslider id=331 cssclass=””]
The introduction of War Tank Meixin adds another card to the roster that is desperately waiting for Rosalyn to arrive in North America. Both of her forms are useful for red teams in end game, farming and potentially even ranking tournaments. Meixin [7296] packs a ton of passive damage for red combo teams due to her 3 fire Takos. She also provides a bit of bulk with Team HP awakenings. She’s held back however by low skill boosts and bindable without SA. If you do have an equip with Bind Resist she can provide 100% Jammer resistance and overall is very useful. Meixin [7297] packs a 5 skill boosts and 31.25x personal multiplier with 10C+VDP. This multiplier sky rockets to 281.25x against Physical spawns which can be very appealing in certain dungeons (including ranking) that contain lots of Physical type spawns. Her leader skill is serviceable and can pair with the soon to come Rosalyn with 3x eHP, 2x eRCV +3 combo and 1M Auto FUA. Unfortunately she does have a low attack mutliplier at 14x. Finally, both forms of Meixin share the same active: 2 turns of 1.5x orb move, total defense void and a bottom row of fire. This is a greaat active for farming and even potentially ranking. It’s on low enough cooldown (6 turns) that it does not feel like a waste in other content as well. Lastly, chibi Meixin [7298] adds on to the huge amound of red row farming tools. Three chibi Meixins create a systemable red row generator with a total of 12 skill boosts, 9 red rows and 6 red takos. They also have meaninful damage when making a VDP on these farming teams for spawns with void damage shields.
Like Rudra, Meixin is primarily waiting for Rosalyn to hit North America. She has uses in all three forms and has great farming actives. Red row farmers may consider picking up 3 of these for her system.
Type 61 Battler Armor: XiaoXin [7299], [7300] & [7301]
[metaslider id=335 cssclass=””]
War Tank Xiaoxin [7299] and [7300] is very similar to her Fire sister Meixin except in her chibi form where she deviates. Please take a look at her synopisis for commentary on her awakenings and how they are used on teams. Xiaoxin’s differences are her killer kit is targeted towards Attacker, she has access to blind resist SA instead of jammer and she provides a different style active. Xiaoxin’s active is very “toolbox” She increases orb move time like her syster but provides a 3 turn 2x spike for blue and 2 turn delay. We used to scoff at these confusing actives saying “Why would you want a delay and spike on the same active?”. That is not the case anymore with the introduction of spawns with Super Resolve and giant HP pools. These kind of actives can now TOTALLY trivialize some content and make sure the active is very useful for the entire dungeon. Xiaoxin is a bit less versatile than her sister due to bad leader skills in both forms, but she is very useable now with leaders such as Hitagi from Monogatari collab. Xiaoxin REALLY stands out in her chibi evolution [7301]. She provides 4 skills boosts, significant healing through heart OEs and notable damage with 2 VDPs and 2 blue Takos. This is not what makes her so unique though as its her active skill that really stands out. On a 5 turn cooldown she fully recovers bind and awoken bind, but at the cost of making heart orbs unmatchable for one turn. This has some notable downsides if you can’t survive the turn on which you use the active skill, but keep in mind that this does overwrite other unmatchable debuffs with this short one turn unmatchable. This is quite excellent as it is, though gimmicky, a FULL CLERIC on a 5 turn cooldown.
Xiaoxin has some strong actives and possible applications as a farming/ranking killer stick. Most notable about her is her strange low cooldown pseudo full cleric active in her chibi evolution.
SO629c-Ballista [7302], [7303] & [7304]
[metaslider id=339 cssclass=””]
SO629c-Ballista [7302] and [7303] is very similar to her Fire sister Meixin except in her chibi form where she deviates. Please take a look at her synopsis for commentary on her awakenings and how they are used on teams. Ballista’s differences are her killer kit is targeted towards Healer, she has access to poison resist SA instead of jammer and provides a different style active. Ballista’s active is very “toolbox” providing 5 TURNS of 50% shield, 1.5x orb move time and 1 spinner. The cooldown is a bit long at 14 turns, but it does a lot and is very useful for busy or orb hungry teams as a spinner combined with long move time translates into a perfect board with enough player skill. Her leader skills are totally eclipsed by other cards currently available like Araragi and Mikage for both forms. Ballista’s chibi evolution [7304] is a low cooldown 2 turn “double Fujin” at the cost of 1 turn of voided RCV. This makes the active problematic in endgame, and the low cooldown (12 turns) isn’t especially notable, but it is rare. She is a great pull though if you lack other damage absorb and attribute absorb voids and can even be used as an assist. Notably she could be useful on speed farming teams for AShura1 because the one active is a low enough cooldown to be used on Sopdet, Another Crusader and also be your 2 turn solution for bad Menoas.
Ballista has useful actives and can be valuable to dark teams, especially orb hungry ones. She has possible applications as a Healer killer stick for farming/ranking.
Shakti, Mother of Mercy [7305] & [7306]
[metaslider id=343 cssclass=””]
Shakti [7305] is poor man’s Freyja. This card will only see use in niche situations where you want a similar active on a slightly shorter cooldown. Considering that Nautilus is 25 turns for his first transform this will likely not be a good replacement for Freyja due to one less turn of re-haste to get to form three faster and limitations on equips due to over-hasting. She even covers the same resistance as Freyja (jammer resistance). She has various other downsides as well like lower stats and only access to 6 slots on latents. Shakti’s most likely to be used form then is her card assist [7306]. It provides ribbon resist and a green Tako. Ribbon is not useful in the current meta, but it could be in the future and this equip does technically provide one effective skill boost.
Shakti looks like a bad SR Freyja, but her assist might be useful for newer players with less access to haste/skill boost equips.
Archangel of Music, Sandalphon [7307] & [7308]
[metaslider id=346 cssclass=””]
Not to be confused with the descended farmable, Archangel of Music, Sandalphon [7307] is good, though niche. He provides great personal damage to balanced and devils especially when matching a light cross. Both of his attributes are light which actually makes him a viable candidate for double damage cap awakening for the 8.4B damage hits. With SA’s he can even have 2 7Cs which means he’s still usable even against other spawns. He packs 4 skills boosts as well! His down side is lack of bind resist and awkward, though still usable active. Sandalphon’s active provides a 1 turn 100% shield which is great, but it also forces 99 turns of locked skyfall making him problematic for anyone but light teams. Take note that you cannot L-unlock your own locked skyfall buffs.His assist equip [7308] is quite good and fairly unique as it provides 60% jammer resists, 1 heart OE and the 100% active shield.
Sandalphon is niche, but useful for light based teams, especially if you’re looking for a useful shield active equip. Most likely he’ll be used to double-double damage cap against non-void shield Balanced/Devil spawns.
Blaze Lotus Night Rubel [7309] & [7310]
[metaslider id=349 cssclass=””]
Rubel [7309] is a mediocre killer stick with a decent farming active. She provides a column of Fire orbs, +2 combos and a shield on a low 9 turn cooldown. Her chibi evo [7310] is likely much more useful as she has notable personal damage for farming/ranking with her 4-5 >80% awakenings and 2 VDPs. She also provides a potentially useful ally delay + large spike which expands her farming usefulness.
Dark Green Brawler Apis [7311] & [7312]
[metaslider id=352 cssclass=””]
Apis [7311] and [7312] is a stinker of a card with almost no use in either form. Her chibi evo does have a 9 heart generator and damage debuff over-write on a 5 turn cooldown which is technically unique. She’ll likely only be useful in very lean monster boxes.
Dark Magician Olkis [7313] & [7314]
[metaslider id=355 cssclass=””]
Olkis [7313] has AMAZING farming and ranking potential. He provides a 500,000 damage laser and 10 orbs in a “big L” formation. This is notable because its a swipe-able COrb (combo orb) for cards with the Combo Orb awakening. This means it is one active that can cover 3-4 functions: laser, swipe-able board with + combo and finally provide combos for the next floor. His chibi evolution [7314] active is less useful but still good as it can overwrite no skyfall debuffs, time debuffs and spinners on a short 6 turn cooldown.
Olkis is a gold egg worth rolling for and a great addition to the monster box for any player that likes to participate in farming and ranking content.
Varuna, Blue Twin Dragon Scale [7315] & [7316]
[metaslider id=358 cssclass=””]
Varuna [7315] isn’t great, but he could see applications in descended dungeons where his low cooldown amp and board unlock might be useful. He can provide blind resist as well. but he otherwise is held back by a lot of trashy awakenings. His card assist [7316] has the same active which can be good or problematic because of the 3turn cooldown. It does have some applications in ranking due to it being a viable way to provide TPA style points, but there are likely better options.
Ushas, the Dawn Mother [7317] & [7318]
[metaslider id=361 cssclass=””]
Ushas [7317] and her card assist [7318] is painfully useless in a post-Muzan world. Any auto-heal teams now get plenty of healing by just pairing with a Muzan which is ubiquitous among the player base. On top of that you can farm an assist equip, [2105] Himi Udon, that does the job of providing 4 auto heals and 40% resist as well.
Wicked Dragon Asura [7319] & [7320]
[metaslider id=364 cssclass=””]
Asura [7319] is an interesting card. He can provide meaninful damage with his 10c and either the blue Tako or jammer blessing awakeing when activating his board which provides a tri-color blue, red, jammer. Tricolor boards can be a good way to setup other boards or ensure that you will get a decent amount of combos. On top of that the active bypasses damage void shields. This is on a low 10 turn cooldown because jammer creation counts as a “discount”. He also has built in poison resist and 4 skill boost. This card definitely has potential on niche descended content teams. His card assist [7302] provides the same interesting active as well as 40% jammer, 20% blind and 20% poison. This can be quite good and might be that perfect combination of awakenings you need to hit resistance caps.
Asura may have potential uses in both forms. While not good in lots of dupes, having a couple might be nice.
Hello everyone, Insomnia here, and the Deadly Sin Dragons and Key Heros(SDKH) are back with buffs and a new card after almost 10 months. The debut of SDKH brought multiple meta leads and many powerful subs and equips that still see use today. Although the power level of the event has fallen off a little over the last 9 months, SDKH still remains a very powerful collab that should not be overlooked, especially if you didn’t roll much in the previous run. Today I will break down everything you can get during this event, both REM and farmables. Different cards will be useful for different people, so I will try and give you as much information on everything as possible, so that you can decide if it is worth pursuing for your own purposes or not.
Image cards are generated by Tsubaki bot, which you can find in many PAD community discords including Hyperion’s. You can find their Patreon here: https://www.patreon.com/tsubaki_bot
7-star REM
[metaslider id=175 cssclass=””]
Gileon was an incredibly powerful leader on debut and still remains extremely strong for Shura 1 and is capable of doing Shura 2 as well. Unfortunately Gileon didn’t get a super significant buff to his leader skill at all so for now he’ll remain as a decent lead. He is extremely tanky sporting a 4x HP and 57.75% shield when above 50% HP. His buff giving him a bonus 25% shield when matching 3 Fire combos isn’t really useful, nor does it do much to address his biggest issue as a lead, his RCV. The RCV issue can be addressed by using a healing stick sub such as Super Reincarnated Amaterasu Ohkami[5938]. To really take advantage of his max 75.99% shield, you’ll need to use a Gileon system, which means running double Gileon leads and a Gileon sub to take advantage of his 3 turn active skill. The constant board change will hopefully create 9 Fire orbs, but as it is a tri-color board change this isn’t very consistent. Gileon also doesn’t have auto-FUA built into his leader skill so you’ll have to manually FUA, which for the most part isn’t a problem. The problems come when you are trying to FUA and make a VDP match, it can be difficult to proc the 7c damage of your other subs depending on the board. I would’ve liked to see at least an add combo to his lead skill, instead they gave him a buff in his best department already, his tankiness.
However, Gileon really shines as a sub. His 3 SB in pre-transform state alleviates some need of stalling and pressure of bringing a ton of SB on other subs. The 3 turn reduction from 30 to 27 turns to transform is also very nice, way better than his leader skill buff. Once transformed you have a tri-color board with Hearts and Fires on a 3 turn cooldown, as well as cleansing any RCV and Time Extend debuffs. His quad 7c awakenings also means he packs a serious punch. 2 of the best Fire leads in NA use him as a core sub, those being Seina[6660] and Tanjiro[6531]. If you run either of these 2 leads then you really should chase a Gileon if you don’t have, as he will continue to be a key sub on those teams and many future Fire teams to come.
Gileon’s new equipment form is actually very powerful. Boasting a SB, OE for Fire, and Team HP awakenings alone already makes it a very strong equip, the powerful active it has is just icing on the cake. Full clearing binds and awoken binds and removing all unable to match orbs effects is a highly desirable set of effects in an active already. The board creation is just a bonus, and although it doesn’t create heals, the active recovers all your HP anyways. The only place where this would be a problem is if your lead doesn’t have auto-FUA (which ironically describes Gileon). Despite all this, if you already own a similar active equip, you may not find as much value in this one. It’s not an absolute must have, but it is nice to have.
[metaslider id=182 cssclass=””]
Menuit is unfortunately not the most useful lead. The meta for heart cross lead was 4+ years ago, and they’ve never made a comeback after that. Considering that all your damage and shielding is set on matching the heart cross, it’s not very consistent. Although with dual Menuits you get guaranteed 5 heal orbs each turn, that’s considering that you don’t have locked orbs on the board. What you need to make Menuit work overall just isn’t worth it as a lead.
As a sub Menuit is still a little awkward, but at least it’s more useful than Menuit as a lead. When transformed, Menuit is a high damaging Water sub and quick heart generator. This can be useful for some Water teams but for the most part there are better options. Where Menuit does shine as a sub is with farming. When transforming, her base form provides 3 turns of bypassing void damage shield and damage absorb shields. This is a unique combination of effects that no other card (except her equip form) has, and it is extremely useful for farming. Having an active that pierces through both damage void and damage absorb shields in one gives the rest of your team more flexibility, especially in dungeons where you can get different spawns each run on a floor. The fact that this effect lasts 3 turns is even more insane as there aren’t many actives for both damage void and damage absorb that last 3 turns. The transformed active unfortunately isn’t that useful for farming, unless for very niche scenarios. It is however only a 2 turn cooldown, so short cooldown inherits can be charged up.
Menuit’s equip form will probably be the best for the majority of the player-base. It combines all 3 void style actives into one, and it lasts for 2 turns to deal with those pesky super resolve spawns. This equip is so insanely versatile it can go on practically any team that needs a 2 turn active for any of those mechanics. The cooldown isn’t even unreasonably high so it can definitely be up in time if you need it early in a dungeon. Highly recommend trying to pick up at least 1 Menuit for this equip. However, it’s not a big deal if you can’t as it’s quite unlikely that you’ll need all 3 effects at the same time. You can easily compromise with a combination of 2 actives for the specific scenario where you need all 3, or just use an active that only covers the one you need for the dungeon you are attempting.
[metaslider id=186 cssclass=””]
Amlynea, or colloquially known as “Deer”, is an interesting lead. All of your damage and shielding is tied to matching 5 colors, which is extremely inconsistent without 7×6 boards, which is unfortunately something that newer dungeons seem to punish. Alternatively, Deer’s active provides 2 spinners that can be used to generate missing colors, and she unlocks the board first so you don’t have to worry about locked orbs. However, with a strong multiplier, a decent amount of great sub options, and great survivability, if you can deal with the challenges that come with matching all 5 colors, Deer can be a fantastic lead.
As a sub, Deer is rather average. 10c and 7c awakening provides a lot of damage if you can hit 10c, and you get plenty of time, however her active is quite niche and there are probably plenty of other subs you could use. It’s difficult to pick a team where she would be the “ideal” sub, unless of course for niche scenarios where that quick spinner generator would be useful. Her only obvious place as a sub is on a Deer team where you are pairing her with a Fasca[5842] or some other 7×6 lead and you still want the system of spinner generators.
Deer’s equip form is rather interesting, being 1 of only 2 cards in NA that gives 2 or more seconds of movement time (the other being LKali equip[7249] which gives 3 seconds but no skill boost). Overall it’s a potentially useful equip, but I wouldn’t label it as a “must have” card.
[metaslider id=190 cssclass=””]
Ferule was one of the hottest leads back during the first run of SDKH, and slowly began to fall out as Shura 2, Shura 3, and their alt. dungeons got released. However, where Ferule shines the most is Shura 1 speed runs. She is one of, if not the fastest and most consistent lead for Shura 1, especially after her biggest weakness got addressed, her lack of shielding. With the new buff she gains a 57.75% shield with dual leads which keeps her healthy against gravity attacks. If you’re looking for fast and consistent Shura 1 runs, she can easily do ~12mins with practically complete consistency. If you are planning on doing Shura 1 with her, you will need to roll a second one to have a system with her 3 turn active in post-transform, otherwise you’ll lose out on consistency and/or speed due to not running an optimal team (which can be manageable especially if you don’t have a strong Shura 1 lead).
As a sub, as I already mentioned she fits onto her own team the best. However, most Light based teams can benefit from her. Her active offers a rather quick orb generation and a short cooldown spike that can be helpful for killing some of the tankier spawns. Her awakenings offer great VDP damage when needed as well, which overall just makes her a solid sub. However, there are typically far better options than Ferule in many other Light teams, simply because they have better awakenings (Ferule could be doing a lot more damage if the SFUA awakenings were replaced with another 7c or VDP).
Ferule’s equip form is just overall a great and versatile equip. The SB and rows make her useful and Light based row teams, farming or general teams, and her active is great for any Light or Light + Heal match teams, as you are always guaranteed the 15 orbs so no need to be worried about orb troll. The SFUA and Combo Orb(Corb) awakenings have niche uses depending on the team, for example if used on a Ferule team, since she doesn’t have auto-FUA built into her kit, you can match a 3×3 Heart box with the active to trigger SFUA and kill through resolve spawns. The actual orb unlock and 15-15 Light and Heal orb part is not unique however, there is 5 star card in this event that does that, making it far more accessible if you only need the 15-15 board, that card being Egg of Pride[6419].
[metaslider id=194 cssclass=””]
Euchs is another lead that was considered extremely powerful during the debut of SDKH, and much like Ferule and Gileon, was slowly crept out over time. Also much like Ferule, Euchs’ is an amazing Shura 1 speed-runner that is also very consistent for relatively low effort. Euchs’ biggest issue as a lead that really prevents it from performing well in newer dungeons is the fact that you have to stay under 50% HP, or else you lose most of your damage. Being under 50% HP is always risky even with a 75% leader skill shield and 35% from the active if you are looping it like you would with Ferule. Getting to 50% HP typically isn’t the issue, if you can’t tank some hits from the first floor of a dungeon, there are plenty of HP reset actives (including your own equip) that can do that for you, but having enough healing to not just straight up die but not so much healing that you go above 50% HP each time is not something that is super consistent. Although you could use a card like Zaerog Core[5633] that can reset your HP each turn, that is just another active slot used, which really only leaves you with 2 sub slots to cover everything you need in a dungeon. Euchs performs extremely well in Shura 1, easily on par with Ferule in terms of speed and consistency, but begins to struggle outside of the dungeon as significant team adjusts may be needed depending on the dungeon, an issue that Ferule teams don’t really have.
As a sub, Euchs is really only useful on his own teams. On his own teams he can get pretty close with just a VDP and another Dark match, which is why he performs so well in Shura 1. The below 50% HP awakenings make it so you can practically kill most spawns with just 2 Dark matches, don’t even need the VDP. To maintain the below 50% HP consistency, you should ideally run the no skyfall badge to prevent any accidental Heart skyfalls that can mess up your runs. Since below 50% HP teams are quite rare, Euchs struggles to find a home in other teams, despite having a perfectly great active.
Euchs’ equip is absolutely incredible for farming purposes. A row make along with a damage and att. Absorb void is an incredibly powerful combination as it combines basically 3 actives into one, creating more freedom in teambuilding. This combination is also unique as nothing else like it exists in the game, for any color. The awakenings are just a cherry on top as it synergizes extremely well for dark row farming teams. Since you only need 2 Euchs, one as a lead and the other for a sub, any additional Euchs should be made into this form, as not only is it great for farming, it fits perfectly onto Euchs teams, and isn’t terrible for other Dark row teams due to the SB and rows it provides as well.
[metaslider id=198 cssclass=””]
Miya is the new 7 star that was released with the return of SDKH, and she’s a pretty damn good lead if you can snag her. Your active loops with dual pairing, your 75% shielding is passive (which is pretty significant when compared to conditional ones), and you only need to match 4 combos, given that 2 of them is a Light and Heal to reach 8c with the added combos in your leader skill. Matching 6 combos will give you enough to trigger your double 10c awakenings outputting massive amounts of damage. Your Team HP awakenings give you some sense of HP as well even though you lack a HP multiplier. Miya also has a rather high RCV multiplier, letting you match through Poison and Mortal Poison orbs in peace, as you don’t have much raw HP to begin with.
Miya as a sub also fits onto many other Light teams, as she straight up brings HP, damage, some utility in the form of L shield and unlock, and a quick orb generating active. Most light teams that have added combos to take advantage of her double 10c will be able to use her, making her extremely versatile.
Overall Miya is just an incredible card to own, for any current and future Light teams. At the moment she is an incredibly powerful lead for Shura 2, but as with anything will eventually get crept out of favor, especially since Shura 3 is already a thing in NA. However, similar to Gileon in a way, it will still be a while before she gets crept out of favor as a sub, simply due to how much she brings. If you manage to get dupes, for now unfortunately they aren’t that useful, but she will almost definitely get an equip form the next time SDKH comes around, whenever that may be.
6-star REM
**The equip form I will be referring to as the sin name(eg. Envy, Lust, etc.) while the reincarnated evolution I will be referring as the dragon’s name(eg. Jevi, Varias, etc.)**
**Another note, you pretty much never use the middle evolution of any of these cards outside of extremely extremely niche scenarios, so I will be talking about all the dragons in their max evo form**
[metaslider id=203 cssclass=””]
Envy is a rather nice equip, it provides a 2 turn damage void nullify active on top of a board change. The unbindable and 4 Water OEs are also great for water teams. The board is unfortunately not ideal for rainbow leads (typically the kind of teams that use this kind of active) which decreases the value of this card. However, it is still overall a great pull especially for those that don’t own a damage void nullify active yet, much less a 2 turn one. This is especially true now that the cooldown went down from 25 turns to only 18 now. Otherwise, for people with better damage void nullify active, Envy will serve only as an unbindable equip or for the Water OEs on Water teams. It’s long cooldown unskilled also lets it serve as a delay shield for the card it is inherited on top of.
Jevi features an array of offensive awakenings and an incredible 6 SB as a sub. The active has the same issues as Envy in that it’s not the best for rainbow teams. Now that the cooldown has been reduced to 18 turns, you can more effectively inherit something on top of Jevi, if you want to still take advantage of the awakenings he provides. This however is rather situational and will heavily depend on the team and dungeon you are attempting, but it’s worth mentioning. As a lead Jevi does have a fixed 9 second orb move time, which can prove useful in certain pairings, but his multiplier is far too low to be significant as a general lead. (something that all the 6 and 5 star cards share)
Overall Envy line is nice to have, mostly for those without good void damage nullify actives. However the active itself is mediocre at best as it can create unwanted boards, especially since mono and dual color teams can typically just match a VDP, which for the most part is better than using an active.
[metaslider id=204 cssclass=””]
Sloth is also a pretty decent equip, the active is perfect for any rainbow team and although super resists are more and more common nowadays, the 40% resist in blind and poison can still be helpful if you have other 60% resist equips. The unbindable is also a nice bonus. All this combined makes Sloth an overall useful equip in many scenarios.
Feygoran attains the same useful active but also has a skill charge awakening, giving you access to the 14 turn active much quicker when used on a rainbow team. Combined with the other offensive awakenings makes Feygoran a great sub for many rainbow teams. Though it’s not the best overall sub for rainbow teams, most players will be able to find a place for him.
Overall the Sloth line is a solid addition to any box, a utility active and awakenings will always have a use somewhere. Although a bind clear with the active would be nice, it’s not a necessity to make the active good.
[metaslider id=211 cssclass=””]
Greed has one of the more rare actives combining damage absorb void and attribute absorb void, making this active both useful for farming and normal teams. Having unbindable and 60% poison resist is just a bonus for any team. As previously mentioned, the increasing popularity of super resists is beginning to make these kind of resists irrelevant, however the strength of the active makes up for it.
Rhamamoa although has the same active as Greed, is not really used for his active ironically. He is mostly used for his triple dungeon boost awakening, each of these awakenings giving a 2% increase to rank exp, monster drop rate, monster exp, and coins when used in solo play. The only other card in the game with 3 is Xmas Saline[5772], a significantly rarer card to obtain. You will frequently see him being used in teams that run the int difficulty of many collab dungeons, and combined with the drop rate increase leader skill of Veroah[4649], lets you easily farm the collab exchangables.
Overall the Greed line is an excellent line to own, having 4-5 in Rhamamoa form and a few in Greed form would be ideal. Even if you do not farm, this is a very easy to grasp concept as it pretty much just revolves around having Rhamamoa subs with lazers such as Awoken Ra[2012] inherited on him.
[metaslider id=216 cssclass=””]
Wrath is a very powerful equip for any dark based row team, for farming or for general use. The SB along with the 3 rows while providing a cleric and burst in the active makes Wrath an all around amazing equip. The dual purpose nature of the active allows Wrath to find a use in a wide variety of different situations.
Vald is also an absolutely amazing card as a sub. Capable of providing 6 SB to a team, while having the same incredible active as Wrath, and having great offensive awakenings makes Vald extremely valuable. If the SB isn’t necessary you even have the option to have super blind resist. Many Dark based teams, and even a couple Fire teams can utilize him quite well.
Overall the Wrath line is one of the best lines out of the 6 and 5 stars. Having such powerful uses in both egg and reincarnated form means having many dupes of him is highly desirable, whether it is to stack dark rows on a farming team, or to have different latent or super awakenings setups in Vald form, most players will benefit from having multiple of him.
5-star REM
[metaslider id=215 cssclass=””]
Lust is an okay equip, it does provide a tape resist and a 2 turn haste for transforming teams, and can be used as a spike later on. A 12 turn cooldown is pretty decent for what you are getting so it’s definitely useable.
Varias is unfortunately not that useful. It could be used for farming with 5 SB and a 2 turn haste, but farmable cards like Whaledor[2940] has 1 more SB and a significantly lower cooldown. As a traditional sub it has some 7c damage, but provides practically nothing else other than it’s somewhat useful active.
Overall the Lust line isn’t too great, there’s not any need for dupes of them, but you’ll most likely get a couple if you roll a couple times in this event.
[metaslider id=223 cssclass=””]
Pride has a unique 15-15 board, which for those that don’t understand the strength of this, means you can always match 10c from it. It also means you never have to worry about the board not giving you enough of 1 color. 15-15 boards are extremely powerful for ranking as you can get the fast solves while maintaining a high average combo. Although you do have the extra animation of the unlock orbs, unless you are going for a high .1% score, this won’t matter, especially now that crown cutoffs are at 5% instead of the old 3%. Owning multiple of Prides is ideal as a result.
Fadelle has the same uses as Pride, for ranking. Both evos will find use as both still maintain the important awakenings, the 5 SB. In second evo form you only have a main attribute, which allows for faster animation (depending on length of the ranking dungeon, you can save almost an entire second), or in reincarnated form, if you need the VDP and SFUA for extra points. As a traditional sub Fadelle isn’t too great, therefore you’ll probably be better off leaving it in Pride form.
Overall the Pride line is great if you’ve been shafted from some previous rankings due to the lack of 15-15 boards. Although there’s not much of a use for the line outside of ranking, considering how common it is to roll one, you might as well prepare for the future if you are going to do ranking.
[metaslider id=227 cssclass=””]
Gluttony is a great below 50% HP equip for Dark teams as it actually cuts your HP with it’s active, and provides a non Heal board to prevent you from healing back up. Below 50% HP equips were quite rare back when SDKH, only in the single digits, and although there have been a few more added, Gluttony is still one of the more easily accessible options.
Madjeh unfortunately isn’t too good. The 5 SB and multiple below 50% HP awakenings are nice, but his rather low base ATK decreases the value of those awakenings. You are much better off leaving it in egg form unless a super niche scenario for Madjeh comes up in the future.
Overall the Gluttony line is really only useful for the egg form’s below 50% HP awakening. If you already have other more useful below 50% HP awakenings, it will practically make Gluttony line cards box cheerleaders, forever collecting dust.
Sacred and Cursed Keys
There are 2 types of keys you can farm, Sacred and Cursed Keys. Sacred Keys all have their own unique active skill whereas Cursed Keys share the same active as existing Sin Dragons, but with different awakenings. Either can be bought for 100k MP and there is no limit to this. As such, you should make at least 1 copy of every key, and if you already made them last time, you won’t have to worry about them.
In my opinion, there is not a single key that really warrants owning multiple, so one of each is fine. You will need these keys to farm the 3 other farmables in the collab.
Sacred Keys:
Warrior Key is a nice 300x mass Fire button for farmers by killing multiple spawns, however since it also reduces your HP to 1, you won’t be able to use the same active twice, which is why there’s not a point to having multiple.
Sage Key isn’t very good in any specific area. A short delay is nice for stalling and/or transforming. A 100% defense void is nice in dungeons like Training Arenas. The 20% resist in everything is pretty pointless, as it is not very valuable anymore.
Tempest Key is actually a very nice damage absorb void option for those without. 13 turn cooldown is also very good for a damage absorb void. You get decent passive damage for Wood and Light as well. You should absolutely make this if you are lacking fast damage absorb options.
The awakenings of Blessed Key are heavily geared towards RCV, making it great on teams with naturally low RCV. However, although the active isn’t bad, it’s not very useful as a 3 turn bind and awoken skill bind clear is very lackluster nowadays. The 5 turn cooldown doesn’t help it in case you wanted to just use this for its awakenings.
Angel Key has a board along with a 2 turn void for attribute absorb, which is nice to have. Although it’s actual usefulness depends on the dungeon and team, it doesn’t take away from this key’s value.
Cursed Keys
Lust Key takes the same active as the Lust line, but with significantly more useful awakenings. The 1000 decrease on ATK on whoever Lust Key is inherited on can be impactful, but you can easily just inherit it on someone who isn’t one of the primary damage dealers. The SB and rows combination allows Lust Key to be used on traditional Fire row teams and Fire row farming teams.
Envy Key takes the same active as the Envy line, but with interesting awakenings. TPA and L unlock in one card doesn’t necessarily synergize, but it’s not necessarily bad either. Although it does let you be versatile in how you want to use it, Envy Key is probably more for rankings, where all 3 of his offensive awakenings count for style points. Otherwise it’s the same slightly awkward nullify damage void active as the Envy line. Do be aware the 2500 decrease in HP awakening can be significantly impactful.
Sloth Key takes the same great active from the Sloth line, but at the cost of a 2500 decrease in HP and 2000 decrease in RCV, gives you a guard break awakening. Although a guard break equip is extremely rare (the only other card in the game that has a guard break and it an equip is Dyer’s Story Equip[7116]), it’s honestly not worth the stat decreases. Sloth Key will find more value in ranking where there is an emphasis on the guard break awakening. Although some traditional rainbow teams could need a guard break awakening, this is extremely niche and you’re almost always better off using a sub that has it.
Pride Key takes the same active as the Pride line, but provides a unique awakening in an equip, a super poison resist. There is no other equip currently that has this, the closest being equips with 80% poison resist. Although the 1000 decrease in ATK and 2000 decrease in RCV can be detrimental like Sloth Key, a super poison resist is far more valuable than guard break making Pride Key worth running for that purpose. Otherwise Pride Key functions the same as the Pride line, primarily used for rankings.
Gluttony Key takes the same suicide active as the Gluttony line, but provides an incredible amount of HP bulk in the form of 4 Team HP awakenings, at the cost of decreased RCV and ATK. Though there are a number of equips with 3 Team HP awakenings, Gluttony Key is the only one with 4, making it unique. Although the value of it probably isn’t as much as a super poison resist, it can be more valuable depending on the situation.
Dungeon Farmables: Gorfeis, Gorkaos, and New Gorkaos
These dungeon farmables are spawns that require specific things on your team to trigger their spawn. These are extremely powerful and I highly, highly recommend farming 2-3 for each, you’ll probably only need 1 of the new Gorkaos though. Farming means skilling them up too dont forget, they require many skillups(70 total for one) and it’s not really worth to use pys. However, with GungHo Collab going on, you can easily farm pys in it so you may opt to use that to farm skillups instead.
For Gorfeis to spawn, you need to have one of any key inherited on your team (the one on your friend’s lead does count). Gorfeis is a great sub for many Light teams, whether as a SB stick or for the active or for the VDP damage. It has amazing stats and a great active. It fits particularly well in Ferule[6401] teams but is extremely flexible and worth the investment.
As a lead, lowering your HP isn’t really a good thing, but if you aren’t taking damage anyways, you basically get a 576x multiplier lead as long as you are matching 7 combos. Honestly, not really useful but not completely useless either.
For Gorkaos to spawn, you need to have all the Cursed Keys inherited on your team (the one on your friend’s lead does count). Gorkaos is an amazing sub for many Dark teams, having potential for 6 SB or super poison resist, on top of a cleric active. In particular he fits very well on Euchs[6403], but many Dark teams and farming teams can utilize him.
As a lead, it’s the same as Gorfeis, just for Dark and slightly more damage. Not much else to say about it.
For the new Gorkaos to spawn, you need to have both Gorkaos and Gorfeis on your team with all the Cursed Keys inherited(the one on your friend’s lead does count). The new Gorkaos will drop as a gem, and you’ll need 5 of them to evolve a normal Gorkaos into this new one.
Gorkaos is an incredible rainbow lead. You are extremely tanky and have incredible damage. For the best results, ideally pair with a 7×6 lead, such as Dark Sophie[6586]. This lets you reach the 5 colors for the maximum damage output, but even the 25x at 4 colors is already enough to kill most spawns.
You also have strong offensive awakenings with the option to have super poison resist as a super awakening, or you can opt for more damage. Overall Gorkaos is just an incredibly powerful card. In base form it functions as a great sub for farming and traditional use, in evoed form functions as one of the best rainbow leads in the game.
Final Thoughts
If you made it here, congrats, this was a long article for a pretty content heavy event. Overall the SDKH event is quite powerful, however due to only receiving minor buffs for the most part, isn’t the best thing to roll for the average player. If you are however, chasing the 7 stars, buying the bundles would probably be enough if you already rolled a ton during the last run. You’d probably be better off saving stones for upcoming content, such as the Star Weaving Fairies Event, which I will be reviewing soon and will hopefully get out before the official debut. Thank you for reading!
We’re back at it again, this time with Samurai Shodown. I opted to skip a Fate overview, as I felt like nothing in that collab had any real staying power. That isn’t to say anything outside Shizumaru in this collab really warrants very much attention either. This is another case of Gung Ho’s recent obsession with re-running old collabs and just adding an extremely strong Orb Skin card.
Starting from this collab onwards, I will be using a tier system. Instead of assigning numbers or letter grades, I will be breaking the cards into 3 separate categories: Chase, Potentially Useful, and Garbage. I should also say, I look at most cards through the lens of end game for the most part. So it may have some use outside of that, my knowledge in those areas is more limited, so my opinions on that will be less researched. I don’t want to provide anyone with an un-researched opinion if I can avoid it.
Cards in the Chase category will be units that I think are the most important to pick up, depending on what your box looks like. Potentially Useful cards will be cards that I think have very niche (but potentially important) use, or cards that seem useful, but currently don’t have a use. Garbage cards will either be skipped completely, or are just completely eclipsed by many other cards. It is more than likely I will just skip mentioning the garbage cards unless I feel like there is something noteworthy about them.
This collab has only 1 card that I feel is a true chase, but a small handful of cards I would deem potentially useful.
Shizumaru does everything Royal Oak could ever want. 2x RCV to help mitigate RCV debuffs, and he makes up for Royal Oak’s lack of any RCV multiplier. Shizumaru creates 3 of the 5 water orbs needed to activate Oak’s leader skill and 3 hearts which compliments the buffed RCV. The only very small downside to the active skill is that it replaces the 20 turn water orb skyfall that Oak gives on his first transform with a 1 turn fire orb skyfall. That being said, Oak’s active skill changes Fire into Water, so it isn’t like this really punishes you all that much.
The awakenings add to this card’s strength. He boasts a 22.5x personal attack multiplier, not including the VDP awaken (56.25x if you do). Very few cards can even hope to match a personal multiplier this high. Having Full Blind Immunity as an added bonus really helps push this card over the edge as well.
Outside of Shizumaru only one other strong Water card has Full-Bind Immunity attached to it, which is Bride Elsha–they are very similar cards. Bride Elsha offers the same Full blind coverage, a (Smaller) RCV Buff, 1 turn of VDP and 1.5x orb movement time. So where Shizumarucreates needed orbs, Bride Elsha gives time-extend as well as a 1-turn VDP active skill, so the choice of which to use comes down to the dungeon at hand. Sadly for Bride Elsha, her Time-Extend is almost completely eclipsed by Azure Dracoblader of the Split Sky, Kyori, however that is another review for another time. Ultimately, the damage awakenings on Shizumaru greatly benefit Royal Oak, far more than Bride Elsha. L-Unlock Awakensgive consistent damage, where Takoyaki Awakens tend to not offer as much to a lead that wants to only make one L per board most of the time.
To really ice this cake, the pre-transform offers you not only 5 effective Skill-Boosts, but 3 of those can be used at your discretion. You could transform Royal Oak and use Shizumaru to give you an extra 3 turns of Skill-Boost towards the second transformation of Royal Oak. This means you only require another 3 turn haste or delay active to get you to your last transform.
The final quick point to mention is that Shizumaru can also be used as an Asymmetric pairing for Royal Oak in Shura 3. It sacrifices the 5 million Auto-Fua, and .5x HP for a 1.5x RCV multiplier. It obviously is less consistent than Oak x Oak, but that’s not to say it can’t be done. Though if you own Royal Oak already, there is no reason to bother doing this.
Shiki is in this category, more specifically her equip form, Nameless. The 2 base forms don’t seem useful. Nameless’ unique offerings make it a mainstay on Royal Oak and Ryumeiteams. Its main competition comes in the form of Demonlord Crasher. Where this card gives 2 Ls and no other utility, Crasher offers Tape and a -50% awaken but 1 less L and a -HP awaken. However, in the context of Royal Oak teambuilding it does make you a near perfect board. 5 of each color orb does essentially mean 10 blue, as dark will be changed to blue orbs with Royal Oak’s active skill. The unlock is useful when Kyori is on cooldown, or if you are trying to charge an inherited active. It has also seen very niche use on Rainbow teams that need L-Unlock but can’t get it from a sub.
Yet another entry into the ever growing list of strong Green Clerics. Alynna makes this card somewhat obsolete for Shura 3, due to her sub attribute and better overall use on Nautilus teams (please see my Relic Dragon Overview for a more in depth breakdown of Alynna). That said, this card has seen a large amount of success in other end game dungeons. For Shura 2 Yashamaru is completely acceptable as a cleric. There, players are given far more time in between Awoken binds and unmatchable orb status to reliably charge up this active skill. With his newly added 10cSuper Awakening, he can now have 20x personal damage, far out doing even Alynna’s damage. However, it comes at the cost of not being able to take the second SB+ Super Awakening. It’s more likely this card sees play on non-Nautilus Green teams, such as Nadeko, Guile or the newly released Joachim—all three of which are consistent Shura 2 leads.
His equip form Shanao is one of only two full-cleric Green equips and it also comes with 4 Jammer Resists attached to it. The main competition for this equip would include TAMADRA Gift Box and Ippon Katana. In this case it offers the 4 jammers that none of these other cards do, so it would see use in those niche instances where the 4 jammers are required to get full coverage on teams. It’s also worth mentioning that equip stat transfers mean that on a green team, this will offer you some HP that those other 2 options will not. It also offers a board refresh, removing any locks or status orbs currently on your board. This can be a benefit or a detriment depending on the situation, but is most often a benefit.
The newest evolution for this card, Heroic Outlaw, Yashamaru Kurama, also has some potential use as a sub on some green teams as well. That being said, no team has really needed or wanted what he offers as of yet. 31.25x personal damage, with Two (Potentially Three with Super Awakens) Cross-Awakenings makes for great utility and damage as well, not to mention the full Jammer immunity. It just happens that no team currently requires this specific combination of awakenings yet, though one may in the near future.
His awakenings offer exactly what is needed for a damage stick in Shura 2. The use starts and stops there though, as outside Shura 2 these awakenings tend to have far less use. It just so happens that the most important floors are either Devil or Attacker. A 1-turn delay active skill is also useful, though often this card will be used to hold an equip active skill until needed. A small note to add onto this card is that currently in NA there is an extreme lack of viable Light leads, which restricts this card’s usage even farther.
This card truly personifies cards that might be useful but just don’t have a home right now. The first evolution Wicked Colossal Ninja, Earthquake, has one of the most stacked actives in the game. It could be used to farm daily dungeons or farmables right now, as the active would make light work of most bosses and difficult spawns. Though as far as Shura goes, it just doesn’t have a place to call home. His leader skill doesn’t fit late game content at all and the active skill is just too long to be relied on, though with 6 Skill Boosts (after Super Awakens) it may see use in the near future.
His equip form, Fujiyama, follows in the footsteps of its non-equip brothers. His equip has the same loaded active and a very strong set of awoken skills. However, while the awoken skills look great on paper, they end up not lining up the way almost any meta Red lead would want them to. A Skill-Boost is great, but tons of other equips offer this. 3 Red-Row awakens is strong no doubt, but many other great equips offer this too, especially Red Ney and Madoo’s equip. This card is worth the mention because while Japan has many better Red Row equips, we lack them (more than just one, as it’s 8 now at this point).
I feel like most everything else in this machine is either not worth your time to read about, or just will never see any real meaningful use. So that ends this overview; I hope you found something useful. Stay safe everyone, take care until next time. 🙂
Hi all, and welcome to the first post on the new site.
Some things to note before we start. In my collab/event “overviews”, I try to avoid discussing any cards which have little to no value in any content. In other words, if I have not seen it used in a ranking, a farming setup (for a dungeon I deem worth farming), or the current end game (Alt. Shura 1, Alt. Shura 2), it likely will not be discussed at all, or only briefly mentioned. I also extensively research/play what the top ranking JP players are using for their current end game (Shura 3), so with two to three months of foresight into their current meta, I hope I can help you avoid potential pitfalls and better futureproof your box against upcoming NA content.
This is the third run of Sacred Relic Dragon Saga, and sadly, quite a few of these cards received the short end of the stick. Sacred Relic also hosts one of the largest letdowns in terms of a newly released card.
Before discussing the buffs, it’s worth mentioning that all the Sacred Relic cards were given the Marvel treatment, in that they now have 8 Latent Skill Slots for transform cards. Being able to take 6 Skill Delay Resist Latents while still having two latent slots leftover is a small, but not insignificant, buff. That Extra HP++ or Killer latent could save your life in a pinch, or could put you over the needed 600k Effective HP threshold for Alt. Shura 2.
Outside of the occasional use for Dyer as a leader pairing for Akine, this event consists mostly of cards which are more useful as subs. This REM features two top-tier subs for top-tier leads. With that bit of pretext out of the way, let’s dive head first into this very shallow pool, starting with the cards I feel you should be looking to chase.
Elven Emissary, Alynna is the most valuable chase card from this event. Normally, I would offer up some alternatives to the cards at hand. However, because of this card’s enormous utility coverage, no other cards can match the value she offers as a sub for Drillspear Jade Conqueror, Nautilus.
Since JP first saw its release into the game in April, Nautilus has dominated the Shura 3 and Alt. Shura 2 meta and is one of the fastest Alt. Shura 1 leaders in NA. In fact, its endgame prowess has only recently been challenged by Hibiscus Dignified Star Spirit, Rosalyn. With Nautilus’ massive 10 million auto-FUA and huge 24x attack multiplier, there isn’t much else that can compare.
So why is Alynnaan unparalleled sub for Nautilus? Nautilustransforms twice, leaving players with a six-turn period between the initial transform at the start of the dungeon and the second transform which grants its full multipliers. To make matters worse, Nautilushas no RCV multipliers to speak of in either form. How does Alynnaremedy this? Alynnahas a very short 12-turn transform and, as a result, she will transform immediately assuming you are also transforming Nautilusturn 1. When she transforms, she gives you 8 turns of a 40% HP Auto recovery. This means that for those six turns before the second Nautilustransformation, you will have an auto recovery buff to assist in staying alive. Her three Skill boosts and inherent (pre-transform) cloud resist awakening is vital in Alt. Shura 2 and generally useful in other content.
Barring her use as a sub for Nautilus, she should be compared to her other cleric contemporaries. While there are many other potential Green Cleric options, these are the best options in most cases:
In a side-by-side comparison, it should quickly become apparent why Alynna is preferred to her counterparts. Not only is her cooldown post-transform the lowest by 2 turns, but she is the only one that fully clears all three statuses. While this may not have been notable a while ago, it is now; these days, most end game dungeons will drown you in combinations of all three. Having the ability to fully clear them as fast as possible will always be greatly beneficial. It also doesn’t hurt to mention that being able to create a row of green orbs and lock them provides great utility as well, especially as a counter to spinners.
Now for the final cherry on this delicious sundae: her post-transform awakenings. While they may seem lackluster at a glance, I can assure you that they provide more value than may appear at face value.
Once again stepping back into Nautilusterritory, he has no RCV multiplier in any of his forms. This means players must find a suitable RCV solution. How does Alynna help with this? Those two Heart Orb Enhances prove invaluable when attempting to heal, combined with the many Heart orbs that Nautiluswill create in his final form. Additionally, the pre/post transform cloud resist is always helpful.
Her damage awakenings are lacking compared to that of Tuala and Chakeol, but in almost all cases, it is worth the trade-off. Most Nautilus teams will consist of many high damage cards, including Selica, Academy Valeria, and Nautilushimself. This means that Alynna’s lower damage output hurts far less than it would on most other teams. However, that doesn’t mean that 2 7c and a VDP isn’t a respectable amount of damage for a cleric.
A small note on her assist Muy before we continue on to the next card; it has a great deal of utility, boasting a Physical Killer, 3 Green OEs, and 2 Team RCV. These awakenings, along with a potent full cleric active and 50% shield, make Muy unparalleled among equips.
Sadly, most of what it offers is either unnecessary for the current end game, or is done better by another equip. The OE is much easier to obtain via Aljae’s equip, Ghum, as it offers the 5 required OEs to have a 100% chance of green OE skyfall, rather than the 3 that Muy offers. The Physical killer is unnecessary, as no green team tends to struggle with any Physical spawns. Machine Killers, Devil Killer, and Dragon Killers tend to be far more effective (For Shura 1,2, and 3 respectively). The Team RCV is also less useful, as most teams have a relatively high RCV multiplier or Heart OE, to make up for their lack of one. Team HP tends to be far more needed to make HP thresholds for Shura 2 and 3. The active skill is also quite strong. However, it’s unlikely most teams will have the time to let it charge, as 14 turns is too long to wait for an inherited cleric active.
Next the second noteworthy card from this event, Journeyman Adventurer, Dyer. This card’s desirability is measured solely by its niche use of providing a VDP option for Light teams that desperately need it.
First, something to get out of the way: as it stands right now for North America, we only have 1 truly viable light lead which is Crimson Dragon Mystic, Ryumei. Soon we should be getting Academy Kio, but until then, it’s only Ryumei. Japan has had the Marvel collab and as many of you know, Captain Marvel dominates the light meta there.
All that said, no matter which of these 3 leads you use, you will always have the same overarching issue thrown into your face–the best Light cards tend to lack VDP. Let’s look at a quick list of some of the best Light subs/leads and see which of them have VDP.
As you should be able to quickly see, the list of viable subs that can take VDP is somewhat limited, especially in NA. This is made even harder in Shura 3, where you need All Attributes on your team. Stretching to get enough VDP while also covering 5 colors is nearly impossible. The compromise? Dyer.
His short 18-turn cool down transformation should be easy enough to achieve, assuming you are using Ryumei (25 turns) orCaptain Marvel (23 turns), who both take longer than that to Transform. It’s worth noting that he himself contributes 0 Skill Boosts to the team, which may cause team building issues.
As opposed to Alynna, who we compared to several cards, Dyeris quite cut and dry, as he only has 1 card for competition. Let’s quickly look at them side-by-side to see the pros and cons:
These numbers all require some consideration for the team/dungeon at hand. Thinking of it in the context of true cooldowns, Fagan – Rai actually only has a 6 turn cooldown after his VDP runs out, though Fagan takes far longer to get to his active skill the first time. Furthermore, not all teams are going to care about the attack spike for Dragons, as you likely won’t want to use this as your primary attack spike. The shield Dyeroffers is universally helpful, as it essentially means you get 1 extra turn of safety after you do the VDP for the next floor’s preemptive attacks.
Which dungeons/teams are they actually useful for? First and foremost, if your team uses Dragons, you may prefer Fagan–this especially applies to Ryumei. If you are running a dungeon that requires several consecutive turns of VDP, then Faganmay be your best choice (this applies to most dungeons Pre-Shura 3). As for dungeons, Shura 3 really only has 1 floor that requires VDP, and only for 1-2 turns at most, you can chip the floor down until you get to the point where you feel you can kill reliably. On the other hand, most prior dungeons (Alt. Shura 1/Alt. Shura 2) have several consecutive floors of required VDP.
Another important thing to consider is that post-transform Dyerhas the Guard Break awakening. This may not seem like much, but is absolutely essential for breaking defense without the Limit Break Latent in Shura 3.
Sadly, we currently possess none of these options (and in 2 of 3 cases likely never will). Getting Marvel would mean we have access to both Captain Marvel and Wolverine, but we still won’t haveDoppo Orochi or Mickey. As a result, I can really only speculate on what Dyer’strue value will be outside of Ryumei. If you are considering Ryumeias your potential future Shura 3 clearing lead, then this trade has tons of value, as odds are that Dyerwill almost certainly be used for Ryumei. If you plan to wait for Marvel or Academy Kio, then trade with caution as there is no telling if you will be using Dyerat all.
Another quick mention on Dyer’s two equips before we continue to the next card.
Arwill (7112) is useful to be sure. Unbindable and a team RCV/HP awakening is strong, that’s for damn sure. A 12-turn CD, 75% shield, and a VDP with a spike, what’s not to love? Sadly, this card’s level of utility is very limited. That’s not to say it doesn’t see use, as it has a great deal of utility on Shura 2 and 3 Ryumei teams. Ryumei (and most other transform leads) is bindable pre-transform. However, Amakozumi, The Chinese Series Equips and Tamadra Gift Box tend to be the preferred unbindable equips.
His second equip, Arwill(7116), is one of only 2 equips with Guard Break, and is the only one that doesn’t give you a stat drop in its awakenings. With that said, for Shura 3, Guard Break isn’t really needed outside of having it on 1-2 cards as a soft requiement. Also, while this may sound harsh, the active skill is pretty garbage and you likely won’t want it overcharging on your subs.
Great, so that’s both the highest value trade/roll targets out of the way. Time to talk about a card that breaks my heart in more ways than one: Orc Musion, Firo.
Why does it break my heart? The answer is two-fold. Firstly, I had high hopes for this card. At first glance, its leader skill looks strong. It’s got a low 14-turn transform active with 2 SB and 3 turns of haste when it transforms, giving it effectively 5 skill boosts. Its awakenings are very unique, as 4 crosses and full poison immunity seems like it should be strong by default.You may think, Firois the Fire/Dark Seinawith a giant auto-FUA instead of + combos. Seems great, right? It has all the makings of a great lead with a unique set of awakenings. However, in practice, it has turned out to be lackluster at best.
So what happened to make it so bad, if it has all this going for it? Simply put,Flame Wheel Mystic, Seina has something going for her that Firo does not. Seina is a 2-color required lead that is self-sufficient in making her own colors with her active. Firo’s active, while good, does not provide a system. In fact, no card in the game can reliably make Dark and Fire orbs every turn. Compounded with that issue, her active gives you an auto-recover which, unlike an RCV buffing card, does not remove RCV Debuffs. For most end game dungeons, you will still want a dedicated RCV buffer on your team. Furthermore, 2.3x HP with a small shield makes ASR2 very difficult compared to leads with a moderate-to-high HP multiplier and a large shield.
The second reason this card makes me sad is that, without Marvel, this card may very well be your best choice for a Fire/Dark card to use on your Red focused Shura 3 teams. This highlights how badly NA needs Marvel to come, and how badly we will all need to roll it. This card sees very little use in JP, outside of an occasional lead swap pair with Magneto or Dark Phoenix to abuse crosses on 7×6. Even then, it is lackluster outside of Shura 2 at best, and impossible to use in Shura 3.
The best news I can give you for this card is that if you IAP, this card is the orb skin so you can just buy it without rolling.
Now, to give brief thoughts on the rest of the cards worth discussing in the event.
Conykin Martial Artist, Deena has potential as a general purpose sub on your blue teams, but shines best on Royal Oak teams. She has a board lock active on a 1 turn cooldown, which is only matched by Magical Machinist, Menoa. While this active is useful in dungeons with many spinner floors, spinner spam stops being a real issue after Alt. Arena 4.
The other issue that plagues Deenais thatShizumaru Hisame exists. We should shortly be getting Shizumaru, who is superior to Deena in all aspects but board locking. Shizumaruhas a 3-turn haste and 2 SB in base form which is essential to transforming Royal Oak the second time as fast as possible. He has a 2x RCV spike on his active skill and generates 3 water and heal orbs on a 2-turn cool down. Deenaoffers very little in the way of utility that Shizumaru can’t outside the board lock, making her use far more niche than her counterpart. One last small thing to consider about Deenavs Shizumaruis that while we don’t know that Samurai Showdown will ever return, it stands to reason that Relic Dragons, and by extension, Deena, will be back soon enough with more buffs.
Dragonkin Merchant, Polowne, once stood undefeated as your go-to Fire (and in some cases Dark) Void Damage Absorb and Void Attribute Absorb card. She still holds that throne, but only for Alt. Shura 1. Starting from Shura 2 onwards, the need for a dedicated Void Damage/Attribute Absorb card is greatly diminished. Instead, most people opt to use an equip with a similar skill on top of a card with an active skill they don’t regularly use (Shiva or some other Red card with an Inosukeequip in most Red teams case). Polowne has essentially been replaced by cards that do more damage as opposed to her utility. In Alt. Shura 1 and most earlier dungeons, her cooldown is low to the point where you will never have to stall for her active to come up and the 4 effective skill boosts she offers you are valuable.
Here are a couple of quick honorable mentions before I wrap this up. First goes to Fiendish Assassin, Shivnia, for being one of the best TA2 farming leads in the game. She makes sub 50% and dark row farming very easy. Even outside of Training Arena 2, she makes a great farming lead for collabs and events as well. Assuming the dungeon has only small or no preemptives, she is likely a very viable lead.
Second honorable mention and last card we will discuss isTrinitas. While I think this equip is amazing, I also think it doesn’t really have a home right now. Most contemporary dark leads do not lack RCV, and the ones who do tend to get it from an RCV multiplier, like Old Castle Watchcat, Bastet. The spike on the active is a bit too long for most dungeons this would be required in. Furthermore, RCV tends to have less use than HP for most teams, as hitting health thresholds is more important than recovering after a hit.
This ends my overview of this event. Most of the other cards in this event just don’t warrant any discussion on my part, as conceited as that may sound. They are just not worth considering for most teams, or are just directly outclassed by another card.
Hope you enjoyed reading this as much as I enjoyed writing it. Hope you will stick around for my future reviews. Until next time, stay safe everyone 🙂


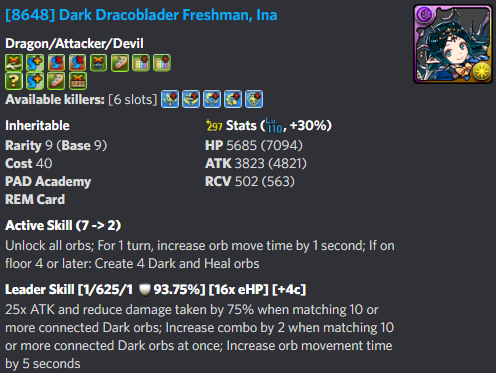


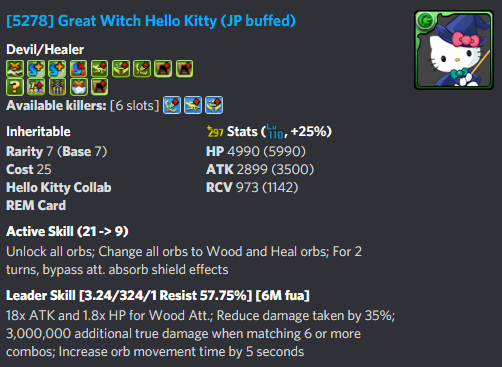

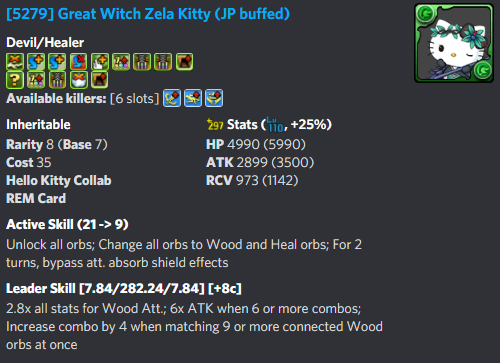

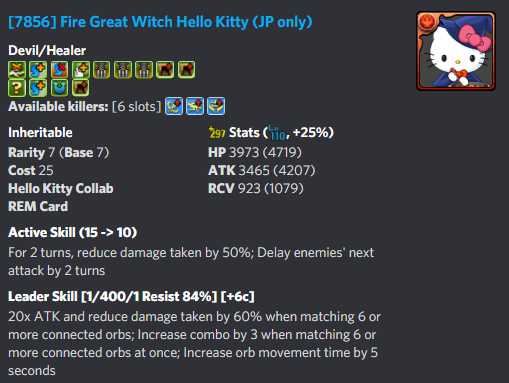


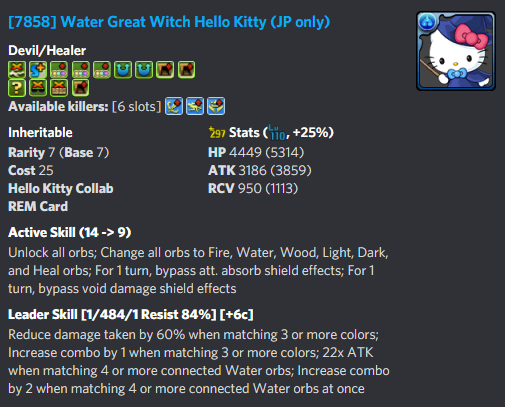

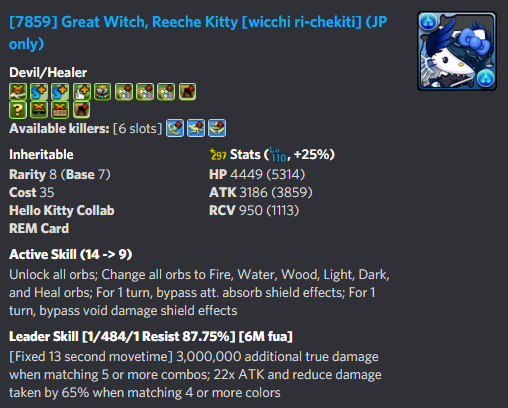


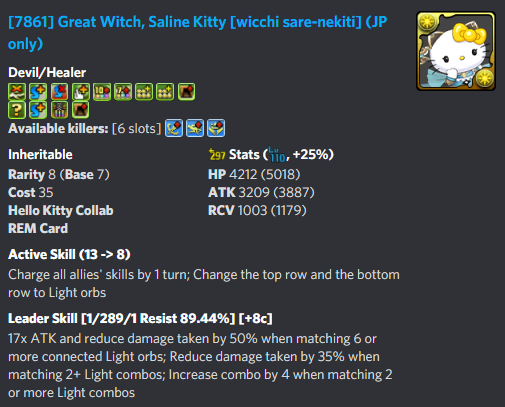

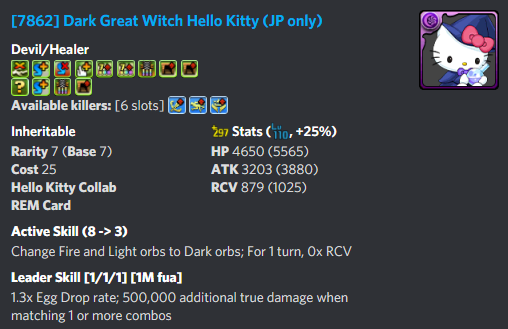

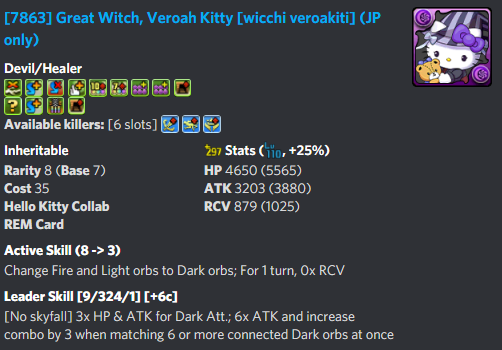


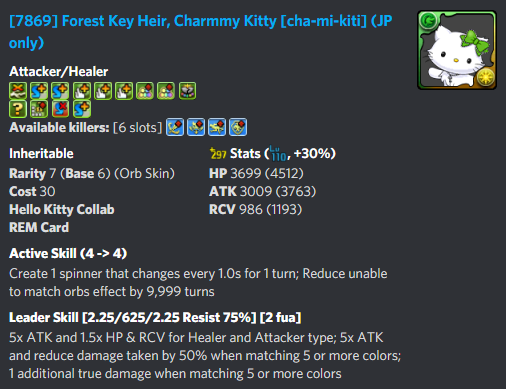


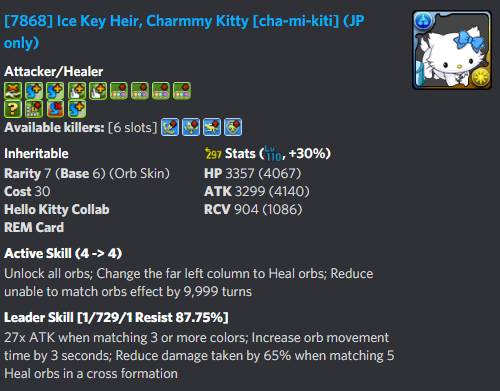

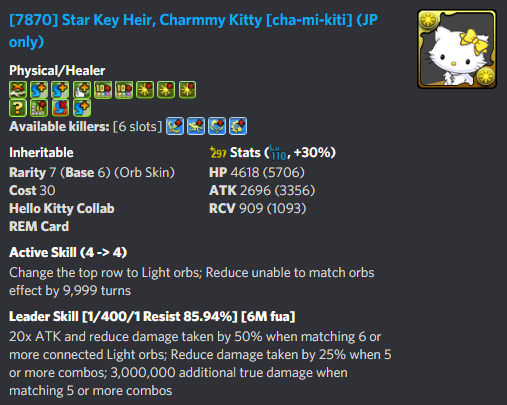


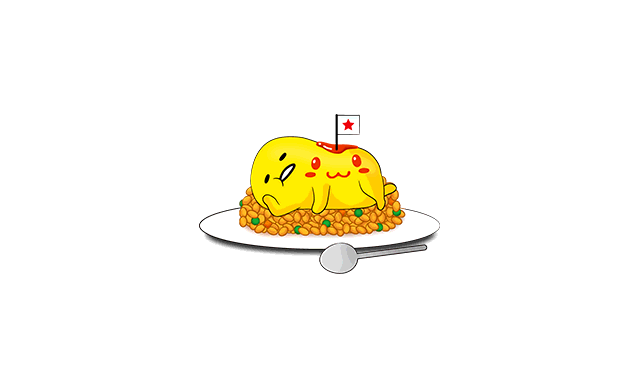
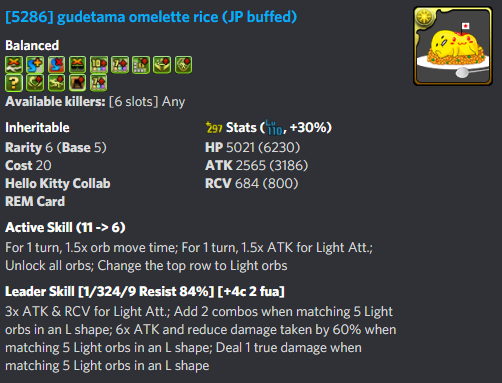

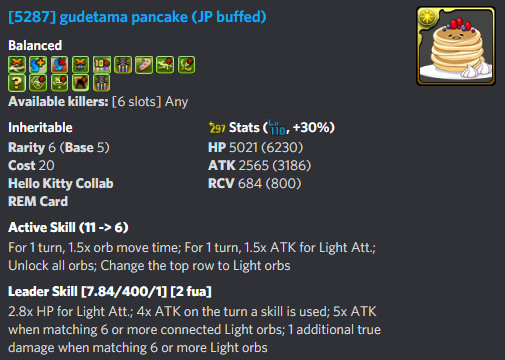
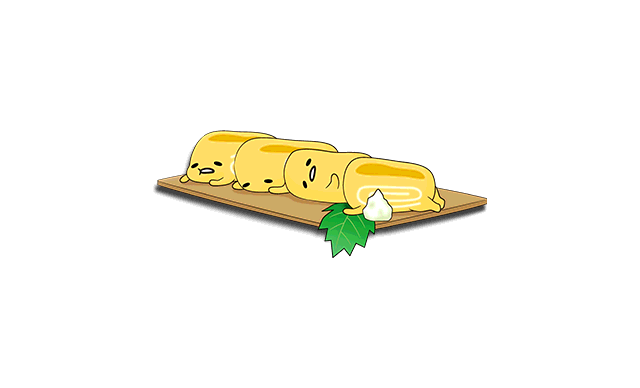
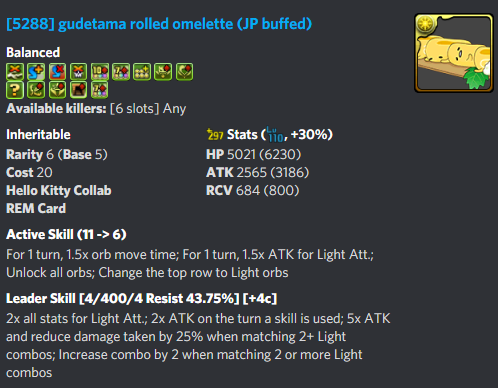
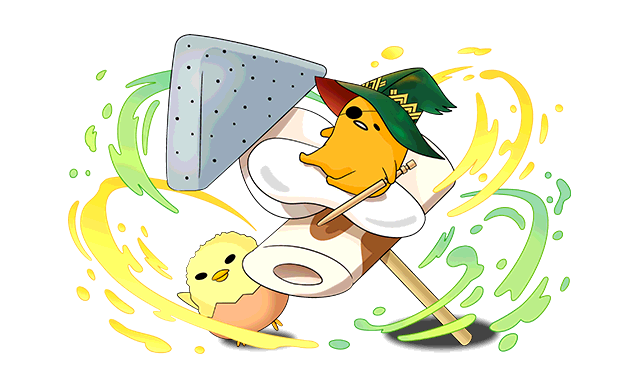
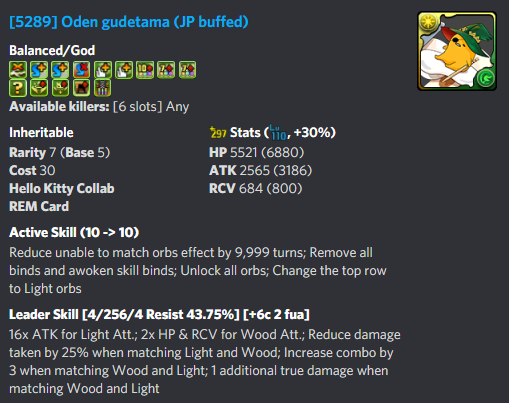

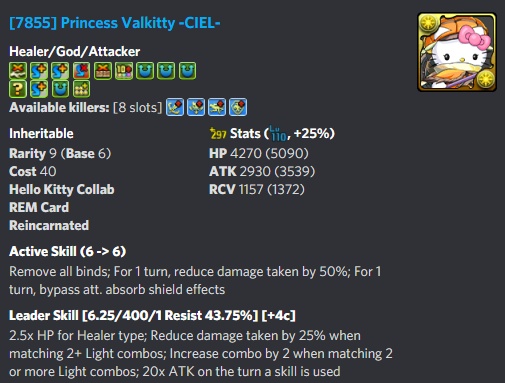


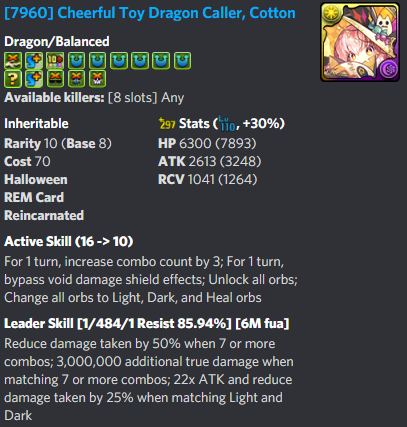


 Corgi Rating: Zeus comes off as the type of guy whose idea of a great first date is listening to Nickelback in a WalMart parking lot at 11:50PM. He drives a lifted truck and spits sunflower seeds into an empty Mountain Dew bottle. Sitting next to him means being consumed by a cloud of Axe body spray. 1/5 Corgis