

Introduction
Like you favourite monsters, dungeons are evolving in complexity and difficulty. Forgone are the days of simply having to survive a single 8,000 damage hit and instead it almost feels like you have to have an advanced degree in Puzzle and Dragons to decipher or interpret the dungeon at hand. Thankfully, we have access to two great resources and this post will focus not only on how to understand and comprehend the information presented, but how to also theory craft counters to each mechanic.

I plan to do a subsequent post that will teach you how to intelligently build a team that will use topics discussed in this article so stay tuned.
This article will focus on how to overcome various hurdles presented in a dungeon along with a specific example of the current One Shot Challenge and subsequent video clear with Yomi Dragon ![]() .
.
Video commentary
—video goes here—
Yomi Dragon clear of One Shot Challenge 9
—
Puzzledragonsx & PadGuide
The two best database resources available to English PAD players are http://www.puzzledragonx.com/ (padx) and the mobile app PadGuide. Both these tools provide the same kind of information and which you choose to use will be mostly based on personal preference. For myself, I prefer using padx for dungeon research and PadGuide for monsters/evolutions etc.
Interpreting a dungeon
Both mediums utilize symbols along with an expanded explanation for dungeon mechanics, but it can still be an overwhelming experience. For myself, when I look at a dungeon, I try and spot any crucial mechanics that require a hard counter either through a special active skill or a particular leader skill. These mechanics include:
- Preemptives (mostly large damage hits)
- Binds (leader or subs)
- Absorbs/voids (colour or excess damage)
- Resolves
- Skill Delays
- Combo shields
- Orb changers
- High HP or high Defense for the bosses
- Execution zones
- Largest reasonable hit
While this may not be an exhaustive list of every possible mechanic, I feel that these are the ones that warrant the most attention and tend to require some sort of intervention to over come. Now, it is rare a single boss will actually have all of these combined, but instead, may have these spread out over the course of the entire dungeon.
Conditional mechanics
Another thing you must watch out for is how conditional are these mechanics and are they avoidable. For example, most bosses change their attack pattern at certain HP percentages and you need to ask yourself if it is possible to avoid certain abilities or are they guaranteed to happen.
For example, a preemptive leader bind cannot be avoided outside of running bind immune leaders or bringing a bind clearing active/recover bind awakening ![]() if the next ability is not dangerous. Conversely, if the leader binds only occur at under 60% HP, it is possible to avoid and not require any form of bind removal.
if the next ability is not dangerous. Conversely, if the leader binds only occur at under 60% HP, it is possible to avoid and not require any form of bind removal.
Often times when playing through challenging content, you need to plan your team around the notion that things go according to plan and do not address these conditional mechanics as you should be able to avoid them.
Dangerous mechanics: elaborated
Assuming that the dangerous mechanics at hand are unavoidable or have an exceptionally high chance of occurring, here are the general counters to each of them:
Preemptives
Preemptives are abilities that will occur as soon as you enter the floor. This can apply to every single mechanic possible and one of the most notable dangers is a large damaging hit. Before you enter a dungeon, you must check to see if you can actually survive the largest preemptive attack with your given team.
If that is not possible, you need to either rethink your team composition or bring a shielding active. The shield will reduce the incoming damage and enable you to survive.
Binds
Binds have varying degrees of danger depending on the team you play and where/how they occur. Some teams are able to be fully bind immune while others simply have leaders who are safe. Depending on where the binds occur and how conditional they are, you may or may not require a bind clearing active or recover bind awakening ![]() .
.
Absorbs/damage voids
These are some of the most annoying mechanics in Puzzle and Dragons as they can either absorb a particular colour or damage over a specific threshold. If it absorbs a particular colour, you simply can bring a different colour team or wait it out. However, in the case of specific thresholds, you must ensure your team has some form of damage control to hit below the required value.
An absorb will heal the boss while a void will simply deal 0 damage.
Resolves
Resolves enable a boss to survive with 1 HP from what would normally be a lethal attack unless they are pushed below a specific threshold beforehand. Often times, this specific threshold is 50% which means the boss has to be below 50% before you attack to safely kill. This can be countered in several different ways such as gravities, damage control, or an ability to survive the 1% skill.
Skill Delays
Skill Delays occur when the boss adds additional turns to your active skill’s cooldown. For example, if you were 3 turns away from using your active and were hit by a 2 turn Skill Delay, you would now have to wait for 5 turns. This can become dangerous when the majority of your team becomes delayed and you desperately need your active skills.
This can be countered via Skill Delay Resist ![]() latents or Skill Inheritance to act as a buffer against the delay.
latents or Skill Inheritance to act as a buffer against the delay.
Combo shields
Combo shields can be either dangerous or a non-issue depending on the team you play. Pure combo style leaders such as Ra Dragon ![]() tend to have no troubles when faced with a combo shield as they can simply optimize the entire board. On the other hand, a row Myr
tend to have no troubles when faced with a combo shield as they can simply optimize the entire board. On the other hand, a row Myr ![]() team faces troubles as you have to dedicate space for a row and the heart cross and makes it nearly impossible on 7+ shields without skyfalls.
team faces troubles as you have to dedicate space for a row and the heart cross and makes it nearly impossible on 7+ shields without skyfalls.
While we do have access to combo boosting actives such as Khepri, it is wise to take a look at the dungeon at hand to determine if the team you are play can feasibly achieve the required combos.
Orb changers
This applies to any boss that changes orbs or the entire board into something else. While this is sometimes not a problem, it can become dangerous when faced with numerous jammer or poison orbs (especially against Beelzebub who spawns a full board of poison).
These mechanics sometimes require a board changer to correct and in the case of 5o1e teams, an orb enhancer as well.
High HP or Defense bosses
When studying a dungeon, you should always check to see how much health the tankiest encounter has (along with the average health of each spawn). This will help you judge whether or not you require a damage enhance active and whether or not your team has the ability to deal with the majority of floors without using an active skill.
Conversely, high defense encounters are those with millions of defense that either require true damage, poison, or amazing burst damage to kill.
Execution zones
Execution zones refer to health percentages where you will die (sometimes even through various defensive actives). Generally these occur when you push a boss into a low health zone or accidentally trigger resolve. Regardless, you should be aware of where these can occur and do your best to avoid them.
A small extension of this is the largest reasonable hit and whether or not you can survive this. For example, if there is a 30,000 preemptive, is it possible to have your team exceed that amount to avoid bringing a damage mitigation active. Knowing you can survive the largest reasonable hit at full health can greatly alleviate team building constraints.
One Shot Challenge 9
Keeping all the above points in mind, here is my rationale and thought process used for tackling this set of One Shot Challenges. Outside of the boss encounter, the spawns are relatively similar and just because I got Volsung, it does not invalidate the general team building/strategy required for the most part.
There are 20 floors and while most floors present some level of danger, I will only be noting the ones of particular danger and strongly encourage you to follow along via padx.
I decided to use my new Yomi Dragon ![]() team to tackle this dungeon as I am able to reliably put out 6-7 million damage with a single 5o1e and combos which helps me take care of the majority of floors without any need for active skill intervention.
team to tackle this dungeon as I am able to reliably put out 6-7 million damage with a single 5o1e and combos which helps me take care of the majority of floors without any need for active skill intervention.
Yomi Dragon One Shot Challenge 9 |
||||||
| Card |  |
|
||||
| Inherit | – | – | |
|||
Outside of the boss encounter, the highest HP enemy is 12 million which is quite manageable with one additional dark combo.
Notable spawns
Hel
Whenever you encounter Hel, you need to yell out “oh Hell No!” as it will automatically show her your dominance and make the floor easier.
If that does not work, it is ideal you kill her right away along with being prepared for the 21,407 preemptive. For the most part, she is not a floor you want to dance around with.

Sonia Tamadras
These Tamadras are a dangerous spawn as you must kill the green one off right away as it hits for 45,276 on their first turn (and ideally the blue one as well). While those two are easy to overcome, the red on can be problematic as you must overcome the 6 combo shield.

Agni
Agni can put you in agony if you do not kill him off right away as he will go through a horrible cycle of orb changers and then a damage void and very few teams can survive. As such, it is best to try and kill him right away while being conscious of his 6 combo shield. He does his skills in order so you can somewhat plan/prepare for them.
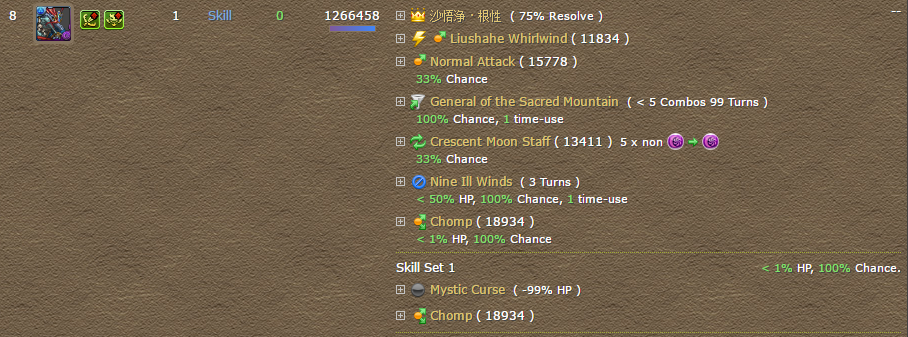
Sha Wujing
Sha Wujin can be a dangerous spawn for teams without damage control as he will execute you if you trigger his resolve which is quite easy to accidentally do due to his small 1.2 million HP pool.
If you are unable to control your damage and tickle him below 75%, you either need a shield (heart cross leaders work) or a delay to circumnavigate the resolve.
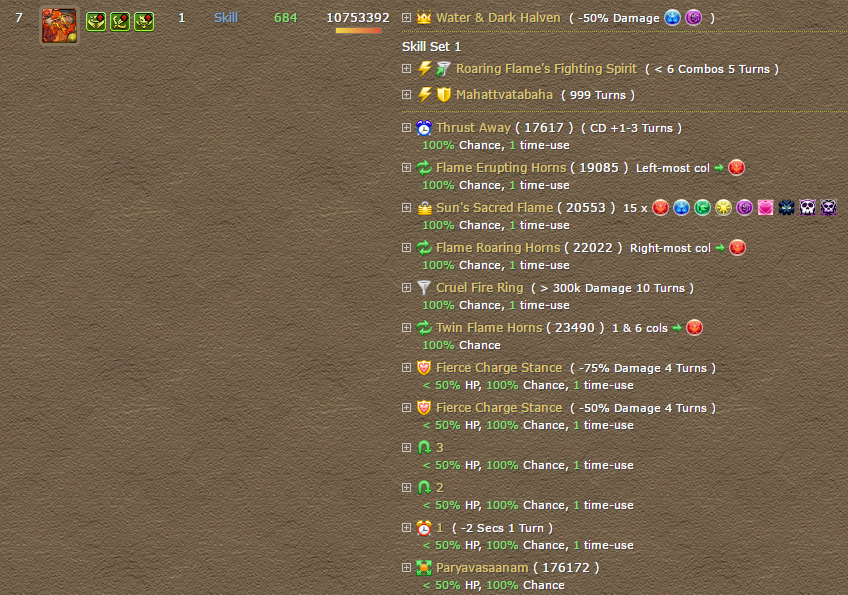
Ilsix
Probably the hardest encounter in this dungeon as he has both a 30% resolve and an incredibly dangerous skill set. If above 30%, he can hit for up to 38,306 damage every turn and if you one shot him (triggering the resolve), he will resurrect to 50% and hit for 21,889.
Thus, the struggle becomes being able to control your damage while surviving the incoming barrage of attacks. For myself, I was able to perfectly control my damage to push him under 30% right away and trigger his Frenzy mechanic. Frenzy causes the entire board to be transformed into water, hearts, and locked jammer orbs along with a 27,361 hit. At this point you MUST kill him or survive the 136,805 attack.
Once in the Frenzy zone, you can use a powerful shield to survive the execution hit and buy yourself an opportunity to set up your board and then kill on the next turn or simply use orb changers to kill right away. What makes this encounter extra challenging is the next floor hitting you for 14,562 as a preemptive so you cannot use a heart breaker.

Tans
The Tan floor is actually quite lethal as all 4 will hit you for around 45,000 damage and have 3.5 million defense. Thus, it is ideal you kill them right away.
Shiva
Shiva is a dangerous spawn to teams that do not have any Skill Delays as he will preemptively delays your entire team by 2 turns along with cutting your current health by 75%. To top it off, he has a very hard hitting skill set and should ideally be killed right away.

Volsung
Volsung is quite easy to deal with as his first form simply has a small combo shield and his final form has a 54% resolve. However, his final form can be delayed or poisoned which completely mitigates the risk as you can safely one shot and then either have the poison finish him off or pinging for 1 damage the next turn.
If you do not bring a way to handle the resolve, you will most likely die a horrible death.

Linthia
Linthia has a 5 turn Awoken Skill bind and the easiest way to counter her is a 5 turn delay or using Green Odin ![]() to clear the binds. Conversely, you could also try to one shot her, but that can be challenging without your Awoken Skills.
to clear the binds. Conversely, you could also try to one shot her, but that can be challenging without your Awoken Skills.
Gainaut
Gainaut simply has a large amount of health and does not really have any mechanic you need to counter otherwise.
Conclusion
Hopefully this guide provides you with some idea on how to prepare and build a team to counter challenging content. The key to success is being well prepared and having a team that can handle most scenarios and filling in the rest via inheritance.
Happy Puzzling!

How I prepared for One-Shot Challenge 9:
“Can Meri handle this?”
*sees combo shields everywhere and Gainaut as the boss*
“…yeah, Meri’s got this.”
LikeLike
=D
LikeLike
Cleared with Revo Minerva team!!
My teams: R. Minerva (Fire Knight inherit)/ A. Leilan/ Yamato Takeru/ Tsubaki (Delay monster inherit)/ A. Cao Cao/ R. Minerva (Grodin inherit).
Was lucky on Ilsiix, because skyfalls comboed too much but HP did not fall below 1%.
Thanks to your post, I could better study what I have in my hands ;)!!
LikeLike
Glad you enjoyed it and congrats on your own clear!
LikeLike
yell out “oh Hell No!” as it will automatically show her your dominance and make the floor easier.
LikeLike
(ノ・ェ・)ノ
LikeLike
Ilsix’s floor…
I triggered the resolve at least 5-6 times in a single run thanks to skyfall.
All I wanted was a heart cross and a 3-orb match, and that board change(to which I can convert water to light with Wukong).
LikeLike
Died also on Ilsix’s floor -.-
Should try with Meridionalis team …
LikeLike
Ilshit is definitely the hardest encounter of this dungeon
LikeLike
The final form of Volsung uses power suction repeatedly.. so if you have 3 skill delay resists per card, you can stall for skills upon entering the level (no hits just failed skill delay as long as over 90%)
LikeLike
That is a good point and could work for a few players but I feel that most people do not have 3 SDR on all cards yet. Nevertheless, it is a good idea for those that do =)
LikeLike
Lakshimi is an easy solution to Volsung and Ilsix at least.
LikeLike
Yup! She is great at both damage control and stalling =)
LikeLike
Belated thanks for this guide!
LikeLike
You are very welcome!
LikeLike