

Introduction
With the release of both GH Tsukuyomi ![]() and Norza
and Norza ![]() , North American players have the opportunity to utilize a truly spectacular team that is able to tackle any dungeon in the game. With this in mind, I have developed a team for my own Monster Box to farm Alt. Arena 4 while using a Yuri
, North American players have the opportunity to utilize a truly spectacular team that is able to tackle any dungeon in the game. With this in mind, I have developed a team for my own Monster Box to farm Alt. Arena 4 while using a Yuri ![]() as a sub as I was unable to roll my own Norza.
as a sub as I was unable to roll my own Norza.
Furthermore, I Monster Exchanged for Tsukuyomi as I am able to build a viable team for end game content. As with any trade, this should not be done on a whim and only completed if you can actually support it.
Taking these points into consideration, I want to share my thought process behind building my own team and how I approach Alt. Arena 4. This article will include a full breakdown of each of my card’s inherits, latents, and rationale for them being chosen along with a detailed description of the hurdles in Alt. Arena 4.
Video commentary
—
Solo AA4 clear
–
Notable Alt. Arena 4 mechanics
Alt. Arena 4 is currently the hardest dungeon available in North America and will push many teams to their limits. As such, it is important to understand the key mechanics that must be addressed.
At this point in time, I feel dungeons are starting to become more gimmicky in the sense that numerous mechanics are only counter-able by a few cards and many are countered via specific actives. Furthermore, Alt. Arena 4 includes basically every terrible mechanic ever invented and in solo mode, it becomes incredibly difficult to have solutions for all of them.
With that being said, here are the more notable mechanics you should strive to address every time (in no particular order):
- 100% SBR
") on Floor 1 (pre-Transform)
on Floor 1 (pre-Transform)
- Get Bound, you die
- Damage Absorb Void (Fujin
 -style)
 - Numerous Awoken Binds
- Numerous Time debuffs
- Some are 75% reductions
- 100% Blind Resist
")
- ATK debuffs
- Unable to Match Orb Effect counter
- You will die to Enoch on Floor 3 & Odin Dragon
- 98,138 damage preemptive on floor 15
- If you encounter Myne on floor 14, you MUST have over 98,138 HP before awakenings or use a 2 turn shield on floor 14
- Cloud Resist
 & Tape Resist
- VDP
 (or Void Damage Void active)
 - FUA
 (maybe
  ) or Auto Follow Up Damage
- Auto Follow Up is preferred
- Guard Break
 or large Auto Follow Up (300k+)
- 2 Billion DEF Aten (f4) & Tamadras (f12) who also have 99% Damage Reduction
- Large Poisons can work but takes up an active slot
- 2 Billion DEF Aten (f4) & Tamadras (f12) who also have 99% Damage Reduction
- Ideally Leader Swap Resist
") Latent
Latent
- Prevents likely death from Mitsuanri
- Poison Surge
") Latent
Latent
- Prevents all Poison Skyfalls
- Stops death combo of Freyja (floor 6) into Acala
- Shuts down Neptune Dragon (floor 19)
- Prevents all Poison Skyfalls
- 100% Poison Resist
")
- Slightly offset by Norza’s huge RCV multiplier
The following mechanics are still dangerous but I feel they are less threatening overall and should be a lower priority to counter:
- Way to deal with Locked Orbs
- RCV debuffs
- Colour Absorb Void
- 100% Jammer Resist
")
- Spinner Counter
Looking at this above list, it become apparent quite quickly that there are an absurd number of different mechanics that must be countered and it becomes incredibly difficult in solo mode where you have less actives available. In fact, I feel 2 player has become more appealing due to Transforming cards who lack Super Awakenings along with being able to share Resists, Skill Boosts, and Skill Bind Resists.
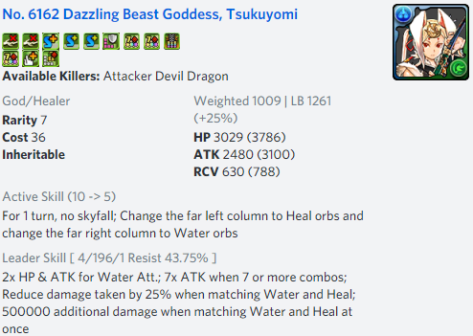
Tsukuyomi x Norza overview
 Tsukuyomi
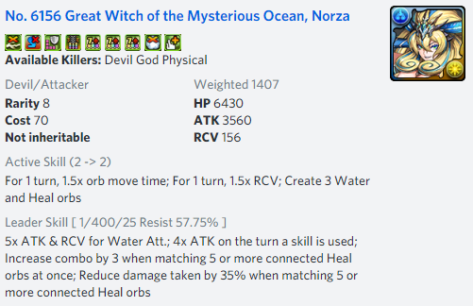
Base Norza
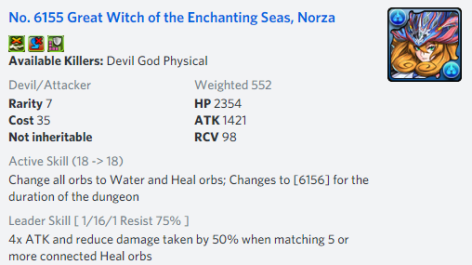
 Transformed Norza
Pros |
Cons |
|
|
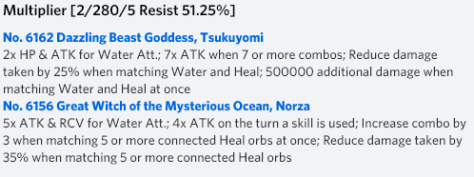
Tsukuyomi when paired with Norza is able to lead a tremendously powerful team that is able to counter a wide variety of mechanics from just the two leaders. Furthermore, they boast over 4x Effective Health if you are able to match 5 or more Hearts, huge healing potential, along with fantastic damage output that can be further augmented with Rows ![]() and Orb Enhances
and Orb Enhances ![]() .
.
Another valuable aspect to this pairing is the 500,000 Auto Follow Up Damage which can be used to overcome Resolves but also Aten and the Tamadras who boast 2 Billion DEF.
In an ideal world, you are able to use a second Norza as a sub which will always fulfill your active skill clause along with continuously buffing your movement time and RCV by 1.5x while simultaneously generating 3 Water and Heart orbs. This is important as you can activate your ATK multiplier every turn and only require 2 Hearts before using your active to trigger your +3 combos and full Damage Reduction.
Sadly, this may be quite difficult to achieve as Norza is a 7-star Godfest Exclusive with no way of acquiring outside pulling the Rare Egg Machine. Thankfully, there are several other options who are weaker throughout the dungeon but will greatly aid in Transforming turn 1. This list includes (but no limited to) Evolved Yuri ![]() , Claymore
, Claymore ![]() , Lutina
, Lutina ![]() , Rimururu
, Rimururu ![]() , and Deena
, and Deena ![]() .
.
Speaking of Transforming, Tsukuyomi and Norza require 18 turns to Transform but are able to get away with 1 less Effective Skill Boost ![]() as you can tank a single hit from Undine when matching Hearts and Water. Unfortunately, Tsukuyomi lacks SBR
as you can tank a single hit from Undine when matching Hearts and Water. Unfortunately, Tsukuyomi lacks SBR ![]() which can be problematic if running other cards who also lack this awakening.
which can be problematic if running other cards who also lack this awakening.
Team building
The following is the Tsukuyomi x Norza team I was able to make from my Monster Box. It is able to address all of the above mechanics but cannot achieve the 98,138 HP required to survive Myne -> Kurone combo and must bring a 2 turn Shield active:
Solo Alt. Arena 4 – Tsukuyomi x Norza
|
||||||
| Card |  (6162) |
 (5958) |
") (5985) |
 (3391) |
 (5680) |
 (6156) |
| SA | – | – | ||||
| Inherit |  (6049) |
 (5257) |
 (4982) |
 (5809) |
 (5813) |
(5257) |
| Latent | ||||||
Tsukuyomi
My Tsukuyomi is fortunate to own the Leader Swap Resist ![]() latent which is able prevent her from ever being swapped. While this occurs 50% of the time on floor 14, it is still invaluable as it prevents the run from snowballing into bigger problems as you suddenly find yourself with almost no Effective HP.
latent which is able prevent her from ever being swapped. While this occurs 50% of the time on floor 14, it is still invaluable as it prevents the run from snowballing into bigger problems as you suddenly find yourself with almost no Effective HP.
In an ideal world, you are leading with Tsukuyomi as she is able to better use the Leader Swap Resist compared to Norza due to Norza having access to God Killers which is the most valuable Killer in Alt. Arena 4. I chose to use Uruka’s Weapon Assist ![]() as it provides the mandatory Damage Absorption Void along with on-colour stats, 2 Orb Enhances
as it provides the mandatory Damage Absorption Void along with on-colour stats, 2 Orb Enhances ![]() , and a single L
, and a single L ![]() . This L is quite important as my team lacks any Orb Unlocking active.
. This L is quite important as my team lacks any Orb Unlocking active.
 Yuri
Yuri
Yuri is the second best option to owning a Norza to use as a sub as she boasts triple 7 Combo and an active that generates 2 Hearts. While this will not always guarantee activation, it comes pretty darn close and the Locked Heart Skyfall is a pseudo counter to enemies who change orbs. With that being said, the Locked Hearts will mess up Spinner cheese. In regards to her inherit, I chose to go with Spirit Ally, Kororo ![]() as this provides 3 Enhanced Water Orbs
as this provides 3 Enhanced Water Orbs ![]() , a Balance Killer
, a Balance Killer ![]() (relevant versus numerous spawns), and a 2 turn Delay which is fully charged on turn 1.
(relevant versus numerous spawns), and a 2 turn Delay which is fully charged on turn 1.
This Delay is able to be used on Floor 1 which in turn converts Yuri into a 3 Effective Skill Boost ![]() card. As a result, I am able to much more easily Transform and I do not have to use the Skill Boost Badge or any Skill Boost inherits. This is perhaps the best aspect of using a non-Norza sub as you are able to inherit a Delay and gain additional stalling time. If lacking Spirit Ally, Kororo, GungHo PEM Helen
card. As a result, I am able to much more easily Transform and I do not have to use the Skill Boost Badge or any Skill Boost inherits. This is perhaps the best aspect of using a non-Norza sub as you are able to inherit a Delay and gain additional stalling time. If lacking Spirit Ally, Kororo, GungHo PEM Helen ![]() is another solid and farmable solution.
is another solid and farmable solution.
Finally, Yuri is able to use Devil Killers which helps bypass the tanky Floor 18 who both lack a God or Balance typing.
") Lamp
Lamp
Lamp has proven to be one of the best bottom rarity cards I have pulled in recent time as he is able to provide 4 Effective Skill Boosts ![]() through his 2 turn Delay. But wait! You cannot use more than 2 Delays on a single spawn if trying to charge up your Transforming cards.
through his 2 turn Delay. But wait! You cannot use more than 2 Delays on a single spawn if trying to charge up your Transforming cards.
While this holds true in most cases, Tsukuyomi and Norza is a special exception as only 1 leader Transforms (so you retain the full multipliers from Tsukuyomi) and Base Norza offers 50% Damage Reduction when matching 5 or more Hearts. As such, I am able to Delay first with Lamp, tank a single hit, and then Delay once again with Yuri’s inherit.
Moving beyond this, Lamp also offers 6 Water Rows ![]() , Super Poison Resist
, Super Poison Resist ![]() , and a phenomenal active post-Transform. Lamp’s new active is able to provide a full Awoken Bind clear and 3 turns of 3x ATK. This is a sizable and long lasting Burst which can be used to easily push through Ra/Yomi Dragon’s 50% Super Resolve (requires 2 turns to kill) and hitting Damage Cap with my team is not uncommon.
, and a phenomenal active post-Transform. Lamp’s new active is able to provide a full Awoken Bind clear and 3 turns of 3x ATK. This is a sizable and long lasting Burst which can be used to easily push through Ra/Yomi Dragon’s 50% Super Resolve (requires 2 turns to kill) and hitting Damage Cap with my team is not uncommon.
This active address two important mechanics and I primarily use him for this and not his inherit ![]() as I would no longer have any Awoken Bind clear. With that being said, Lamp’s inherit does have a powerful active skill and I sometimes let it overcharge if I do not encounter Odin Dragon as I can often kill Floor 19 without overwriting the -50% ATK Debuff (more on this later in article).
as I would no longer have any Awoken Bind clear. With that being said, Lamp’s inherit does have a powerful active skill and I sometimes let it overcharge if I do not encounter Odin Dragon as I can often kill Floor 19 without overwriting the -50% ATK Debuff (more on this later in article).
Just be mindful that Lamp lacks SBR ![]() which now drops your Resistance down 80% as Tsukuyomi also has none (working under the presumption all other cards have SBR).
which now drops your Resistance down 80% as Tsukuyomi also has none (working under the presumption all other cards have SBR).
 Blue Odin
Blue Odin has received a sizable revamp to his awakenings that now give him Super Blind ![]() , Tape Resist
, Tape Resist ![]() , 5 Rows
, 5 Rows ![]() , 4 Skill Boosts
, 4 Skill Boosts ![]() , and a 6 turn cooldown. This is quite amazing from a single sub and I am able to carry my Unable To Match Orb active (Mystic Elf Card
, and a 6 turn cooldown. This is quite amazing from a single sub and I am able to carry my Unable To Match Orb active (Mystic Elf Card ![]() ) through him. I also ensure it is always ready by Floor 3 due to his own lower cooldown and use of Skill Delay Resists.
) through him. I also ensure it is always ready by Floor 3 due to his own lower cooldown and use of Skill Delay Resists.
While all of this is wonderfully strong, Blue Odin also lacks a SBR ![]() which has now dropped my total Resistance down to 60% as my final sub does have one.
which has now dropped my total Resistance down to 60% as my final sub does have one.
 Evolved Minaka
I chose to go with my Evolved Minaka due to her exceptional stat distribution (almost all of it is in HP and RCV), 4 Water Rows ![]() , and a valuable active that does provide 50% Damage Reduction for a single turn along with generating Water and Heart orbs.
, and a valuable active that does provide 50% Damage Reduction for a single turn along with generating Water and Heart orbs.
While this single turn of Damage Reduction will not hold against the Myne + Kurone combo, it will save you from Ra/Yomi Dragon after hitting them below 50%. Furthermore, I am facing a -40% SBR ![]() deficit as only 2 subs and my friend’s leader has this awakening along with no current solution to Myne + Kurone.
deficit as only 2 subs and my friend’s leader has this awakening along with no current solution to Myne + Kurone.
Thankfully, it is Kuriboh’s Weapon Assist ![]() to the rescue! This Weapon Assist is able to provide 2 SBR
to the rescue! This Weapon Assist is able to provide 2 SBR ![]() (bringing me up to 100%). Furthermore, this active will provide 5 turns of 30% Damage Reduction which solves Myne + Kurone (and Ra/Yomi Dragon) along with an L
(bringing me up to 100%). Furthermore, this active will provide 5 turns of 30% Damage Reduction which solves Myne + Kurone (and Ra/Yomi Dragon) along with an L ![]() awakening. While the L is less valuable due to my Uruka Assist, it may be your only way to bring an L to your team.
awakening. While the L is less valuable due to my Uruka Assist, it may be your only way to bring an L to your team.
Norza
Finally, my friend’s Norza comes with 3 God Killer Latents along with the Spirit Ally, Kororo ![]() Weapon Assist in order to grant her a Balance Killer
Weapon Assist in order to grant her a Balance Killer ![]() and three Enhanced Water Orbs
and three Enhanced Water Orbs ![]() . This in turn grants her massive personal damage along with Killers against the majority of dangerous spawns.
. This in turn grants her massive personal damage along with Killers against the majority of dangerous spawns.
As such, Norza is my main damage solution and when I layer in Rows ![]() and abuse the +3 combo mechanic, she is able to deal lethal damage with relative ease and hitting Damage Cap is not unusual.
and abuse the +3 combo mechanic, she is able to deal lethal damage with relative ease and hitting Damage Cap is not unusual.
Why I have 19 Rows  & 8 OE
After tinkering around with my team, I somewhat accidentally ended up with stupendous amounts of Passive Damage through 19 Rows ![]() and 8 Orb Enhances
and 8 Orb Enhances ![]() . This leads to outrageous amounts of damage which is further compounded by Killer Assists or Latents on my main damage dealers along with L shield
. This leads to outrageous amounts of damage which is further compounded by Killer Assists or Latents on my main damage dealers along with L shield ![]() (+1.5x ATK for owning card) on my 2 Leaders.
(+1.5x ATK for owning card) on my 2 Leaders.
As such, I am able to safely kill any spawn with a single Row assuming 7 combos are achieved (which is made easier by +3 combos). This provides peace of mind when facing durable spawns as I know I will be able to hit for hundreds of millions of damage from Tsukuyomi ![]() , Yuri
, Yuri ![]() , and Norza
, and Norza ![]() .
.
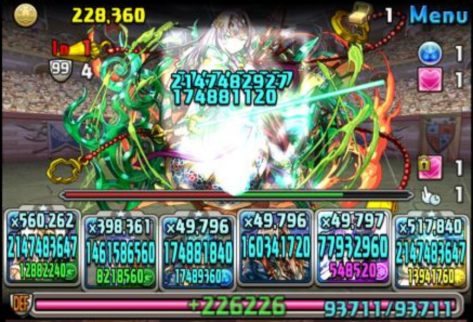
In fact, due to the Killer damage, I am able to kill the MP Dragons without using a Burst if it was unavailable:
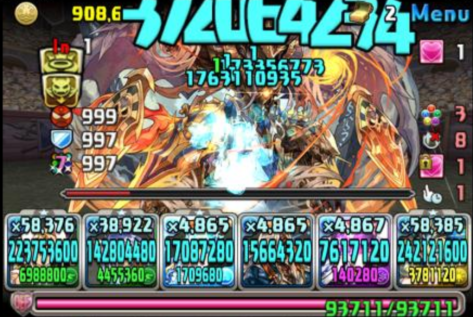
This damage is killing the 1.5 Billion HP Ra Dragon (with 100M DEF) through a -75% ATK Debuff. You do have to kill him in 2 turns due to Super Resolve but this is achieved due to him (and Yomi Dragon) having Balance and God typing.
To quote the wise Miso along with his damage calculations:
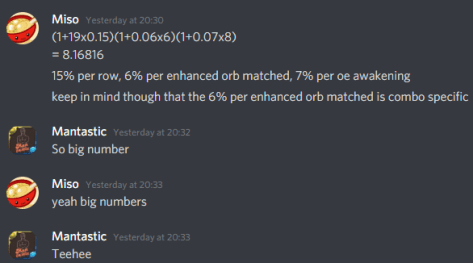
Math is hard but big numbers
Abusing L Shield
For the longest time, L shields ![]() were a terribly underwhelming awakening but they have been recently buffed to also include 1.5x ATK for the owning card. Furthermore, with due to Tsukuyomi’s Auto Follow Up Attack, you no longer have to have a column of Hearts to overcome Resolve.
were a terribly underwhelming awakening but they have been recently buffed to also include 1.5x ATK for the owning card. Furthermore, with due to Tsukuyomi’s Auto Follow Up Attack, you no longer have to have a column of Hearts to overcome Resolve.
Building upon this, both Tsukuyomi and Norza have this awakening along with Norza’s Leader Skill granting +3 combos and 35% Damage Reduction with any 5-Heart match.
As such, you will always want to match these 5 Hearts in an L to both bolster damage and grant +3 combos. This means my Row-approach can now feasibly hit 7 or more combos which in turn enables Tsukuyomi, Yuri, and Norza to deal explosive damage.
You can still kill many spawns with just 3 Hearts but stalling and saving for a row will always kill.
Stalling
The main reason why I die in this dungeon is because I make an error on one floor, accidentally push something into execution, or let too many mechanics pile up and not having the right actives available.
With this in mind, I can prevent errors by paying attention, using Rows to kill, and Stalling for actives.
Unfortunately, Stalling can be difficult for this team as there is so much damage potentially coming out but there are ways to help mitigate this.
Firstly, not using an active drops your ATK by 75% (loss of 4x) and if you do not hit 7 or more combos, nothing will die (loss of 7x). Sadly, you only enjoy 2x HP and must find a way to tap into either of your Damage Reductions.
Your two Damage Reductions come from either a Heart + Water combo (25%) or 5 Hearts (35%) and these can both stack. With this in mind, I often make minimal combos that includes Hearts and Water along with only using Yuri or Norza if I run out of Hearts. You will always heal back up to full health when matching Hearts due to the 5x (7.5x with Norza active) RCV.
This approach is why I usually have around 6 average combos for the entire dungeon. Do not be afraid to stall.
One final point if you are not using 2 Norza’s is to try and favourably time which floors Norza is used in order to take advantage of her RCV/movement time buffs and orb generation.
Dungeon breakdown
Alt. Arena 4 has numerous obnoxious components and I wish to go through the more notable floors and how I deal with them for my team. I am only including spawns that I feel are more dangerous and some may be overlooked. Full dungeon for reference can be found HERE.
 Floor 1
Undine has a preemptive Skill Bind attack which means you must have 100% SBR ![]() prior to Transforming. She will also hit for 88,179 ATK on her first turn which can be either naturally tanked or reduced via Damage Reduction through your leaders.
prior to Transforming. She will also hit for 88,179 ATK on her first turn which can be either naturally tanked or reduced via Damage Reduction through your leaders.
With this in mind, I abuse a double Delay strategy in which I Delay right away, tank 1 hit, Delay again and then Transform (video showcases this). When you are tanking the first hit, make sure you only match the bare minimum as you do not want to accidentally kill and enter Floor 2 without Transforming.
The second attack hits for 176,358 which is probably going to kill the majority of teams.
After using Norza, I try to save my Water and Heart orbs as I can use them for Floor 2.
 Floor 3
Enoch has a 50% chance of appearing and will preemptively prevent Hearts from being matched for 3 turns. This will be lethal to Tsukuyomi x Norza so you must have your respective active ready. This is why my Blue Odin has Skill Delay Resist awakenings in case Paimon appears on Floor 2.
If you did get Paimon on Floor 2, I kill with a Row and no active used as Yuri and Norza were both Delayed.

 Floor 4
Persephone has Damage Absorb and must have an active to counter.
On the other hand, Aten features 2 Billion DEF but can thankfully be killed via Tsukuyomi’s Auto Follow Up Attack. Just be aware that it will take two 500,000 hits to bring him down to his 10% Super Resolve.
 Floor 5
Floor 5 features a -99% ATK Debuff for 3 turns along with hitting for 140,000 per turn. For most teams, it is best to use your ATK buff here and then easily kill due to only 10 million HP but for myself, I prefer to hold onto my Lamp due to Floor 6’s preemptive Awoken Skill Bind.
As such, I actually just kill the Snowglobe through their ATK Debuff by matching a Row and 7 combos:

My team does survive if I fully activate both of my Damage Reductions should this not kill.
 Floor 6
Freyja will preemptively Awoken Skill Bind for 5 turns along with 5 turns of Mortal Poison Skyfalls. You ideally have the Poison Surge Latent ![]() to counter these Skyfalls and then you only have to worry about the Awoken Skill Bind.
to counter these Skyfalls and then you only have to worry about the Awoken Skill Bind.
This is why I save my Lamp ![]() for this floor and kill the Snowglobe through the 99% reduction.
for this floor and kill the Snowglobe through the 99% reduction.
If you fail to remove the Awoken Skill Bind, there is still a relatively high chance you may accidentally kill as she has only 52 million HP. If this happens, things can snowball out of control if you enter future floors while Awoken Skill Bound.
 Floor 7
Acala gets out of control if the Poison Skyfalls are still present from Freyja which will often get you killed. As such, either have Poison Surge or stall on Freyja as much as possible.
While Acala does have God and Balance typing, I am unable to one shot her, even with the 3x Burst from Lamp (was used on Floor 6 and carries over) despite hitting Damage Cap on both my leaders (one Row and Water combo):
This left her around 20% HP and now I just simply stall it out which is relatively easy due to no Poison Orbs.

 Floor 8 + 9
Set will cause a -4s movement time if you fail his 10 combo shield which can be easily overwritten by Norza but if you for some reason you do not and Nut appears, you will simply die as she has a preemptive and another one if a Time Debuff is already present.
As such, if I see Set, I one combo the first turn then Norza + kill after Time Debuff is removed.
") Floor 12
Floor 12
The Tamadras that appear in AA4 have 2 Billion DEF along with 99% Damage Reduction shield but only have 300,000 HP. As such, Tsukuyomi’s Auto Follow Up Attack kills them with ease.
If you are not playing an Auto Follow Up leader, using Guard Break ![]() is another clean solution.
is another clean solution.
 Floor 13
Kaminue has a 5 turn Fire, Water, and Wood Absorb and I just simply stall it out. Just make sure to always proc your Damage Reduction and fully activating will not kill as it is incredibly unlikely Norza’s Light sub attribute can deal 210M damage.

 Floor 14
Floor 14 is often a dangerous floor as Mitsuanri will preemtively swap you leader with a random sub which can be lethal but can thankfully be fully countered by Leader Swap Resist ![]() . If you have the Leader Swap Latent, he becomes a relatively easy spawn.
. If you have the Leader Swap Latent, he becomes a relatively easy spawn.
On the other hand, Myne has a special death animation that will remove all 1 turn shields, Damage Reduction, buffs, etc. before you enter the next floor. This means your Leader’s Damage Reduction will not be available which will prove lethal if have <98,138 HP before awakenings. As such, you must use a 2 turn shield before killing Myne.

 Floor 15
Kurone will preemptively Awoken Skill Bind you and then hit for 98,138. This is not an issue unless Myne was on the previous floor as Myne will remove all 1-turn Shields.
Thus, using a 2 turn Damage Reduction on Floor 14 is mandatory if you do not have more than 98,138 HP.
On the other hand, if you encounter Ryokaku, you will have silly-fast Spinners in the top row along with a 2 turn timer. As such, I try to save/move all Water and Heart orbs to the bottom on the first turn. On turn 2 (before he attacks), I use Yuri and then prep the Spinners for 2 different colours or all the same if lacking enough Hearts/Water. Thus, when I start matching, some is already premade and the +3 combos should be enough to overcome the combo shield. Remember, a Row will always kill.
Floor 17-18
Despite every spawn on these floors having large amounts of Effective HP, they all easily melt to a Row with 7 combos and Killers.


 Floor 19
Shiva Dragon is quite straight forward as you can easily stall out his 75% Damage Reduction and then a single VDP ![]() with 7 combos will kill with my set up due to colour effectiveness.
with 7 combos will kill with my set up due to colour effectiveness.
Neptune Dragon simply needs a Damage Absorption Void and if you have Poison Surge ![]() , he becomes trivial to stall on.
, he becomes trivial to stall on.
Finally, Odin Dragon is terrifying and significantly harder compared to the other two as you must have way to clear Unable to Match Orbs active or you will die. Furthermore, he has a 5 turn Awoken Skill Bind which will turn into 99 turns when it expires. As such, I always ensure my Lamp is ready and I try not to waste time Killing him.
I always found it strange that Odin Dragon is that much more obnoxious and he will end your run if unprepared.

 Floor 20
Floor 20 is the final “real” floor and regardless of which encounter appears, you must make sure you activate your Damage Reduction before you push them to 50%/Super Resolve. If you do not, their buffed attack will kill you.
For Yomi Dragon, having Colour Absorb Void will trivialize them and ideally you have 2 or more turns. With that being said, having only a single turn means you should save it for when they hit 50%/Super Resolve as you can wait out for a more favourable Colour Absorb when she is at full health. If you have none, it becomes trickier as you have to get lucky on the second Absorb and is partially why Kuriboh’s longer shield is valuable.
Regardless of which one you do encounter, they both have a -75% ATK debuff for 5 turns. This can be stalled out but at the same time, my particular team composition can kill either one due to both being Balance and God typing assuming Row and Water combo can be achieved.
Conclusion
Tsukuyomi when paired with Norza is able to lead a spectacularly powerful team if you are able to solve her Skill Boosts, Skill Bind Resist, and a sub who has a 1-2 turn cooldown.
For myself, this is easily my most powerful team, especially for 6×5 that has been well designed to counter the majority of mechanics within Alt. Arena 4. This particular team composition works well for me but you may have ways to further optimize it as this is what I am able to piece together from my own Monster Box.
Let me know what you think about Tsukuyomi and Norza in the comments below along with how you built your own team.
Happy Puzzling!
If you enjoy my content, please consider turning off AdBlocker for this website. If you wish to directly support me, please click the beautiful image below.


How would you modify this team if lacking the Poison Surge latent?
LikeLike
You have to be extremely careful with Freyja and stall on her in case Acala appears after.
You could also try using the huge Burst potential and 2-shotting Acala if she does appear
LikeLike
What about jammer skyfall buffs? Or are there not enough actives to bring that for Freyja and still cover everything else in the list?
LikeLike
It would eat up an entire active slot which is already going to be strained as 2/6 are dedicated to the LS activation
I was also thinking that if you use my set up, you could potentially 2-round Acala right after as the burst from Lamp carries over from Freyja for 2 turns
LikeLike
Really thorough write up. Good fricking job.
LikeLike
Thank you =D
LikeLike
Thanks so much for this guide! I’ve been struggling to clear this dungeon and this is easily the most detailed/simple explanation I’ve seen for my team.
LikeLike
Glad to be of help and hopefully it translates into some clears for you =)
LikeLike
First clear today! It’ll go a lot smoother if/when I am able to get the poison and leaderswap latents; my first drop was the jammer, of course. Awesome guide!
LikeLike
Hey that is fantastic to hear! Congrats on your first clear =D
LikeLike
Thanks for the run down! This is very helpful
I am still debating whether trading for Yomi. I can put together this same team with the exception of kokoro and BlOdin but I think I could probably find an alternative.
Different topic, I lucked out into rolling Reigenleif. Do you think it is more advantageous to replace a dragon or bakura (no bakura equip unfortunately). Current team is Yugi, Yugi Evo, 2x Dragons, bakura/SRAnubis and Yugi/Nelle. Assume I can transform first turn in all scenarios
Thanks!
LikeLike
One Bakura without an inherit is a bit of a drawback but at the same time, fortress x2 and him all lack SBR
Dropping one of those for Reigen can help solve some of this and I would be more inclined to remove a Fortress as Bakura does provide a Super Resist still
As for missing Blue Odin, another card with the same Resists is Sun Quan but he is also lacking as strong of a kit
LikeLike
I can literally make this entire team omfg… Except for Zordon. Are there any replacements for him / is he absolutely crucial?
LikeLike
Zordon is the least important inherit. I almost only use Lamp for his base active so using basically any inherit that provides Passive Damage or a Resist if lacking (could be something with 40% Jammer) would work
LikeLike
Instantly thought of the Hatsume weapon equip – the Bellflower Iwashimizu Dance Fan when you said “40% Jammer” lmao – but it’s kind of short (9 turn CD). Still a good idea to have? The weapon I have on him right now is the Charlotte weapon (La Roche) from Samurai Showdown.
LikeLike
I’d just try to make sure the inherit doesn’t not run the risk of charging up as you are relying on lamps active =)
LikeLike
Would you say that Ryune is a viable sub for Tsukuyomi assuming one doesn’t own a lampeid (screw you lisheilla)? I look at her kit and see that she would be pretty good with 5 effective skill boost, poison res, and 2SBR.
LikeLike
Yeah she would cover a similar array of awakenings as Lamp but you will then have to find an Awoken Bind clear and ATK burst
LikeLike
Yeah that does create a problem, I’m looking to make an A6 and AA4 team like most people and I’m exploring options, I’ll probably do a Reeta and V Ideal team. Thanks for the really informative guides and reviews
LikeLike
Thanks for the guide! I had a couple questions. Say my team doesn’t focus on rows, would using base Minaka be better for the extra skill boost be better? When would Ciel equip be more useful than Kororo?
LikeLike
Additionally, would Erika equip be useful?
LikeLike
Erika would be better compared to Ciel as you get to use the 2 turn delay on floor 1
LikeLike
Unless you need the SB, I would stick with Evolved Minaka as she has around 5,500 more HP (which is basically 20k Effective Health with full activation)
Koro serves 3 purposes: balance killer, delay if used on Yuri (+2 Effective SB), and 3 Enhanced Water orbs.
Ciel only provides a Killer but what I would suggest is using the GH Helen from the PEM instead of Koro
LikeLike
I am missing the two YuGi Oh equips. Are there alternative (I would have to use the SBR badge to get 100%)?
LikeLike
Well without kuriboh you would lack the multi turn shield which needs to be addressed. This may also mean you need the sbr badge if you are running blodin and lamp as they lack their own
LikeLike
Post is great Mantastic. Great detail.
Sharing my setup for team variety, I self-coop with valentines chocolateer ideal. I die as often as clear, mostly to my own mistakes / laziness / no lookups asssumptions. Have cleared multiple times.
Main
1 chocolateer Ideal ^ Akine equip (anti-void inherit)
2 Kami in rikuu costume (anti-absorb, guard break) ^ dark Reece Frow hat equip (unbindable) – I’ve also run Hao here for a dark coverage base sub with anti-void ability before Aten picked up latent.
3 Mega Aten (anti-void latent, cleared at first without) ^ blue Dracoblade (unbindable, arbitrary but does clear time debuffs)
4 OdinDra (FuA) ^ Jhoira equip (anti-cloud / awaken unbind)
5 Snow Reece ^ Shelling Ford (mostly for jammer/blind vs actually using, but fine if ability comes up)
6 (friend) chocolateer Ideal ^ no.5761 rider belt: cyclone (weird/slow but very useful 2 turn dmg immunity + 25% true gravity)
Alt
1 Ideal ^ no.5761 rider belt cyclone
2 Akine (anti-void) ^ whatever (could be improved)
3 Chakeol (matchability/unbind) ^ dawns warlock Odin (awoken unbind, could be improved)
4 Odin Dragon ^ Sleipnir (Anti-color absorb, could be improved)
5 Snow Reece ^ Snow Reece hat (mainly for anti-cloud, was what I had to hand)
6 (Friend) Ideal ^ Akine
Various of the inherits are weird because no SA in coop, so things needed to be unbindable, or anti-cloud needed mixing in.
I’ve been too lazy to equip better, could definitely be tuned further. I didn’t 100 all hazards but team doesn’t need to.
Kamui in Rikuu costume has guard break to solve Aten and f12 Tama. For Aten I pass turn back, only having guard break on one side, and consequetive guard break hit him. F12 Tama floor team can tank a hit(s) if guard break side isn’t up. Team has 300+k hp. Noting that Farmable dark ra dragon (medals trade in) is another decent ok stats x10 damage 10cc/7cc with guard break card option as kamui is chase card rare. Kamui anti-absorb is nice to save snow Reece board change + anti-color, but isn’t essential, one anti-absorb suffices. Both sides run snow Reece just as a good generalist sub, slot could swap to whatever box has if unavailable.
I usually chakeol early floor can’t match hearts but can also play through it having 300k. You can die various to any given dumb mistake, but nothing per se is a death floor. Every time I die it tends to be some random floor to an unforced error I did to myself. I don’t bother with tape, it’s 5 turn, uncommon on one floor, and playing through it is fine.
The two end boss floors you can just grind all the dragon bosses down. The hardest floors are actually the lead up to end floors, F16-F18, imho. I’m not shy about burning two turn immunity inherit there vs on end floors, if needed. Not essential, but convenient ability.
I didn’t quite bother equipping full 100 resists to both/each side, just partial resists. It’s no issue on chocolatier to play through a happenstance darkness or jammer if partial resist didn’t catch it. You can play through the Neptune boss skyfall poison with a sufficient bit of care. I’ll equip anti poison latent when it finally drops. I keep getting literally everything else. You can equip anti leader swap but tbh I probably won’t and will just keep SDR, as swap is fine, hp are high, and swapping with subs like Reece or Aten or etc is largely a shrug. I’ve swapped with slightly awkward OdinDra sub and played through with a clear.
I prefer self coop to solo as even if you seemingly have a full coverage/answer team solo, because the dungeon is super bad mannered about hitting you with a time reduce, into the very next floor hitting you with a 10 turn time reduce, or back to back awoken binds…it just gets overload silly. So the hell with that and have ten ability, and an extra 100k hp, and twice the latent drops to self-trade, even though they’re dupes per clear.
Norza/Tsukuyomi…I considered it, but I didn’t like the heart drought/screw chances and found it unreliable the couple runs I tried. But of course the dungeon is a garbage fire solo, no matter what you run, and I didn’t work on team setup in 2p self-coop much, since my Alice-Fasca is stronger/ better subbed, and I knew I’m in love with chocolateer’s survivability / rcv when things get extremist.
Nice writeup on the key dungeon mechanics. I learned them just by happenstance exploring / dying a lot, getting familiar with all the floors, mostly.
LikeLike
Just an extra mention, when I run it solo, I run double Aten, OdinDra, snow Reece, because usIng leads to counter rcv debuffs, and double Aten to counter time debuffs, both of which come thick and fast, is kinda essential. Reece for the anti-absorb, and I have to inherit 0 def for Aten/tama. It is annoying though, as you also need multiple antivoid inherits for late floors, so you end up having stall on opportune midfloors to set up the end run sequence, and I dislike that a lot. Also, 2p is twice the drops. So. Is possible to solo clear, but solo, I’d prefer a team more naturally anti-void / anti-fua from leader ability. (Having the antivoids on Aten rather ironically makes 2p coop easier and trolls solo as harder as messing up your solo stallability some floors.)
LikeLike
I completely agree with you on that solo mode can be a nightmare to build for due to so many mechanics being thrown at you
In regards to your two teams, do you feel having Guard Break on only 1 side is hindering you? I know you have to burn one Pass on Aten and will have to correctly time killing the floor before the Tamadras
I feel that with the transforming meta, 2p has become more appealing due to those cards lacking SA any way.
For myself, I only self coop for easier content as I lack strong pairings with myself
LikeLike
What would be the ideal subs assuming you have two Norzas? somehow I was lucky enough to get a 2nd one…
LikeLike
You would have to rearrange your set up compared to mine as you would have -3 SB (Yuri + her inherit cannot be used) and the easiest place to get more is to drop Minaka as she has the least
Kintoki Sun Wukong (https://ilmina.com/#/CARD/6069) is a hugely valuable sub due to 5 SB, long lasting shield that also voids attribute absorb
LikeLike