

Introduction
The GungHo Collab makes a return to North America and features 6 new cards to an already massive rolling pool. As a result, many cards will undergo a “rotation” in which several will be absent from any given GungHo Collab event.
This is probably to help alleviate the stress of having so many different characters and it is important to check the roster before rolling to ensure your key chase cards are present.
With that being said, this is a separate 6-stone that features a lacking bottom rarity which will comprise over 50% of the rolls which is saddening to say the least. As a result, it makes it much harder to justify rolling as duplicates are probably unwanted for the bottom rarity cards along with only one having modest value.
Regardless, this article will outline the pros and cons for each card within the GungHo Collab Egg Machine event to give players a better understanding of what each monster can do.
Video commentary
—video coming Monday—
Overview
GungHo Collab REM Pros & Cons – June 5, 2020 |
|
Pros |
Cons |
|
|
GungHo Collab REM |
|
| 7 Star base (20.7% total) |
|
| 6 Star base (28% total) |
|
| 5 Star base (51.3% total) |
|
GungHo Collab REM Rankings – June 5, 2020 |
|
| S | |
| A | |
| B | |
| C | |
| D | |
Order within each tier is random and not reflective of ranking
Regardless of card’s ranking, you should always keep it if it is your very first time acquiring them
Bottom rarity quick summary
The bottom rarity should be the main motivation to roll in an event and here is a brief summary showcasing their awakenings and/or Weapon Assists if applicable. Awakenings in (brackets) are Super Awakenings.

")
")

") (
(
 Damage Reduction")
 ) – D
) – D
")


") (
( 
 ) – D
) – D
") (
(  ) – D
) – D
 ( ) – B


")
 ( ) – C


 ( ) – C

")
Limit Breaking
Limit Breaking is the process of leveling a card beyond level 99. This will unlock more weighted stats along with the potential to receive Super Awakenings. These additional awakenings can add significant power, but only function in solo mode.
Any card that can qualify for Limit Breaking will have their level displayed in blue and feeding a Super Snow Globe will push them beyond the level 99 cap.
You can read more about Super Awakenings HERE.
Monster Exchange
The Monster Exchange System has mostly eliminated the need to roll in most events as players can simply trade in for a card of their choice. This is often done during lackluster events to avoid spending Stones on poor bottom rarity cards or to snipe a specific card if luck is not on your side.
Weapon Assists
Weapon Assists are a special evolution for select cards that will be used exclusively as inherits. This form retains the same base stats as the original form, but will also transfer over all awakenings on the Weapon Assist card and this occurs if the Awoken Assist ![]() is present.
is present.
My approach to Collab/Seasonal rolling
Rolling any Rare Egg Machine is a gamble and it becomes a matter of maximizing your rate of returns in an event.
This translates into rolling when the bottom rarity has high value as those will be the most common cards. Furthermore, I may utilize the Monster Exchange system to acquire the higher rarity cards if they will significantly advance my progress. As such, I tend to look most closely at the bottom rarity pool to determine if it is worth rolling in.
This is just my own personal approach and everyone has different goals/motivations so take this section with a grain of salt.
7 Star base
 Dazzling Beast Goddess, Tsukuyomi (New) – S

Pros |
Cons |
|
|
Tsukuyomi is the first new card 7-star card to be released within the GungHo Collab and comes with solid personal damage, 4 Skill Boosts ![]() , and a wonderful leader skill for pairing with the future Norza
, and a wonderful leader skill for pairing with the future Norza ![]() .
.

This pairing will yield 2/280/5/51.25% team that also has +3 combos with a 5 or more Heart match and 500,000 Auto Follow Up Damage. While 1 point is enough to kill Resolve spawns, 500,000 can execute Latent Tamadras in A6/AA4. Furthermore, the two leaders alone bring wonderful utility which will make it easier to handle the various mechanics within end game content.
Sadly, this team does have an active skill clause and while your friend’s Norza can be used every 2 turns, you will need to find a card to fill this gap. Naturally owning your own Norza would be ideal but barring that, evolved Yuri ![]() will also work. This is perhaps the biggest hurdle to overcome but is tremendously powerful when it can be achieved.
will also work. This is perhaps the biggest hurdle to overcome but is tremendously powerful when it can be achieved.
While all of this sounds wonderful, one must be aware that Tsukuyomi has no SBR ![]() along with Hearts being unable to be matched being reasonably common in A6/AA4. As such, you must plan out your tea accordingly to have 100% SBR on floor 1 along with having an active to clear unable to match status.
along with Hearts being unable to be matched being reasonably common in A6/AA4. As such, you must plan out your tea accordingly to have 100% SBR on floor 1 along with having an active to clear unable to match status.
") Dazzling Beast Goddess, Tsukuyomi (Dark Colour)
Dazzling Beast Goddess, Tsukuyomi (Dark Colour)

Pros |
Cons |
|
|
Tsukuyomi’s Dark form grants her impressive VDP ![]() potential along with an active that can overwrite Time and RCV debuffs along with generating a row of Water on a blistering 3 turn cooldown. This is meaningful as you can easily counter these two debuffs but will always have an orb changer even if those metrics are not required.
potential along with an active that can overwrite Time and RCV debuffs along with generating a row of Water on a blistering 3 turn cooldown. This is meaningful as you can easily counter these two debuffs but will always have an orb changer even if those metrics are not required.
This tends to have the most merits in higher end content where dungeons are riddled with Time and RCV debuffs and Tsukuyomi’s Attacker typing means she can function on Lamp ![]() teams.
teams.
In addition to this, Dark Tsukuyomi features a leader skill with high multipliers when matching 9 connected Water orbs but quickly drop down when only 6 are matched.
Sadly, Dark Tsukuyomi is overshadowed by her Base form who is a stronger leader as she includes a large Auto Follow Up Attack along with a much stronger pairing in the future Norza. As such, I would be more inclined in keeping my only Tsukuyomi in her Base form as it will most likely provide more value overall.
 Healing Archangel, Raphael (New) – B

Pros |
Cons |
|
|
Raphael is another new card added to the GungHo Collab and features strong personal damage when above 80% health due to three >80% ![]() awakenings. These awakenings are inconsistent in Arena-style content where your health will fluctuate and are better suited to dungeons where you can carefully plan out every floor.
awakenings. These awakenings are inconsistent in Arena-style content where your health will fluctuate and are better suited to dungeons where you can carefully plan out every floor.
As such, it will be difficult to fully capitalize upon Base Raphael and his Leader Skill while boasting 75% Damage Reduction will only take effect when above 80% health.
This results in dual leaders being unable to tank as much damage as you would think as his window for meaningful damage is quite narrow. Thankfully, his Dark form grants him a more flexible Leader Skill.
") Healing Archangel, Raphael
Healing Archangel, Raphael

Pros |
Cons |
|
|
Dark Raphael features a Leader Skill that is similar yet weaker compared to the old Tifa ![]() due to Raphael having less RCV but the same ATK and HP multipliers. This feels a little strange as Tifa is an incredibly old card and having what is essentially a reskinned colour at this point in time is less magical.
due to Raphael having less RCV but the same ATK and HP multipliers. This feels a little strange as Tifa is an incredibly old card and having what is essentially a reskinned colour at this point in time is less magical.
While a 7×6 board with reasonable multipliers is never going to be a bad thing, it may be hard to stand out at this point in time but at least gives Wood teams a viable pairing if you want to enjoy a larger board.
Perhaps one beneficial aspect for Dark Raphael is he embodies a more pure combo playstyle as his Leader Skill only requires 2 Wood combos which should be reasonably easy to achieve on a 7×6 board. Sadly, does become more orb hungry when you are required to form a VDP ![]() as you will now require 12 total orbs.
as you will now require 12 total orbs.
As a whole, I feel Dark Raphael is a reasonable card but not one that will stand out at this point in time.
 Reginleif, Bearer of the Slain – A

Pros |
Cons |
|
|
Reginlief is the final 7-star card added to the GungHo Collab Rare Egg Machine and comes with the highly prized Devil and Balanced typing. This enables her to fully enjoy Yugi ![]() and Nelle’s
and Nelle’s ![]() full multipliers along with providing 5 valuable Skill Boosts
full multipliers along with providing 5 valuable Skill Boosts ![]() . In fact, two Reginliefs can form a System in which you will always enjoy the +15% Dark Skyfall buff along with regularily clearing 3 turns of Awoken Binds and Unable to Match Orb effects.
. In fact, two Reginliefs can form a System in which you will always enjoy the +15% Dark Skyfall buff along with regularily clearing 3 turns of Awoken Binds and Unable to Match Orb effects.
Furthermore, Reginlief has respectable personal damage and reasonably high RCV. This would make you think she would be an instant sub for Yugi/Nelle teams but she does come with several faults. Firstly, we already have numerous Skill Boost solutions from the Yugi Collab but perhaps the bigger issue is a lack of orb generation from Reginlief.
Reginlief is able to produce +15% chance for Dark Skyfalls but there is no guarantee you will have enough Dark orbs on the following turn. This is further exasperated if using two Reginliefs as subs as you may lack sufficient orb changers and if you already own Hiei ![]() , both cards will be less effective. This is because Hiei provides +7% Dark Skyfall chance for 99 turns but will also produce a row of Dark at the top.
, both cards will be less effective. This is because Hiei provides +7% Dark Skyfall chance for 99 turns but will also produce a row of Dark at the top.
As such, I feel Reginlief is still a strong card but perhaps came too late but at least she gives players a viable alternative to Dark Magician ![]() /Fortress Dragon
/Fortress Dragon ![]() if they missed the Yugi Collab.
if they missed the Yugi Collab.
") Reginleif, Bearer of the Slain (Dark Color)
Reginleif, Bearer of the Slain (Dark Color)

Pros |
Cons |
|
|
Dark Reginleif drastically changes her kit to become a powerful TPA ![]() card due to having 6 of these awakenings (11.4x) along with exceptionally high base ATK.
card due to having 6 of these awakenings (11.4x) along with exceptionally high base ATK.
This translates into outstanding personal damage but at the same time, is awkward to fit on a team. This is because TPA only truly shines if the entire tea is build around this awakening as it does not provide additional damage if a match-4 is not achieved. As such, I feel Dark Reginleif will primarily be used as a Farming solution as she can deliver massive damage with a single combo which has synergy with her high 484x ATK Leader Skill that fully activates from a single match-4.
 Great Witch of the Dark Flowers, Reeche – B

Pros |
Cons |
|
|
Dark Reeche has always been in a bit of an awkward place and is amusingly outclassed by their New Year ![]() for who provides an additional Skill Charge
for who provides an additional Skill Charge ![]() and 7 Combo
and 7 Combo ![]() . While GungHo Reeche is not a bad card, she is just not as strong as other options currently available which in turn makes it harder to find usage as a sub.
. While GungHo Reeche is not a bad card, she is just not as strong as other options currently available which in turn makes it harder to find usage as a sub.
Thankfully, her brand new Weapon Assist will breathe some life back into her.
 Weapon Assist (New)

Pros |
Cons |
|
|
GungHo Reeche’s new Weapon Assist is able to provide Full Bind Immunity ![]() along with a single Skill Boost
along with a single Skill Boost ![]() . At this point in time, there is only one other card who can provide this exact combination but this will drastically change when the Chinese Celestials gain their own Weapon Assists.
. At this point in time, there is only one other card who can provide this exact combination but this will drastically change when the Chinese Celestials gain their own Weapon Assists.
This is because these girls will gain these exact awakenings which in turn makes Dark Reeche less unique. With that being said, Dark Reeche has the advantage of both a stronger active and one that has a longer cooldown.
A longer cooldown means it is quite unlikely to accidentally charge up. Of course this can put a damper on actually being able to access this active but at the same time, you probably only want this once per dungeon. As such, there is a strong likelihood you can still have it charge up partway through the dungeon if the Colour/Damage Absorb Void is required.
 Noir, the Infinity of Lost Gear – B

Pros |
Cons |
|
|
Noir is still a solid damage solution for any mono Dark team as she features triple 7 Combo ![]() along with a VDP
along with a VDP ![]() . This has been a reliable “template” for offensive cards as she will provide 8x personal damage with regular matches and jumps to 20x with a VDP. Building upon this, her Balance typing means she can use any Killer Latent which in turn grants her additional killing potential. To top it off, Noir’s active has been buffed to now generate 6 Dark orbs along with Enhancing them. This is a two-fold active as you will have orb generation and damage augmentation but the main drawback is that it will not overwrite ATK debuffs.
. This has been a reliable “template” for offensive cards as she will provide 8x personal damage with regular matches and jumps to 20x with a VDP. Building upon this, her Balance typing means she can use any Killer Latent which in turn grants her additional killing potential. To top it off, Noir’s active has been buffed to now generate 6 Dark orbs along with Enhancing them. This is a two-fold active as you will have orb generation and damage augmentation but the main drawback is that it will not overwrite ATK debuffs.
While Noir has the template for a solid Damage solution, she does not stand out in this day and age. This is because she only provides a single Skill Boost ![]() which hinders her sub potential on Transforming teams along with no Resists as her kit essentially revolves around her offensive potential.
which hinders her sub potential on Transforming teams along with no Resists as her kit essentially revolves around her offensive potential.
Furthermore, her lone Balance typing does restrict her from many Transforming teams including Yugi ![]() and in turn will relegate her to subbing on teams such as Ina
and in turn will relegate her to subbing on teams such as Ina ![]() . While Ina is not a bad leader, she is not the same caliber as Yugi.
. While Ina is not a bad leader, she is not the same caliber as Yugi.
 Flamewinged Divine Beast, Ralg – C

Pros |
Cons |
|
|
Ralg has the potential to be a reasonable Farming solution as his 324x ATK only requires 6 connected Fire orbs along with an active skill being used.
This is relatively easy to achieve damage but the active skill clause can be a liability. This is because players cannot utilize someone like Sado ![]() to generate 2 rows of Fire and then save one for the next floor. Small issue but does restrict you overall.
to generate 2 rows of Fire and then save one for the next floor. Small issue but does restrict you overall.
In addition to this, Ralg lacks personal damage which means 2/6 cards will only be providing Passive Damage and you will have to rely on your subs to do the heavy lifting. This is a far cry from someone like Shivnia ![]() or Dark Omega
or Dark Omega ![]() who are the heavy hitters for their respective teams.
who are the heavy hitters for their respective teams.
As a result, Ralg feels underwhelming but can still function if you can work around his flaws.
![]() Orage, the Burst of Lost Gear – C
Orage, the Burst of Lost Gear – C

Pros |
Cons |
|
|
Orage returns once again to the GungHo Collab and comes with a modest buff to her active skill as it will now include a 1.5x ATK boost. These small bursts have become meaningful due to numerous ATK debuffs found in the higher level Arenas and having it attached to a 10 Water orb generator will be helpful.
Furthermore, Orage provides 4 Skill Boosts, two Team HP ![]() , along with a natural Cloud Resist
, along with a natural Cloud Resist ![]() . This gives her a place on Transforming teams but I feel she is okay overall.
. This gives her a place on Transforming teams but I feel she is okay overall.
This is because with the advent of Super Resists (![]()
![]()
![]() ), the value of Cloud
), the value of Cloud ![]() or Tape
or Tape ![]() has somewhat diminished because they can be found on Weapon Assists. Super Resists are never found on Weapons and I feel it is often best to try and utilize Super Resists and then find Cloud and Tape via Weapons.
has somewhat diminished because they can be found on Weapon Assists. Super Resists are never found on Weapons and I feel it is often best to try and utilize Super Resists and then find Cloud and Tape via Weapons.
This is also because Weapons that grant Cloud or Tape can also come with a Skill Boost which in turn solves another problem and Skill Boost via Weapons are in high demand. This is further exasperated by Fagan Rai’s Weapon ![]() being widely available and arguably one of the best inherits in the game.
being widely available and arguably one of the best inherits in the game.
With this in mind, I feel Orage is not that special as she only provides 4 Skill Boosts which is nice but not exceptionally high while also not providing that much else overall.
 Karin Shindou – A

Pros |
Cons |
|
|
Karin’s Base form has received modest buffs but at the same time, does not make her strong enough to justify using over her other forms.
This is because she only features modest personal damage, an inconsistent Leader Skill, and while her active can overwrite ATK and RCV debuffs, is not justification enough overall.
") Karin Shindou (Dark Colour)
Karin Shindou (Dark Colour)

Pros |
Cons |
|
|
Dark Karin was once considered a top tier leader due to her relatively easy activation requirement, bonus movement time, and the flexibility to asymmetrically pair with a wide variety of leaders. While numerous stronger leaders have been released, Dark Karin can still clear plenty of content with relative ease and if anything, is “stronger” due to having access to pairings such as Fasca ![]() .
.
If you are at a point where you already have a solid roster of leaders to draw upon, Dark Karin can still be used as a sub to aid in Transforming due to her 3-4 Skill Boosts ![]() while also retaining personal damage against Dragons and Devils who are common place in most dungeons.
while also retaining personal damage against Dragons and Devils who are common place in most dungeons.
Another potentially helpful aspect is her active provides an ATK boost (overwrites debuffs) along with 3 turns of 50% Damage Reduction. This translates into 2x Effective Health which in turn could be used to gain an extra turn or two pre-Transform.
") Weapon Assist
Weapon Assist

Pros |
Cons |
|
|
Karin’s Weapon Assist has gained newfound value with the release of Arena 6 and AA4 due to the fact that both dungeons are riddled with ATK and RCV debuffs. As such, having a Weapon Assist that can overwrite both of these while also providing a single Skill Boost ![]() will be meaningful.
will be meaningful.
With that being said, this Weapon will have the most value for those dungeons and may feel less magical otherwise. This is because AA3 and below can be usually done without either of these buffs as it features less mechanics overall.
Taking this into consideration, the form of Karin you should pursue will be dependent on your current level of progression. If you are newer or not thinking about tackling Arena 6 and above, Dark Karin will be your best bet as she can function as a solid leader for most content or as a potent sub.
On the other hand, if you are struggling with Arena 6, this Weapon may be just what you needed as it can solve three different aspects in a single Weapon.
 Zeta – B

Pros |
Cons |
|
|
Base Zeta has received several buffs but does not change his overall viability as his other forms are still significantly stronger and should be pursued.
") Zeta (Dark Colour)
Zeta (Dark Colour)

Pros |
Cons |
|
|
Dark Zeta was also once considered one of the best leaders in the game when he was originally released. This is because he could pseudo system himself by utilizing several dupes to continuously remain below 50% while each Dark Zeta could produce spectacular damage.
While this set up will not work for the hardest content currently available, it will still sweep the vast majority of dungeons. As such, Dark Zeta can still be used for time-sensitive content as his Leader Skill is fast and easy to use.
Moving beyond this, Dark Zeta can still function as a solid Damage solution for mono Water teams provided you can keep your health below 50% and is made easier with dupes.
Dupes are a common trend with Zeta and if you only have a single card, his overall potency is somewhat diminished as it may be harder to stay below 50%. On the bright side, his Weapon Assist is quite powerful and may be the best option for many players.
") Weapon Assist
Weapon Assist

Pros |
Cons |
|
|
Zeta’s Weapon Assist is able to grant the owning card 60% Blind Resist ![]() along with two Water Rows
along with two Water Rows ![]() . This mix of offense and defense is meaningful along with Blind Resist being one of the mandatory metrics you must cover.
. This mix of offense and defense is meaningful along with Blind Resist being one of the mandatory metrics you must cover.
As such, this Weapon has the most merit on mono-Water teams who utilize Rows such as Lamp ![]() . In fact, Lamp teams with this Weapon is quite efficient as Transformed Lamp will provide Super Poison Resist
. In fact, Lamp teams with this Weapon is quite efficient as Transformed Lamp will provide Super Poison Resist ![]() which in turn makes it easier to team build as you have almost covered 2 important metrics with a single card plus inherit.
which in turn makes it easier to team build as you have almost covered 2 important metrics with a single card plus inherit.
While the Healer Killer ![]() is situational/niche, it comes at no additional cost and is another benefit to an already powerful Weapon Assist.
is situational/niche, it comes at no additional cost and is another benefit to an already powerful Weapon Assist.
 Elena Brilliante – C

Pros |
Cons |
|
|
Elena has received a sizable buff to her active as it will now provide 8 turns of 15% Fire Skyfalls instead of 4 turns. While any Skyfall buff has the potential to not always provide enough orbs, having this for 8 turns will most certainly be noticed.
In addition to this, Elena also has the ability to function as a potent solution against Dragon, God, or Devil spawns as she can gain access to another of these Killers via Super Awakenings along with being able to wield their Latents. This means she could be used on various Farming or Ranking Dungeon teams and her bicolour board changer is almost always be helpful.
With that being said, if you do not foresee yourself using Elena as a sub and instead wish to only use her active, you may find her Weapon Assist to be of great value.
As a slight tangent, when Elena was first released, she had the potential to be valuable for Ranking dungeons and was used a modest amount then due to the combination of bicolour plus Skyfall buff. Sadly, the combination of Majic Lin ![]() (perfect 15-15 bicolour) plus a forced 4-colour Skyfall (eg. Xellos
(perfect 15-15 bicolour) plus a forced 4-colour Skyfall (eg. Xellos ![]() ) is a stronger combo booster despite taking 2 actives.
) is a stronger combo booster despite taking 2 actives.
") Elena Brilliante (Dark Colour)
Elena Brilliante (Dark Colour)

Pros |
Cons |
|
|
Dark Elena trades her 8 turn, +15% Skyfall active for 99 turns of +7%. As such, length of the dungeon will determine how valuable this will be but at the same time, the secondary effect tied to her Dark form is underwhelming.
This is because a +50% health heal over two turns will often go to waste and she is not actually generating orbs the turn she is used, just a slightly higher chance of Fire orbs appearing. Furthermore, Dark Elena’s awakenings are lackluster along with a disappointing Leader Skill.
As such, it will be hard to justify using her outside of inheritance which will not provide any awakenings. Taking all of this into consideration, this is Elena’s most underwhelming form.
") Weapon Assist
Weapon Assist

Pros |
Cons |
|
|
Elena’s Weapon Assist is able to grant the owning card a single TPA ![]() and Balance Killer
and Balance Killer ![]() while also retaining her Base form’s active.
while also retaining her Base form’s active.
While TPA is an often underutilized awakening, it can still produce meaningful results on teams such as Grigory ![]() and being able to grant him an additional TPA will help bolster his damage output. Furthermore, while a Balance Killer is more situational, it does have merits in A6/AA4 as several of the later spawns feature this typing along with large health pools.
and being able to grant him an additional TPA will help bolster his damage output. Furthermore, while a Balance Killer is more situational, it does have merits in A6/AA4 as several of the later spawns feature this typing along with large health pools.
With that being said, this is still a niche Weapon Assist.
 Raizer – B

Pros |
Cons |
|
|
Raizer’s Base form is underwhelming overall as he does not provide anything truly relevant beyond personal damage (with no VDP) when below 50% health.
As such, he is best converted into his other forms as they will serve you better.
") Raizer (Dark Colour)
Raizer (Dark Colour)

Pros |
Cons |
|
|
Once upon a time, Dark Razier was one of the mot desirable cards to own from the GungHo Collab as he was one of the only 2 turn Damage Absorb Void cards.
While one should not actually require 2 turns to kill a single Absorption spawn, the fact that Arena 5 and Alt. Arena 3 have a 25% chance to encounter two Absorption spawns back-to-back. While the second one (Durga) is not lethal and is a great way to stall for actives, waiting 10 turns elongates clear times. As such, having access to an active that can counter both spawns was highly desired.
Fast forward to today and we now have a whole host of different 2 turn Damage Absorption Void actives which in turn downgrades the unique value Dark Raizer provides. Furthermore, Raizer’s Weapon Assist does not feature this active so trying to inherit Dark Raizer will not provide any additional awakenings.
This is not to say that Dark Raizer is a bad card, it is just that he has lost his luster and unique role of being one of the few 2 turn Damage Absorption Void actives.
") Weapon Assist
Weapon Assist

Pros |
Cons |
|
|
Raizer’s Weapon Assist is able to provide 2 Team HP ![]() and an Attacker Killer
and an Attacker Killer ![]() . This can provide a modest amount of added bulk but at the same time, will probably be unneeded for the vast majority of end game teams as you will always have enough Effective Health to survive non-executes.
. This can provide a modest amount of added bulk but at the same time, will probably be unneeded for the vast majority of end game teams as you will always have enough Effective Health to survive non-executes.
Furthermore, this Weapon does not provide any Resists and an occasionally helpful Attacker Killer awakening. This places it at the bottom of the theoretical inherit totem pole as having sufficient Resists is most important followed by reliable Passive Damage such as Rows or Orb Enhances.
 Lilia – A

Pros |
Cons |
|
|
Lilia’s Base form is able to Lock all orbs on a 6-turn cooldown which will counter all Spinners. This is meaningful under the right circumstances as you can freely match without trying to time the changing of orbs.
With that being said, this is a pretty weak active overall and while her Leader Skill has strong multipliers, it is inferior compared to her Dark form while also requiring 10 combos to truly shine.
") Lilia (Dark Colour)
Lilia (Dark Colour)

Pros |
Cons |
|
|
Dark Lilia is significantly stronger compared to her Base form as she is able to enjoy solid personal damage due to triple 7 Combo ![]() and VDP
and VDP ![]() along with a stronger active. While Dark Lilia will only Lock Wood orbs, it will at least convert Water and Hazards and with smart planning, can place the Locked orbs into the Spinners.
along with a stronger active. While Dark Lilia will only Lock Wood orbs, it will at least convert Water and Hazards and with smart planning, can place the Locked orbs into the Spinners.
Furthermore, with a 5-turn cooldown, Dark Lilia can carry another inherit to help diversify her utility. As such, Dark Lilia can function as a reliable sub for mono Wood teams, especially if Spinners are present.
As a leader, Dark Lilia has potentially high ATK multipliers but must hit 10 combos in order to do so. This will be inconsistent but at least she will provide 1 point of Auto Follow Up Damage when matching 9 connected Wood orbs. While this will eat into your combo count, you do not have to worry about Resolve spawns which in itself is meaningful.
 Weapon Assist
Pros |
Cons |
|
|
Lilia’s Weapon Assist is able to provide both Cloud Resist ![]() and 3 Wood Rows
and 3 Wood Rows ![]() which can be meaningful for mono Wood teams. Sadly, the active tied to this Weapon is lackluster/niche while also having shorter cooldown.
which can be meaningful for mono Wood teams. Sadly, the active tied to this Weapon is lackluster/niche while also having shorter cooldown.
This means it runs a higher risk of accidentally charging up at inopportune times and the effect when used is only helpful is Spinners are present.
With this in mind, I would more inclined to not make this Weapon and instead use her Dark form as it will provide more value overall.
 Omega – A

Pros |
Cons |
|
|
Base Omega has the potential to be a meaningful card but he sadly lacks an ideal home to take advantage of his kit. His main appeals are his 1-turn cooldown that will trigger any active skill clause Leader Skills along with his high personal damage against God and Devil spawns.
Together, these should make him a reasonable sub but there is no ideal place to use him. Thankfully, his Dark form is one of the most efficient Farming leaders in the game.
 Omega (Dark Colour)

Pros |
Cons |
|
|
Dark Omega is still one of the most efficient Farming leaders in the game due to his entire kit being relatively self-sufficient. This is because he combines a double row maker, -50% HP cut, 324x ATK, high personal damage (three <50% ![]() ), and is incredibly easy to activate as you only have to be below 50% health. Furthermore, Dark Omega can abuse Fire Rows
), and is incredibly easy to activate as you only have to be below 50% health. Furthermore, Dark Omega can abuse Fire Rows ![]() for even more offensive potential and can make short work of easier/predicatable content.
for even more offensive potential and can make short work of easier/predicatable content.
The idea of Farming a dungeon over and over again is to do so in the fastest and efficient manner possible. As such, players can easily plan out their active skill usage and somewhat swipe/minimal combo their way to a speedy vicotry. While this will not reduce the amount of stamina spent, your clears will be faster and more mindless which becomes important if repeatedly farming the same dungeon.
 Weapon Assist
Pros |
Cons |
|
|
Omega’s Weapon Assist is underwhelming overall and has a high opportunity cost as you will be forgoing the chance to use his wonderful Dark form.
The reason why this Weapon Assist is lackluster is because of the 6 -> 1 turn cooldown which will accidentally charge up quite easily while only generating a single Fire orb. Low cooldown actives are great on subs/leaders but tend to be problematic on Weapon Assists for this reason.
While the Tape Resist ![]() and 3 Fire Rows
and 3 Fire Rows ![]() are useful awakenings, the juggling of the low cooldown will tend to harm you more overall.
are useful awakenings, the juggling of the low cooldown will tend to harm you more overall.
6 Star base
 Weaver of Destiny, Urd – B

Pros |
Cons |
|
|
GungHo Urd features 4 Skill Boosts ![]() along with huge personal damage when below 50% health and facing a Devil or Healer spawn. This is valuable as Training Arena 2 (TA2) as many spawns feature these typings and you only need to cover Balance and you are somewhat set.
along with huge personal damage when below 50% health and facing a Devil or Healer spawn. This is valuable as Training Arena 2 (TA2) as many spawns feature these typings and you only need to cover Balance and you are somewhat set.
With this in mind, GH Urd is a phenomenal damage solution for TA2 as either a leader or sub as she is somewhat self sufficient in the sense she can cut your health while also generating 6 Fire orbs.
 Creator of Destiny, Verdandi – B

Pros |
Cons |
|
|
GungHo Verdandi is blue which will eternally confuse me as the original Verdandi has always been green. Regardless, GH Verdandi comes with 4 Skill Boosts ![]() along with strong personal damage against Gods while also having a VDP
along with strong personal damage against Gods while also having a VDP ![]() . While I am usually against cards who primarily feature Killers as a form of damage, God Killers are relevant for Arena 6/AA4.
. While I am usually against cards who primarily feature Killers as a form of damage, God Killers are relevant for Arena 6/AA4.
As such, it would not be a terrible thing to have GH Verdandi on your team for these types of content and her 4 Skill Boosts will help the future Norza ![]() Transform while also being able to generate Heart orbs.
Transform while also being able to generate Heart orbs.
On the other hand, GH Verdandi has the potential to lead a reasonable team of Reincarnated cards as she boast solid multipliers.
 Witness of Destiny, Skuld – B

Pros |
Cons |
|
|
GungHo Skuld features a Gemstone-style active that provides additional ATK based on the number of SBR present. Assuming every card has one along with Skuld’s 4, you will enjoy 9*0.2 + 1 = 2.8x ATK on a 4 turn cooldown. This is quite an efficient ratio but perhaps more importantly is being able to overwrite any ATK debuff.
While I feel that having 4 SBR is excessive, it can be used to help mitigate a lack of SBR pre-Transform or when using cards such as Academy Valeria ![]() who lack their own SBR.
who lack their own SBR.
As such, the value GungHo Skuld will bring to your Monster Box will hinge on how many non-SBR cards you want to bring on a given team along with whether you are playing through A6/AA4 where the ATK buff has significantly more applications.
 Flame Winged War Goddess, Urs Laguna – D

Pros |
Cons |
|
|
Urs Laguna is a terribly disappointing card as they feature 4 different Killers which will result in an underwhelming amount of damage. This is problematic as Killer solutions are best when they focus on a single typing as they can deal spectacular amounts of damage when needed.
As such, Urs Laguna will not be able to achieve this and will be sidelined for essentially any other Killer card as it will be difficult to find a triple typing spawn that features their Killers.
 Brilliant Sea Beast, Grand Starster – B

Pros |
Cons |
|
|
Grand Starster makes a return this time around and retains his ability to provide a wonderfully powerful active on a fast 8-turn cooldown. This active has value because it is able to produce a tricolour board that includes Hearts along with a 5 turn Bind and Awoken Bind clear.
This is compensated by the inclusion of Jammers which are obviously not ideal but perfectly manageable as you can easily clear them away along with your other combos. With that being said, this is works in our favour as we now have access to a powerful active on a much faster basis.
Furthermore, Grandstarster is able to provide Passive Damage via three Enhanced Water Orbs ![]() along with additional utility via their Super Awakenings.
along with additional utility via their Super Awakenings.
While all of this is meaningful, Grandstarster faces plenty of competition when being selected as a sub and I feel they just sadly do not make the cut for most teams if faced with other options. This is because I feel Granstarster’s main appeal was when Colosseum 2 was released and their exceptionally low Team Cost ensured they hit max level quickly.
Finally, you should leave the Jammer Blessing ![]() unawoken as it will provide only a tiny 1.5x ATK for Grandstarster but at the same time, will take up space on your board and will be a hindrance overall.
unawoken as it will provide only a tiny 1.5x ATK for Grandstarster but at the same time, will take up space on your board and will be a hindrance overall.
 Mercury – B

Pros |
Cons |
|
|
Mercury is a solid Ranking Dungeon or Farming solution when faced with numerous Dragon spawns. This is because she has access to two natural Killers ![]() , the ability use Dragon Killer Latents, and two >80%
, the ability use Dragon Killer Latents, and two >80% ![]() awakenings. Furthermore, she can also acquire an Attacker
awakenings. Furthermore, she can also acquire an Attacker ![]() or Physical
or Physical ![]() Killer via Super Awakenings to further push her damage.
Killer via Super Awakenings to further push her damage.
While also of this is wonderful, she is only truly efficient against Dragons and while also remaining above 80% health. As such, her value will be dependent on how much you value these game modes where speed and efficiency reign supreme.
With that being said, Mercury is a step up above other Dragon Killing options as she will often out damage them while above 80% health.
") Goddess of Purity, Artemis – C
Goddess of Purity, Artemis – C

Pros |
Cons |
|
|
GungHo Artemis has the potential for impressive Evolution or Devil Killing potential due to her ability to have two natural awakenings of each along with being able to also wield their Latents.
As such, GungHo Artemis will be a situational card for specific Ranking or Farming content as she can deliver tremendous damage to those respective spawns while also having a higher ATK stat. With that being said, I would probably lean more towards an Evolution Material counter as this role cannot be performed by many cards whereas numerous Devil Killing solutions exist.
") Kaguya, Princess of Tsukuyomi – S
Kaguya, Princess of Tsukuyomi – S

Pros |
Cons |
|
|
Tsukuyomi has a surprisingly high ATK multiplier when matching 5 colours while also matching 5 connected orbs. Sadly, she lacks Effective Health due to only having 25% Damage Reduction with a single leader and will struggle to survive larger preemptives.
In addition, her awakenings are nothing special and having 3 Skill Bind Resist will often go to waste. Thankfully, she has an incredibly powerful Weapon Assist.
 Weapon Assist

Pros |
Cons |
|
|
Tsukuyomi’s Weapon Assist is like fine wine, improves with time. In fact, this Weapon has quickly become one of most used equips due to the release of Arena 6 and AA4. This is because both these dungeons feature numerous ATK, movement time, and RCV debuffs and having a single active that can counter all 3 on a fast 7-turn cooldown is simply amazing.
This is because any buff will overwrite their respective debuff regardless of how much is actually buffed. In fact, for the Light ATK buff, it still overwrites any ATK debuff regardless if you actually have Light cards on your team.
With this in mind, I like to inherit my Tsukuyomi Weapon on cards with already fast cooldowns in order to have regular access to this wonderful utility active.
To top it off, this Weapon will also provide full Bind Immunity ![]() which is incredible for cards such as Aten
which is incredible for cards such as Aten ![]() and Diaochan
and Diaochan ![]() who both lack Bind Immunity and have fast charging actives. To be fair, even if a fast cooldown card cannot benefit from the Bind Immunity, this is still a solid Weapon Assist when playing through higher level content as it can address three dangerous mechanics.
who both lack Bind Immunity and have fast charging actives. To be fair, even if a fast cooldown card cannot benefit from the Bind Immunity, this is still a solid Weapon Assist when playing through higher level content as it can address three dangerous mechanics.
On a personal note, I own both Umbrella ![]() and Tsukuyomi’s Weapon and find that these two are some of my most used equips when playing through challenging content.
and Tsukuyomi’s Weapon and find that these two are some of my most used equips when playing through challenging content.
5 Star base
Helen – D

Pros |
Cons |
|
|
Helen is the first 5-star card within the GungHo Collab REM and the fact that she is just called Helen should be indicative of how much love GungHo has for her. She is not Helen the Great nor Changer of Fates, Helen, just Helen.
While that probably has no actual bearing on her usability, it does not change the fact that she is a terribly outdated card with no true value at this point in time. Perhaps if she had a Weapon Assist form she might find some merits but without one, it is harder to justify inheriting her.
Konohanasakuya – D

Pros |
Cons |
|
|
Konohanasakuya is another underwhelming card who does not fulfill any relevant niche/role due to her abysmal awakenings, terrible Weighted Stats, and comically lackluster active. Healing 7,000 HP might have meant something in 2015 but nowadays that is barely anything and 10% heal is never going to be enough to work as a Healing solution.
Tenfuufa – D

Pros |
Cons |
|
|
Tenfuufa gets a 0/10 as she will not find usage beyond brand new accounts as her offensive potential, utility, and Weighted Stats do not amount to much overall. This is sadly the trend for bottom rarity cards who lack Weapon Assists.
Atalanta, Tempestuous Warrior – B

Pros |
Cons |
|
|
Atalanta’s Base form has no relevance and should always be converted into their Weapon Assist evolution.
Weapon Assist
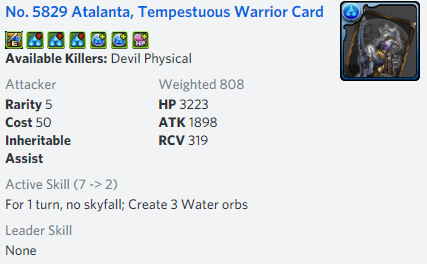
Pros |
Cons |
|
|
Atalanta’s Weapon Assist has the ability to grant a sizable amount of Passive Damage to mono Water teams due to the 3 Rows ![]() and 2 Orb Enhances
and 2 Orb Enhances ![]() . As such, if you are able to cover all relevant Resists and have an open inheritance slot, this can potentially be the way to go.
. As such, if you are able to cover all relevant Resists and have an open inheritance slot, this can potentially be the way to go.
With that being said, I want to stress that offensive Weapon Assists should not take priority over those that provides important Resists as being able to completely counter/ignore a mechanic via awakenings is incredibly valuable. This is because it will directly save you active skills while also providing safer and more consistent clears.
Orpheus the Pining Poet – C

Pros |
Cons |
|
|
Orpheus comes with two Coop Boost ![]() awakenings which bolster his stats by 2.25x when used in multiplayer. This greatly patches up his other wise lackluster Weighted Stats but the only one that is truly important is his ATK.
awakenings which bolster his stats by 2.25x when used in multiplayer. This greatly patches up his other wise lackluster Weighted Stats but the only one that is truly important is his ATK.
This is because cards with higher ATK are often selected as Button Bases for Button farming. This process revolves around using an active that produces instantaneous damage when using the active (at the push of a Button) and these abilities scale with ATK. As such, the higher the ATK, the bigger the Button/damage.
As a result, Orpheus can be a potential Button Base if you enjoy this type of farming in multiplayer but at the same time, this may not be for everyone. Furthermore, Orpheus has a much lower ATK stat compared to some other double Coop Boost options which in turn may sideline him. Thankfully, his Weapon Assist has merits.
Weapon Assist

Pros |
Cons |
|
|
Orpheus’s Weapon Assist is able to provide a single Coop Boost ![]() awakening which will grant 1.5x stats to the owning card when used in multiplayer. As mentioned above, Coop Boost is a way to inflate a card’s ATK stat and if you have someone that naturally comes with a Button active (eg. Brachydios
awakening which will grant 1.5x stats to the owning card when used in multiplayer. As mentioned above, Coop Boost is a way to inflate a card’s ATK stat and if you have someone that naturally comes with a Button active (eg. Brachydios ![]() ), you can further boost their damage output.
), you can further boost their damage output.
This will be the main application for Orpheus’s Weapon Assist and the amount of value it will bring to your Monster Box will depend on how much you value this type of farming.
Delphyne the Dragon Princess – C
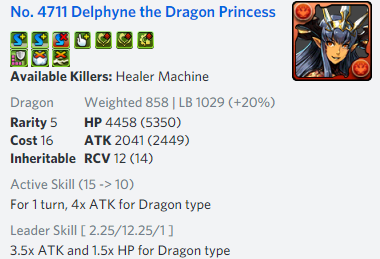
Pros |
Cons |
|
|
Delphyne is the final 5-star card featured this time in the GungHo Collab REM and comes with the ability to deal meaningful damage against Healer type spawns. This is because she comes with 2 Healer Killers ![]() along with the ability to use Healer Killer latents.
along with the ability to use Healer Killer latents.
As such, she may be utilized in some Farming or Ranking Dungeon builds along with her active providing a sizable 4x ATK burst for Dragon types. With that being said, Delphyne is still a niche card and may have more merits as a Weapon Assist if you already have a viable Healer Killer solution.
Weapon Assist

Pros |
Cons |
|
|
Delphyne’s Weapon Assist is able to provide 60% Jammer Resistance ![]() along with the ability to boost ATK for Dragons by 4x for a single turn.
along with the ability to boost ATK for Dragons by 4x for a single turn.
While it may not be flashy, this Weapon Assist can be utilized by a variety of teams provided other Resists are taken care of. This is because Jammers tend to be a lower priority as they are not “lethal” as they can be matched away and do not deal damage unlike Poison orbs. As such, I would only try to bring Jammer Resist if all other relevant/dangerous metrics are already covered.
On the other hand, while not every team uses Dragons, the ATK boost can be used to overwrite any ATK debuff, even if no cards on your team are Dragons.
Do I plan to roll? & Dream rolls
I do not plan on rolling within the GungHo Collab Egg Machine as the bottom rarity is terribly disappointing along with me already owning the 6-star Tsukuyomi ![]() . As such, I would be rolling in hopes of acquiring a 7-star card and while the rates are actually reasonably high, 50% chance for a sad 5-star is unappealing.
. As such, I would be rolling in hopes of acquiring a 7-star card and while the rates are actually reasonably high, 50% chance for a sad 5-star is unappealing.
Regardless, I would love to pull a Tsukuyomi ![]() for my dream 7-star card as she can perform wonderfully well as a leader or a sub and will give me an alternative to Lamp
for my dream 7-star card as she can perform wonderfully well as a leader or a sub and will give me an alternative to Lamp ![]() along with already owning Yuri for future Norza
along with already owning Yuri for future Norza ![]() pairings.
pairings.
For my 6-star choice, I would normally say the other Tsukuyomi ![]() as she features an incredible Weapon Assist but I am already blessed by her from a previous event so I will choose the wrong colour Verdandi
as she features an incredible Weapon Assist but I am already blessed by her from a previous event so I will choose the wrong colour Verdandi ![]() as I already have a potent Training Arena 2 farming team in Shivnia
as I already have a potent Training Arena 2 farming team in Shivnia ![]() (team can be found HERE) which makes Urd
(team can be found HERE) which makes Urd ![]() less appealing.
less appealing.
Finally, Atalanta ![]() is my bottom rarity choice as he offers the strongest Weapon Assist of all the 5-star cards and at least has a chance of being used if I am able to cover all important Resists.
is my bottom rarity choice as he offers the strongest Weapon Assist of all the 5-star cards and at least has a chance of being used if I am able to cover all important Resists.
My Dream Rolls |
||
7*
|
6*
|
5*
|


The above chart are the cards I would love to acquire from each rarity if I could choose one for my Mantastic account. This is my own personal opinion based on my Monster Box, goals and whether or not I have dupes.
Conclusion
The GungHo Collab makes another return to North America and has cut down on the already massive rolling pool by rotating several cards out this time around. This does provide a higher chance of rolling what you want but at the same time, it will be challenging to actually roll one specific card.
While the six new cards added are unique and for the most part reasonably powerful, I do not feel it is justification enough to roll at this point in time as the bottom rarity is still lackluster and comprises over 50% of the rolls.
Thankfully, this event will return on a regular basis which means we will always have a chance to pull from it several times a year along with ideally timing our rolls when the cards have been further buffed or the bottom rarity is reworked/removed.
Let me know what you think about the GungHo Collab Rare Egg Machine and how much you plan on rolling in the comments below.
Happy Puzzling!
If you enjoy my content, please consider turning off AdBlocker for this website. If you wish to directly support me, please click the beautiful image below.![]()


I was wondering if base Tsukuyomi would pair with Minaka? And Norza as a sub? I would think that Tsukuyomi would like to have the 7×6 board that Minaka gives, also the Rcu.
LikeLike
I also wanted to add that the 168x dmg is kinda low but there are really powerful water subs that may account for this.
LikeLike
Well one thing with Tsukuyomi is that her ATK multiplier is on the lower end and she somewhat relies on high personal damage along with Norza’s LS offering 20x (and 5x RCV)
If you pair with Minaka, you have a much lower multiplier and lose out on Norza’s damage from a friend. If you have a Norza, use your own Tsukuyomi as a lead, your Norza as a sub, and friend Norza
LikeLike
Couldn’t you use Deena as a sub for her active?
LikeLike
For which team? Future Norza? Yes you could but run the risk of overwriting Hearts and you then have another card to Transform which may put constraints on SB
LikeLike
Hello Mantastic,
is Tsukuyomi such a good leader that i should trade:
Elena Brilliante
Ralg
Fujin
Raijin
and another 7 star Collab card for?
I Just got one of each card but i don t use them for my current teams.
My Tsukuyomi team would look like:
L. Tsukuyomi
S. Cherun
S. Blue Cotton
S. Lampeid or Startster
S. Yuri
L. Norza (when she is coming to NA)
Do you think its worth it?
LikeLike
From what research I have done, having 2 Norza (sub + friend) is ideal as they are a huge source of damage and an ideal active but Yuri is the next best option
Do you feel this team will surpass your other options as you are losing numerous non-dupes. When trading, especially non-dupes, I want to ensure it will dramatically advance my progress
Another thing you could do is wait. Norza’s Godfest is speculated to come next weekend (will overlap with GH) and Tsuku without Norza isn’t that great atm. Thus, roll in that SGF and maybe you will get additional fodder and save some non-dupes
LikeLike
Thats a great idea! I will wait until the weekend. Maybe i get Lucky. Are you planning to trade either? you haven t done that just one time if i remember correctly.
LikeLike
I think, ultimately, granting that subs and meta evolves, that Blue cotton and Yuri make the cut, but Cherun is actually preferable as an inherit. Yes, the active is a good board, but as a base card, the body/awakenings just aren’t pulling enough high end luxury subs weight, and the Cherun inherit still gets you the board, 10 percent team hp, and a random cloud. Base,you get the active a bit quicker but at the expense of basically no damage on the base card/body. (I inexplicably have two Cherun from the misbalanced rng gods, thought it would be nice, but am probably converting the second to equip to just run both as equipments. The first as a Tsukuyomi inherit has been seeming fine.)
Probably lampeid/starster doesn’t make the cut either. Fine for now. I get that you need awoken unbind (and anti-absorb, btw, which isn’t in your base subs.) Lampeid is okayish at bind recovery, but doesn’t do enough else, and has terrible stats…at cd10 you could just inherit awakening bind clear to a better low cd body. You don’t particularly need the Lampeid anti-posion awakening with the x5 / x7.5 rcv the split lead is serving up, it’s abstractly fine but of less than usual value in high rcv splits. (I’ve played through a lot of incidental poison in higher end arena runs with high rcv chocolateer ideal, juggling sub compositions a lot without always paying attention to having tight anti-mechanics coverage, anti-poison is breezy nice but quite optional on high rcv leads.)
Beach fujin is obviously a little luxury in a narrow water attribute anti-absorb card pool, or the more accessible pixel sherias, noting his active unfortunately breaks hearts and needs friend lead cd2 combination to add back in a heart match – slow to recycle long cd Sherias but fine as a stats/awakenings card as a one shot anti-absorb, with a second anti-absorb inherited elsewhere for the troll filled multi absorb dungeons. Inheriting cd8 Uesugi Kenshin (samurai 3 pantheon series) on something low cd is probably also a very reasonable way to go though, as the hp1 side effect is less of an impediment on a x5+ rcv team.
A note that Cd1 increase water skyfall 10 percent Lutia from draconian orchestra machine is perhaps a sub flex option Mantastic didn’t mention, albeit not a common pull. One card slot perma active, so Yuri and friend lead Norza can both actually save up their actives for more/better inherits, as a way for satasfying perpetual ability use while minimizing the constant card ability invoke rotations.
LikeLike
You have a good point. Fortunately i have beach fujin. what would be your choice for other subs? i don t own sherias or lutia. i have Kenshin as an inherit, any other good choices you can recommend?
LikeLike
One thing you have to also consider is enough SB to Transform Norza and with Lamp and Sherias, you get 4SB Effective SB and a Super Blind and Poison
Main issue with Lutina (and Deena) is they don’t actively contribute to the activation requirement as neither can produce Hearts and Deena has a chance to overwrite Hearts
LikeLike
I might trade for Tsuku after rolling in that speculated SGF and seeing what kind of team i can put together
LikeLike
Hi Mantastic. Do you happen to remember whether L-Tsukuyomi has ever been tradeable in previous iterations of the GungHo Collab?
Thanks for the awesome REM review
LikeLike
I do not think she has ever been available outside of rolling and I think I got mine during a previous SGF where the 6/7* were featured along other GFE
LikeLike
Hey Mantastic, quick tip if you didn’t already know. Cards with leader skills that require all subs be reincarnated or super-reincarnated doesn’t apply to the leader you are pairing with. This actually makes this restriction somewhat more palatable and opens up options for leader pairings.
LikeLike
Yeah that is great to know as it will help those leaders out tremendously a you can asymmetrically pair with something that provides more than just raw multiplier stats
LikeLike
Hey Mantastic.
No queries this time, just wanted to thank you for all your content and wish you well ❤
LikeLike
Thank you for your kind words ❤
LikeLike
What do you think of the buffs to Leo and his assist? Aside from his tpa, I’m looking forward to using his assist eventually on a water team, when my water box doesn’t suck, or maybe as a substitute for tsukuyomi’s assist.
LikeLike
Yeah his Weapon can most certainly be used in lieu of Tsukuyomi’s and while I feel it is not as strong (longer CD and no TE), it does provide a more meaningful burst
LikeLike
I rolled Raphael, but I don‘t see him replacing Freyja as my leader, eventhough the 6×7 board is nice…
LikeLike
Hi, I have a few extra trade fodders I can throw to get tsukuyomi but I was wondering if it is really worth it? You would still require the Norza, if you get lucky, to run the comp. I currently have Yugi, Fasca, and Dyer team comp that I am currently using. I think i have enough subs to run a Tsukuyomi comp if I tried. My trade fodders would be eschamali, dantalion, fujin, raijin, and gremory. I believe they are all dupes.
LikeLike
Well the biggest issue is exchanging for something without an ideal or exceptionally strong team for them considering you have other options
Perhaps as a compromise Norza’s SGF is speculated to come soon and it will probably overlap with this event
LikeLike
Let me know if you do try him out and how well it does work
LikeLike
Thanks for the review as always. I have two questions for you:
Do you feel Tsukuyimi/Norza are a significant improvement over Yugi/Nelle and Alice/Fasca?
What about over Chakeol teams?
LikeLike
From direct experience with Chakeol, Chakeol’s team with luxury subs is stronger. The damage output is a shade low on the Tsukuyomi split, and having to use card abilities constantly is a sIgnificant bit of subtle lost edge. The hardest content will stress all your active ability slots. I don’t really want to be popping Tsukuyomi active at a low cooldown or cycling two other cd2 cards. Half your team actives being spoken is too high maintainence a date / is too many for high end content. The power of Alice/Fasca in part is that any random board with a single light match is good enough to sweep most floors.
Regarding the splits, the abstract is so heavily influenced by possessing specific subs, the power of Alice/fasca or yugi/Nelle varies so dramatically by how precise/ideal your subs are that it tends to dominate over the lead pairing. I don’t have an ideal yugi team, but I have a near ideal personally enjoyed Fasca/Alice team, and it does absurd damage. But I still run chocolateer ideal dual, as it is just incredibly survivable despite the various 6×7 splits being the latest hot sauce for the meta. I’m not convinced Tsukuyomi split is better than any of these, as the water subs pool is not quite right for the high-end “counter all the mechanics“ game going on in the tip-top meta. I have subs/inherits like cherun and various seemingly dovetailed cards / abilities, and Tsukuyomi just doesn’t feel as snappy and flexible as I thought it would. (Note: early days though, just pulled it and am still experimenting.)
If I had limited pulls and none of the leads cards, I’d probably chase Fasca, or Chakeol, or chocolatier Ideal, before I’d chase Tsukuyomi.
LikeLike
Thanks for the detailed reply! That’s really helpful.
I have both Yugi and Nelle and I traded for Alice on my main. My alt also pulled Chakeol, so I was debating whether to trade for Chakeol on my main as well since my green box is pretty good
LikeLike
It all depends on what you have in your monster box. The Tsuk/Norza teams are tremendously strong IF you can build her well (aka 2 Norza total) in order to always loop her desirable active
With that being said, it will be a hard team to build as you ideally have your own Norza and trade for Tsuku. If that is your goal, there is speculation that this coming weekend will be her debut SGF and if you manage to roll her, may be valuable to trade for Tsuku
LikeLike
Hey Mantastic,
The question on everyone’s mind – how many versions of Tsukuyomi does one game need?
LikeLike
Yes
The answer is Yes
LikeLike
Just saying, change the world ability counters spinners, so old school yomi as the elder zen worthy of ancient legend remains a splendid fellow. Keep the variant forms coming…
LikeLike
NY Yomi has been one of my favorite subs for a long time but the SRevo looks quite good as well. Day 1 SRevo for the old times
LikeLike
Traded all 7* without VDP for the new S level 7* after taking a 7* C level.
LikeLike
Has this improved your overall experience?
LikeLike
Well I had bizarre luck in GH… 2 tsukuyomi, a 3rd Karin.. I have enough dupes to trade for Rag….
I have an ideal yugi team (no hiei or DM have 2x fortress dragon, 2x bakura, lumiel etc), and lamp and alice for other pairings.
My fasca yugi team is not ideal however, and my dark/balanced team would love Raganleif from GH.
No nelle or fasca. No dyer or aten or chakeol.
I have an ideal Grigory team too.
I’m outta stones so won’t be rolling for Norza, I still have my medal to trade for yuri.
Should I trade dupe Ney, a dupe ameno, the dupe tsukuyomi, dupe skuld for Rag to make my yugi nelle even better or save it in case dark tskuyomi gets a better home?
LikeLike
How much of an improvement do you think acquiring Reginleif will bring your box? Do you have any other alternative for clearing unable to match orbs?
She can most certainly replace a Fortress Dragon and also provides SBR
Another thing I need to ask is what kind of content are you currently playing/clearing? If A6/AA4 is far off still, you may not be able to fully take advantage of her
LikeLike
Finally got my hands on Karin Shindou and changed her into dark form. I’m trying to make a Light/Dark team and the team I made is the following:
Karin Shindou
Sinon – evolved form
Erika – evolved form
Skill connect Kirito
Reincarnated sima yi
Ideal – evolved form
I need a monster that’ll reduce damage when attacking with either light, dark or both. Any advice would be very appreciated?
LikeLike
I would not pair with an Ideal and instead look into either Tifa, Fasca (if you can make only Attackers), Haohmaru, or Base Dorna.
All of these pairings will be a significant upgrade to an Ideal
LikeLike
Thinking about trading for 2 Reginleif and wanted to know your thoughts. Assuming NA gets DMC, I was thinking about trading for V and making a team with V, 2 Reginleif, Winged Dragon, RDiao, and Yugi. I have 3 Elena, 3 Raizer, 1 Noir, 2 Rodin, 2 Dkali, 2 Skuld, and 4 Ney.
LikeLike
Well DMC may never come so this is a pretty big gamble overall. Do you think you could gain enough value from them if DMC doesn’t come?
LikeLike