Tag Archives: Academy

MD3 Dungeon Guide: Academy Tokugawa x Academy Ina

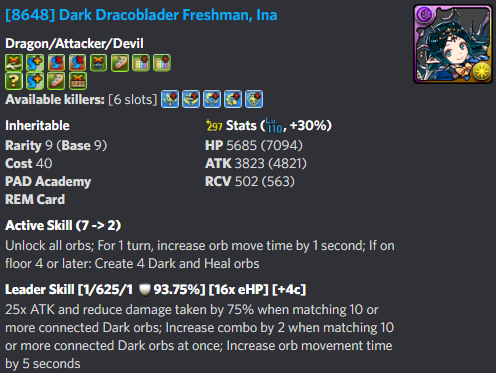
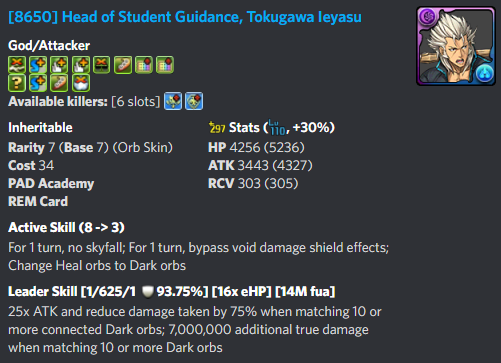
With the advent of Academy Tokugawa and Academy Ina, a new, powerful MD3 team has entered the fray. By taking advantage of non-transforming leaders, this team mitigates the danger of stalling to transform Atori or Raphine. Additionally, it takes advantage of high eHP and ease of stalling to make TF Yurisha and Seina manageable. While the team is relatively safe with copious amounts of movetime and high durability, it suffers from a tedious and slow playstyle that is highly contingent on cheesing Raphine’s spinner and matching precise boards for clean one shots. Though the sub slots are highly inflexible, most of these equips can be easily substituted. Whether you’re looking for safe MD3 clears or a simple one-and-done, this build will do the job.

Build Notes

Build assumes rainbow solves with dark bricks unless otherwise noted. Additional notes indicate extensions of rainbow solves except for F3 and F4. Lead with Baran for a 7×6 board. Stall for Tokugawa as needed. Stalling without a dark brick requires 10-11 connected dark orbs. System Raphine and HChakeol after F6 and F7 respectively. Certain floor sequences must be followed precisely to maintain systems for orb generation while countering debuffs.

HP Thresholds:

  • 52,813 with awakenings
  • 52,376 without awakenings

Potential Replacements:

  • Bonta-Kun: leader swap
  • Saitama: SB and long CD, preferably with team HP and/or RCV and poison resist
  • Orochi: cross, preferably with team HP and/or RCV and poison resist
  • Tsukuyomi: NY Tsukuyomi, Myr
  • Kiyosumi: delay, preferably with team HP and/or RCV and poison resist
  • Ultraseven: HInahime’s Club, Shusuke’s Article, HMadoo’s Hat

Floor Guide

Use Bonta-Kun and transform Raphine T1. Match a minimum of 10 connected dark orbs and 10 combos over 2T to kill.

Use Okuninushi to clear the potential awoken bind and avoid Saitama overcharge. Use Tsukuyomi to create a long term time buff. Kill over 2T.

Use Ultraseven to buy time for debuff clears. Match 2 red or dark crosses, a light or dark TPA, and a light or dark L. Kill over 3T, with the first turn spent clearing debuffs.

Stall 2T, matching 10-11 dark orbs without 10c. Use Kiyosumi and Tokugawa. Bring the Phoenix to super resolve in 1T. Transform Raphine. Stall 2T, then use Raphine again. Stall 1T, then kill all spawns.

Use Tokugawa and one shot with rainbow activation.

Use Raphine T1 to begin system and overwrite Horus’ debuff if he appears. Use Okuninushi if Ra appears. One shot with rainbow activation.

If Ruel spawns, use HChakeol to unlock. Stall 1T for Tokugawa. Use Tokugawa and kill by matching a light TPA or an additional dark combo.

If Rozuel spawns, use HChakeol and kill by matching a light TPA or an additional dark combo.

If Famiel spawns, use HChakeol, stall 1T for Tokugawa. Use Tokugawa and kill by matching an additional dark combo.

For all spawns, stall until Okuninushi is 2T away from charged and Raphine is 1T away from charged.

If Uriel spawns, use Tokugawa and kill by matching a light TPA and an additional dark combo.

If Gabriel spawns, use Tokugawa and kill by matching a light TPA, an additional dark combo, and either a water TPA or a wood TPA.

If Michael spawns, use Tokugawa and kill by matching a light TPA and an additional dark combo.

If Raphael spawns, use Raphine and kill by matching a light TPA, an additional dark combo, an additional light combo.

If Lucifer spawns, use Ultraseven to counter his full heart board and his 50% moveset. Spend T1 clearing the board, kill over the next 2T.

If Baal spawns, match an additional dark TPA to clear light unmatchable.

If Sarasvati spawns, use Okuninushi and kill by matching 2 light TPAs, and an additional dark combo. Either one light TPA or the additional dark combo must be substituted with an L of the corresponding color.

If Astaroth spawns, bring her to super resolve. Be cautious of bringing her to super resolve when you have 1T spinners as this will render her puzzle impossible. Clear her puzzle by spinning away the poisons in the two leftmost and two rightmost columns. Leave the connected poisons in place to match.

If Pandora spawns, stall 1T if needed for Tokugawa. Use Tokugawa and kill by matching a light TPA and either an additional light combo or an additional dark combo.

If Krishna spawns, use Baran or Kiyosumi to void her absorption shield and either Ina or Raphine to clear the time debuff.

If Vishnu spawns, use Okuninushi T1 to delay shield. Stall until his absorb shield lowers to ensure Okuninushi is ready by F14 T2.

If Belial spawns, use Ina or Raphine to clear the time debuff.

If Amon spawns, shield T1. Chip him T2 with minimal activation, then kill on T3.

If Seina spawns, ensure you heal to full while she is enraged. Use Tokugawa T1 to chip, then use Ina T2, Raphine T3, and Ina T4. She should be killable in one shot after her void shield lowers. Alternatively, one shot her T1 by matching 5 light TPAs, a fire combo, a water combo, a dark TPA, and a dark brick.

If Ryumei spawns, make either a light L or a dark L T1 to unlock and kill over 2T. Alternatively, one shot him by matching 5 light TPAs, a fire combo, a water combo, a dark TPA, and a dark brick.

If Mikage spawns, make either a red cross or a dark cross T1 and kill over 2T. Alternatively, one shot him by matching 3 light TPAs, 2 fire combos, 2 water combos, 2 dark combos, and a dark brick.

If Uvo Sara spawns, use Okuninushi to clear awoken bind and kill over 2T.

If BSara spawns, chip her T1, then use Tokugawa and kill T2.

If LSara spawns, use Okuninushi or Kiyosumi and kill her over the following 8T. Stalling the full 8T is not necessary.

Make either a red cross or a dark cross T1. Kill over 4T.

If TF Yurisha spawns, stall for Ultraseven by piercing her void sparingly. Use Ultraseven the turn you bring TF Yurisha to super resolve. Mind her 5% execute.

If GYurisha spawns, maximize damage by matching additional dark combos and light TPAs. Kill over 12T.

If LYurisha spawns, kill over 7T.

PAD Academy (2022)

PAD Academy returns to Puzzle & Dragons for North America! This rerun introduces the new Academy Ina and Academy Tokugawa as well as color shift evolutions for Academy Valeria and Academy Kio! Dates: 05/09/22 – 05/22/22

Introduction

Two events reviewed in a row, shocking right? Welcome to the PAD Academy review, otherwise known as the, “Still making dark teams more overpowered somehow” seasonal event. 

As per usual, I am only going to write about what I think are the cards most people should look out for. In this case there are only 3 new cards, 1 of which is an orb skin, and 1 of which is tradeable. Most of the older stuff is extremely unremarkable in this seasonal. 

I always like to get this question out of the way fast, is this event worth rolling? NO, simple as that. Everything truly worth having in this event can either be traded for, or purchased as an orb skin. The mid rarity whale trap cards in this event are mediocre in comparison to some we have had in the recent past, and Academy Orochi sees very little use. Also unlike most other seasonals and GungHo original events where there are tons of orb skins, and most are worth owning multiples of, this event the skins are trash aside from the new one.

Nine Stars – Tradeable

Dark Dracoblader Freshman, Ina & Head of Student Guidance, Tokugawa Ieyasu

Going to break the rules of my reviews here, and just lump a seven star in with the nine stars. It truly is impossible for me to say anything about Ina without Tokugawa being part of it. 

Academy Ina, and Tokugawa are truly the highlights of this machine now. I find myself saying this all too often as of recent, but while the team they comprise is very strong, it is going to be a bit of a stretch to build optimally for new or non-paying players. 

Leading with Baran’s new evolution to give you a 7×6 board makes this team extremely capable, if not one of the fastest MD3 teams, which as of yet doesn’t really have many reliable fast teams. Ina having a 2 turn cooldown active, while Tokugawa only has a 3 turn, means that no matter which one you have, you can easily choose to lead swap either of them with Baran. It is also an extremely effective pairing for tackling most of the Sanctuary of the Gods content. 

Between the two of them they cover both Blind and Jammer, and have perfect leader synergy. Tokugawa brings the large (seven million) Auto Follow-up leader skill, and Ina brings the plus combo (two) leader skill. Both require ten or more dark orbs to be matched for activation, but that isn’t really an issue assuming you lead with baran for the 7×6 board. Ina unlocks your board and then after floor 4 makes you dark orbs, Tokugawa voids VDP and once again makes dark orbs. This means you have both 3 floors until floor 4, and then a 1 turn break in between both actives to find dark orbs. Fortunately basically every dark card these days seems to generate dark orbs on a tiny cooldown, so really just take your pick of which you like most for that dungeon. 

[metaslider id=1111 cssclass=””]

I normally like to leave speculation out of my reviews, but I will just add a small note about Ina’s equips. The first is three jammers, with a skill boost and three turn haste active skill. This doesn’t seem like much, but really there have been very few haste actives over two turns that haven’t seen use at some point, and this one just appears very strong on the surface. However, this is speculation on my part because in my experience, research or discussions with other players, most can’t seem to find a good place for this to be used at the moment. That isn’t to say it won’t in the future. 

Her other equip is a cross awakening, with four poison. Cards with this much utility in the awakenings normally do not go completely unused, as there always arises a scenario where that combination of utility is useful. Unfortunately the cooldown on this one is very short, and the active skill is very restricted to dark teams, and not all that useful to dark teams even then. So it may never see use. 

[metaslider id=1116 cssclass=””]

Tokugawa has two equips, both of which are very odd, but again potentially useful. One is very simple, two Team-HP, and two Team-RCV, with a single turn of void damage, and some auto recovery over four turns,  as the active. In this case, simple does not mean bad. The most simple equips done to the maximum of their simplicity are the ones that tend to live the longest. 

The other is an unbindable, and below eighty percent, and a Combo-Orb. The active skill is the exact same as the base monster. This means you have a very low cooldown VDP active skill that generates dark orbs, that alone would be enough utility for this to see some amount of use, but add on that it makes them unbindable, and it is even stronger. 

Academy Valeria

[metaslider id=1084 cssclass=””]

Strangely most older seasonals tend to fall out of use sometime before their machine comes back around again, but that has never been the case with Valeria. She remains useful for wood teams year round. It turns out that if you pack seven skill boosts, a full resist, and a ton of damage on a card with an active skill that is useful in many scenarios, it keeps them around for a while. Not much more I can say about Valeria’s original Wood/Light form aside from, it was good before, it is still good for the exact same things she was before. 

If I say, Illusionary Artist, what is the first thing you think of? Atelie, right? That’s because she came out to a dungeon that was made for rainbow teams, and subs that were desperately starving for a lead to put them to work. What comes next? Kaishu. Fun Baran lead swaps, tons of great subs. You know who you likely don’t think of? Prim. Until now, we had no real reason to even consider her. The lead swap options for her we’re fairly mediocre, and she just felt like a lackluster version of Royal Oak, who himself is already on life support in the end game. 

Well fear no more, Blue Valeria is here to save the day for Prim. Now you have your perfect 7×6 lead. Great awakenings, paired with a moderately useful active skill, and a low cooldown, means you finally have a way to put your Prim to work. 

Her final use case is as a sub for Sea Wolf teams, she offers him the Blind Resist that most of his best subs don’t carry, freeing up team space elsewhere, as well as huge VDP damage.

Soccer Club’s Striker, Kio

[metaslider id=1090 cssclass=””]

Unfortunately for Kio, his last run around the block saw him kneecapped due to our lack of Marvel collab, as he sorely needed Captain Marvel for his viability. Nowadays however, we have moved past Captain Marvel meta, and moved on to bigger and better things for Kio. The addition of another seven combo awakening, and VDP on his active skill has made him an extremely viable Daytona sub candidate. As with Baran from Dai recently, he is your makeshift second Halloween Cotton. Sadly for Kio, I think his days as a viable lead have long passed, but that isn’t to say it can’t be done. 

His dark form at first glance seems like it would be fairly interesting. It has a fairly unique set of awakenings, and an active skill that sees use on many other cards similar to him. Sadly however, for Dark Kio is that he just doesn’t quite cut it for almost any team. One turn of a Fujin active and a VDP on an eight turn cooldown is just not short enough in most late game scenarios. 

His equip retaining that same active skill, and also gaining some somewhat interesting resistances and movetime, means it will have a very niche, but still real use case on a very small number of teams. 

Seven Stars – The Seasonal Whale Trap Rarity

[metaslider id=1097 cssclass=””]

This card is nothing new, or that we haven’t seen before. It does what so many other rainbow leads do, granted only requiring 3 colors not the full 5 to activate. That doesn’t make it any more exciting though. This active skill seems almost fully tailored to clear MD2. A three turn cooldown that clears unmatchable, in a dungeon that spams you with unmatchable status, is what we all want. 

Qilin pairs quite well with the likes of the new evolution of Dai, and Alexander. He is fairly restricted to leads that don’t need full rainbow for activation, and dungeons that require his specific brand of active skill. 

The tragedy for Qilin however, is that she is the new card added to this seasonal that you can’t trade for, or buy as an orb skin. So if you want her it is going to likely require a great deal of whaling, which if you aren’t a heavy spender, you absolutely should not be doing. This card is fun, and strong, but not worth the money it would require you to obtain. At best just lead pair with one owned by the whales on your friend list.

Honorable Mentions

I will briefly just touch on two of the eight stars, as I think almost all of them are basically un-needed to anyone’s box. Firstly is Academy Orochi, this should be fairly obvious by now. A card that is a four turn delay with a skill boost and some resists should scream, “Trade for me!” to anyone that sees it. Second, and last for this review, is Yog-Sothoth equip. It has a decent bit of utility for teams that fall in to the colors the active skill creates. If this seems like something you might want in your box, pick one up, the trade fodder for these eight stars is very lenient.

Well that’s two reviews in a row, what if I shoot for three? See ya round, folks.

PAD Academy Overview & Who to Monster Exchange for – July 5th, 2021

Introduction

Due to my wrist (and other) pains, I have been struggling to find a way to do reviews and hopefully this shorter format provides some insight as a supplement to my YouTube video.

For PAD Academy, it is a top-heavy event which offers several powerful cards at the higher rarities. Thankfully, both the 8 and 9-star cards can be Monster Exchanged for which will be the best course of action as the bottom rarity has middling value despite owning a Weapon Assist . This is because their value is terribly low and will be replaced as soon as other options become available.

With this in mind, I will only be highlighting within this article the top major prizes to consider Monster Exchanging for.

Video commentary


Overview

PAD Academy REM Pros & Cons – July 2021
Pros
Cons
  • Can Monster Exchange for 8 & 9-stars
    • Trade-only, minimal/no rolls
  • All cards have a Weapon Assist
  • Questionable value at bottom rarity
    • Terribly low value overall
    • Comprises the majority of rolls
  • Terribly low rolling rates for 8/9*

Continue reading PAD Academy Overview & Who to Monster Exchange for – July 5th, 2021