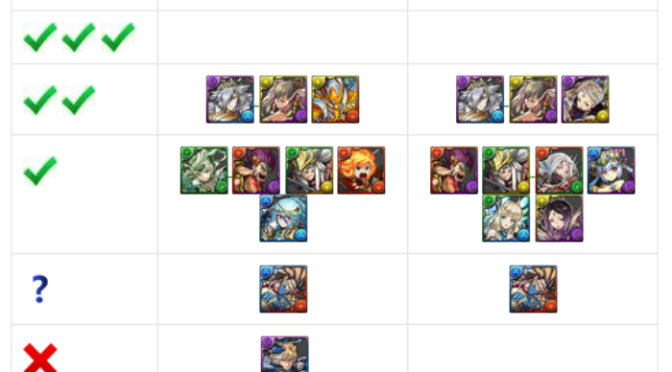
The Sphinx Ranking Tournament uses the loved/dreaded preset teams. With a preset team, it helps even the playing field as no one can gain an advantage via specific cards or combos. However, it does dramatically cut down on creativity and also results in more “luck” when trying to min-max your score as skyfalls/bad boards will play a massive role in determining how well you place. With this post, I will try my best to help give my readers a slight competitive edge based on my own experience running the dungeon.
In these ranking dungeons, we are scored based on 3 criteria:
Average combos made: 5,000 points per combo
Time Remaining: 500 points per second remaining
Maximum damage: up to 10,000 points if you hit 40 million.
Sample Clear
138,000 score
I improved my score off stream to 0.2% as it is actually a lot easier to simply tunnel and not narrate.
Mantastic commentary
—talking about the dungeon itself—-
Your team
Everyone will be using the same team (max skill, max awoken, and +297) and it is important to understand how your leader skill functions along with any combo synergy you may have.
Kaede at a glance
Kaede
Dragon / Attacker 6 star base —-
3
3
1 turn haste
7 turn CD —-
3.5x ATK for 2 wood combos. 4x ATK for 3 wood combos. 2x ATK & 50% damage reduction for a heart cross 64x ATK / 75% damage reduction
Kaede’s Scaling Leader Skill
# wood combos
1
2
3
Multiplier
No
12.25x
16x
With Heart Cross
No
49x
64x
As you can see, there is a modest multiplier when you do not make a heart cross, but in order to deal lethal damage, you must be able to fully maximize the board in terms of the number of combos made as well as squeezing in as many TPA as possible.
When making the decision to roll or save your magic stones, you need to determine if the featured pantheons can benefit or complement your teams. Chasing for one specific monster is unwise as you will most likely be disappointed and should ideally have Godfests that overlap with many target cards. Remember all monsters that come out of the REM will qualify for Skill Inheritance so do not be too hasty when selling dupes. For a more detailed team building help, please refer to my Popular Leader’s and their Full Sub List Post which is in the process of being updated. Lastly, to find more information about a specific pantheon or monster, refer to my Master List to better refine your search. If you are considering to purchase any of the Monster Point cards, please refer to my updated Tier List for help and advice.
Introduction
The Saint Patrick’s Festival Godfest marks the debut of the new Three Kingdoms 2 pantheon along with two new GFE, Fujin and Raijin . All of these cards feature new and unique active skills that add a great deal of dimension and diversity to your Monster Box. All featured pantheon cards will roll out at their standard boosted 3x rates while the GFE will be available at 4x rates. In addition, all rolls will come out with +50 to a random stat and at level 50.
Following the trend of my previous Godfest reviews, I will include a tier list of both the pantheons, GFE, and a list that combines both for each day.
If you wish to read a more thorough analysis of the Three Kingdoms 2 pantheon, please refer to my previous post HERE. A full review of Fujin and Raijin can be found HERE.
One thing you need to be aware of is the lower than perceived rates for the Three Kingdoms 2 pantheon. All the 3K2 cards are 6-star rarity and will slightly harder to acquire than a regular card.
Gala of Flame
—- — — —
Day 1
Three Kingdoms 2
Angel 1
GFE
— — — —
Day 2
Three Kingdoms 2
Mechanical 1
GFE
Video commentary
—video goes here—-
Ranking the cards – Pantheons & GFE
As part of my new format for Godfest posts, I will try my best to tier the featured pantheon cards along with GFE and then combine the two to showcase how strong of a day it is to roll. These opinions are my own and take into consideration the card’s value as a leader, sub, inherit, and possibly any niche role they fulfill. In order to rank in the highest tier, the card has to excel in their respective role and cannot feasibly be replaced by anyone else. This can also be thought of as a Best in Slot card and tends to have applications on the top tier teams.
The Three Kingdoms 2 (3K2) series is coming to North America on Friday, March 17th and will feature the new locked orb removal mechanic. In order to entice players with new cards, GungHo tends to release new/unique abilities which also helps open up new team building/inheritance possibilities. One nice thing about the 3K2 pantheon is that they are a pantheon and should in theory be easier to obtain.
The Three Kingdoms 2 are all able to transform the board to a 7×6 size and promote pairing with different leaders along with featuring the 7 combo awakening. 7 combo awakening provides 2x damage for that card when hitting 7 or more combos and is a tremendous damage boost overall. While this can be problematic with absorption mechanics, we do have access to Fujin and is somewhat controllable as you can make the conscious effort to match less combos and pray for no skyfalls.
Unfortunately, due to the fact that these are new cards, they do not have an ultimate evolution and suffer from lower base stats and fewer awakenings, but hopefully their newer aspects help justify these weaknesses.
One thing you need to be aware of is their lower than perceived rates. All the 3K2 cards are 6-star rarity and will be slightly harder to acquire than a regular card.
Video commentary
Non-English names add +2 to my name killing skill —video goes here—
Two new 6-star Godfest Exclusives are coming to North America and both push Powercreep to a new level. Every game requires a certain element of Powercreep to keep things interesting, but it should advance at a steady march, not by giant leaps and bounds. While Raijin is unique and powerful in her own right, she is at least not overwhelming in what she does unlike Fujin .
I liken Fujin’s level of Powercreep to that of a Gemstone Princess (far too powerful in their own right) and dearly hope it does not set a presedence for future dungeon spawns. With that being said, once you own a Fujin, your PAD life will never be the same again.
I have been receiving many questions over the past few months about what is the best way to power-level or grind up rank experience. Truth be told, the best avenues are utilizing Ganesha paired with either another Ganesha or a stronger multiplier leader and mowing through content. However, the most common place this occurs is Monday Dungeon and this is actually a terrible waste overall. For myself, I have never played dungeons with the sole purpose of Rank Experience outside of the stone acquisition or acquiring the last few points of experience for a rank up.
Each subsequent rank up increases the experience required for the next level and by rushing through, you are losing out on numerous opportunities to develop and actually progress within Puzzle and Dragons.
This article will focus on why purely farming rank experience is a poor investment of your stamina along with the justifications to this stance. While there are some exceptions, it is largely a poor avenue of stamina spending for the average player.
Video commentary
—-video goes here—–
What is rank farming
Rank farming is essentially what it sounds like: repeatedly playing a dungeon that has an exceptionally high rank experience to stamina ratio. Often times, these dungeons are meant to be fast and easy to play and can help players rank up at an unprecedented rate.
Unfortunately, there are actually many drawbacks to ranking up this fast as you often waste stamina, lose out on actual puzzling skills, losing out on the opportunity to develop your monster box, hitting a wall faster, and the inability to chain rank ups from valuable dungeons. Continue reading Why not to Purely Farm/Grind Rank Experience→
Like you favourite monsters, dungeons are evolving in complexity and difficulty. Forgone are the days of simply having to survive a single 8,000 damage hit and instead it almost feels like you have to have an advanced degree in Puzzle and Dragons to decipher or interpret the dungeon at hand. Thankfully, we have access to two great resources and this post will focus not only on how to understand and comprehend the information presented, but how to also theory craft counters to each mechanic.
I plan to do a subsequent post that will teach you how to intelligently build a team that will use topics discussed in this article so stay tuned.
This article will focus on how to overcome various hurdles presented in a dungeon along with a specific example of the current One Shot Challenge and subsequent video clear with Yomi Dragon .
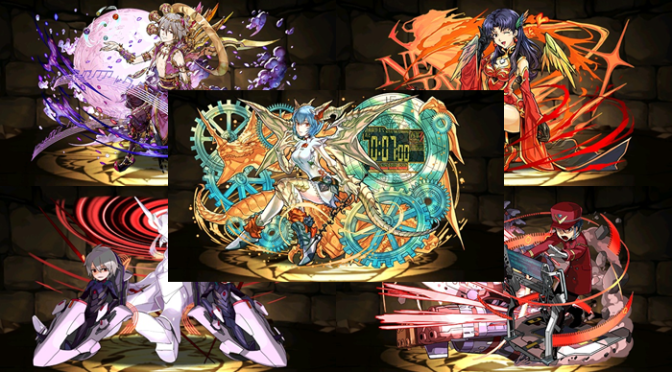
The Evangelion Collab is one of the oldest Collabs in Puzzle and Dragons. This is generally a bad thing as older cards are poorly positioned against Powercreep and to keep the Collab interesting, GungHo has released several new cards. Unfortunately, most are disappointing reskins of existing REM monsters with noticeable downgrades.
To make matter worse, the Collab has low value outside of the 6-star category and has little to offer for the average player.
All players above rank 50 will receive 1 free pull on the Evaangelion Collab Rare Egg Machine.
Video commentary
—video goes here—
Rolls overview
Evangelion Collab Egg Machine Overview
6 star rolls
5 star rolls
4 star rolls
Evangelion Collab Egg Machine Overview
6 star rolls
Myr Regalia, Rei
Attacker / Dragon / Machine
4,210 HP / 1,775 ATK / 523 RCV
950 Total
Active Skill:
7
+7 seconds orb movement time for 1 turn
10 turn cooldown
Leader Skill: 3x ATK when matching 4 colours, 6x with 5 colours. 3x ATK & 50% damage reduction with a heart cross 324x ATK / 75% damage reduction
Pros
Cons
Bind immune
950 weighted stats
Leader skill is amazing on paper
TPA-based team
Not loli
Poor sub value
Leader skill is impractical
no viable board changer
Low value active
Cannot use orb changers except single orb
Lower consistency than Myr
Needs rainbow activation and heart cross
No sub element
Impressions
Rei Myr looks gamebreaking on paper if you only look at her multiplier without taking into consideration the activation requirements. However, upon closer inspection, she is far from easy to utilize and is impractical in end game content. Continue reading Evangelion Collab Rare Egg Machine Review and Analysis→
The “hot” topic of the month is Monster Point cards and which one to buy. I created a helpful reference guide and tier list (which can be found HERE and generally speaking, you can simply go down the tier list until you find a card that best fits your box); however, I felt that showcasing what I am doing along with my rationale behind my decision may be beneficial for people to see.
I want to stress that my decisions are the best for myself and my own situation and may not apply to everyone. What you should try and take away from here is the thought process behind the decisions and try to see if you undergo a similar method for coming to your own conclusions.
Video commentary
—video goes here—-
My purchase history
When Yomi Dragon was first released, she caused quite a stir as she was one of the most universally accessible and powerful leaders at the time along with providing wonderful utility as a sub. As such, I decided to make the investment as I had a modestly diverse dark box and the potential to clear more content with her. You could read more about my initial purchase from a year ago HERE. Continue reading My Monster Point Situation and what I am Doing→
With the announcement of free 390,000 Monster Points being given out to all players over the course of March along with the highly anticipated evolutions for the original 5 MP Dragons, many players are excited to take the next step in their Puzzling adventure. However, these evolutions are challenging to perform and very few players are actually able to clear Arena 3 and acquire the Radar Dragon they need. Thankfully, we will now gain the ability to “easily” acquire any Radar Dragon of our choosing through a special hourly dungeon.
While this is great for the most part, these dungeons are actually very challenging and feature their respective Radar Dragon in a buffed form compared to their Arena 3 counterpart. However, the dungeon is quite short in nature and there are many different strategies for efficiently dealing with each encounter along with the option to simply stone to continue if you badly need the drop.
I plan to clear and record all of the dungeons and will upload the team/video to this post as they are released.
If you want to read more about which MP card to purchase, please refer to my guide HERE.
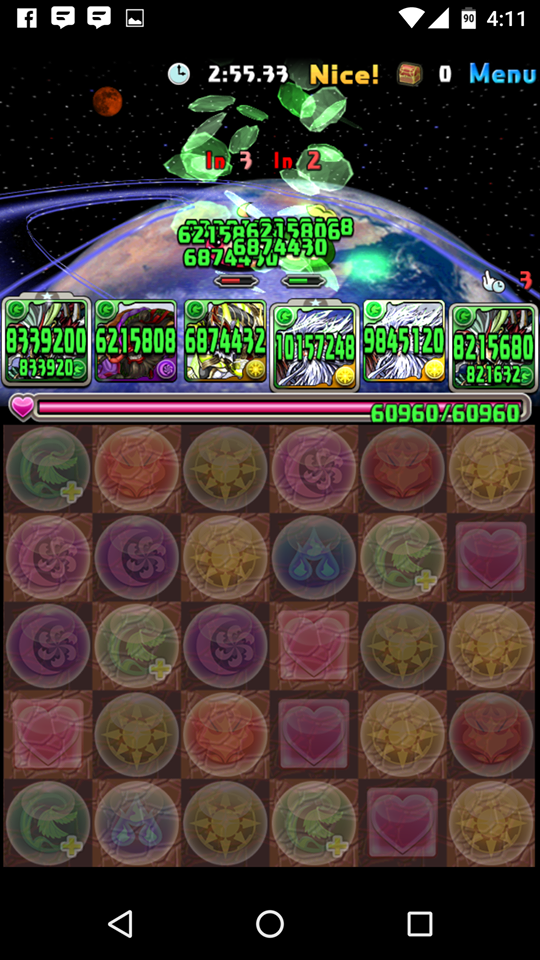
Player 2: 1 combo
Player 1: PASS Player 2: Raphael swipe Player 1: 1 combo Player 2: Sun Quan , Hermes or Blue Sonia Player 1: 0 combo, do not kill Player 2: Kill via ping as Apollo is at 1 HP
Floor 3
Player 1: Mori , Sarasvati & try to push below 50% Player 2: Push below 50% if triggered resolve. Use any actives Player 1: Blue Sonia , Sarasvati Kill
Karin has God and Dragon Killer which enables her to deal incredible burst damage against all 3 floors and 9x to Heph.
You should plan out who will be receiving the 15 turn skill delay and try your best to use actives from that side wherever possible. In my case, Player 2 is delayed.
On the final floor, you can trigger the resolve as it will heal him to 50% HP and 1 health. You simply need to ping with any source of damage to remove the resolve.
Sarasvati could easily be replaced by any high damage glass cannon leader. You should prioritize heavy orb changers as it is simply a burst and kill scenario.
If unable to inherit Raphael , can simply use him as a sub or use a large shielding sub to survive. Do your best to return to full health every turn.
Killer awakenings are very powerful here as there is no absorption mechanic and the resolves are not too hazardous. You can hit Heph into resolve and then have him resurrect without taking any damage.
Noah Dragon
NOAH DRAGON HAS 52 MILLION AND PADX HAD IT DISPLAYING A VERY INCORRECT AMOUNT. SHOULD BE FIXED SOON
Do not bring a dark team. Also, find a team that has very high damage output. Pretty much the only hard requirements. You can simply stall the 99 turns, but that is quite a grueling experience and if you want to kill faster, you need to have appropriate damage control. Do not use Killer awakenings.
Noah Dragon VOIDS all damage above 5 million. Void means it will deal 0 damage when dealing more than 5 million damage and means cards like Fujin have no effect.
Player 1: 1 combo Player 2: Raphael -> Dios Swipe Player 1: PASS Player 2: Ping for 1 damage
Floor 2
Player 1: Green Odin -> Dios Swipe
Floor 3
Player 2: Famiel -> Sakuya -> Hades -> PASS Player 1: Sakuya -> Yomi -> Dios Swipe
Assuming the team is at least +99 attack, you will always kill Zeus Dragon even with 1 combo:
This comes out to around 50-51 million damage and you only need 48 million to kill Zeus after the Gravities. Tengu will have a tiny bit more attack when I inherit Green Odin.
I had to make an adjustment to my team as people have pointed out that 20 million damage from the Sakuya Gravity would be voided (I thought 20 million was safe) so I am using Famiel to tickle for 100,000 damage then proceeding as normal. You must use Gravities in the order that is listed.
For some reason my Hera-Beorc is missing from my box so I am doing this strategy instead of using her 10% gravity.
Player 2: Hera-Is , Zeus/Hera , Hades , Meri 7 combo, kill
Floor 3
Player 1: Indra when going to be hit. Genie after
Make a row + 2-5 combos based on your own damage output
Player 2 can have dark cards as the binds only hit the Player 1. I have 3 SDR on most of my Player 1 cards and the 2 turn haste from Mori help brings those cards back up.
You cannot use a 50% damage reduction shield as this Hera Dragon hits significantly harder than the Arena 3 version. On Hera Dragon, you must never match more than 6 connected water orbs in a row formation. You can go for 7+, but it has to be in a blob. The amount of combos you make is dependent on the number of your Orb Enhances and Row awakenings your team has.
The three Gravities push Ceres below her 30% resolve right away and any combination you can configure that achieves the same result is fine.
A very popular strategy is to use Reincarnated Hades and his massive dark damage reduction to cheese your way through. Just make sure you bring a 10 turn bind clear for the first floor.
Conclusion
I will continue to update and populate the team rosters as I do more research and actually play the dungeons along with uploading the videos right away.
When making the decision to roll or save your magic stones, you need to determine if the featured pantheons can benefit or compliment your teams. Chasing for one specific monster is unwise as you will most likely be disappointed and should ideally have Godfests that overlap with many target cards. Remember all monsters that come out of the REM will qualify for Skill Inheritance so do not be too hasty when selling dupes. For a more detailed team building help, please refer to my full list Popular Leader’s and their Full Sub List Post. Lastly, to find more information about a specific pantheon or monster, refer to my Master List to better refine your search. If you are considering to purchase any of the Monster Point cards, please refer to my updated Tier List for help and advice.
Introduction
To mark the special 60 million worldwide downloads, GungHo has blessed us with a rather exciting Godfest that not only features desirable pantheons, but also 5x GFE and +20 to all stats (60 pluses in total). This is probably one of the best Godfests in recent memory and will be very tempting to roll for the majority of players. However, many people are speculating the release of Fujin and Raijin who both posses gamebreaking new active skills. Unfortunately, both of these cards are 6* GFE so the chances of you rolling them will remain low. Furthermore, GungHo has a tendency to release new cards alongside poor Godfests and it may be a long time before we are fortunate enough to this desirable of a roster again.
With this post, I am going to once again tinker with my formatting in order to streamline the information delivered as my previous tier lists/checkmark reference tables proved successful. As such, I will rank all the cards featured with an explanation/justification for each placement. This will yield a faster posting for me and more condensed information as people tend to enjoy a quick reference table.
Gala of Tides
—- — — —
Day 1
Japanese 1
Indian 1
GFE
— — — —
Day 2
Three Kingdoms
Indian 2
GFE
Video commentary
—video goes here—-
Ranking the cards – Pantheons & GFE
As part of my new format for Godfest posts, I will try my best to tier the featured pantheon cards along with GFE and then combine the two to showcase how strong of a day it is to roll. These opinions are my own and take into consideration the card’s value as a leader, sub, inherit, and possibly any niche role they fulfill. In order to rank in the highest tier, the card has to excel in their respective role and cannot feasibly be replaced by anyone else. This can also be thought of as a Best in Slot card and tends to have applications on the top tier teams.